Owner’s manual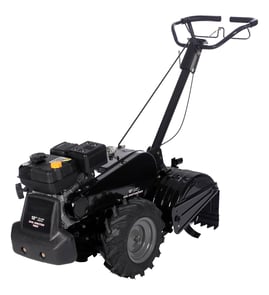




What is the bar on the back of a tiller for?
On the MTD 21AB454A062 rear tine gas tiller, the bar at the back is the depth stake (also called the drag bar). We use it to control how deep the tines dig and to help steady the tiller so it does not “run away” as it pulls forward.
- Sets tilling depth by limiting how far the rear of the tiller can drop
- Adds drag to slow forward movement for better soil breakup
- Helps keep the tiller stable and reduces bouncing
- Improves control when switching between shallow passes and deeper passes
Use the adjustment method shown in your owner's manual. In most rear-tine designs, you:
- Stop the engine and let all moving parts stop
- Pull the lock pin (or hairpin clip)
- Remove the clevis pin
- Move the depth stake up for shallower tilling, down for deeper tilling
- Reinstall the clevis pin and secure it with the lock pin
| Depth stake position | Typical result | Best for |
|---|---|---|
| Higher (less drag) | Shallower cut | First pass, hard soil, sod breakup |
| Middle | Medium depth | General garden tilling |
| Lower (more drag) | Deeper cut | Final pass, soil mixing, amendments |
Depth control protects the drivetrain and belt system from overload, improves traction, and gives you a smoother, more even seedbed. We also recommend making multiple passes, gradually increasing depth, instead of trying to reach full depth in one pass.
Last updated: February 2026
Can a rear tine tiller cut through roots?
Yes. Your MTD rear tine gas tiller model 21AB454A062 can cut through small roots while tilling, especially when you use the correct depth setting and the right drive mode for hard soil. For larger roots, we recommend clearing them first to prevent sudden kick-forward and damage.
Rear-tine tillers are built for tougher ground, but roots vary a lot by size and wood type.
- Works well: fibrous roots and small woody roots you can cut with a shovel or loppers
- Use extra caution: roots that repeatedly snag the tines (the tiller can lunge forward)
- Do not till through: thick, structural roots (you risk losing control and damaging the tine drive)
- Best approach: make shallow passes first, then gradually increase depth
- Stop immediately if the tines bind on a root or hidden object
The operator instructions for this model emphasize choosing the depth stake setting and using the correct tine drive for soil conditions.
- Start with the shallowest depth stake position and work deeper in steps
- Use reverse tine drive for virgin ground, sod, or hard soil (better bite and control)
- Use forward tine drive for softer ground; keep the depth shallower so tines do not “run across” the surface
- Keep bystanders at least 75 feet away while operating
- If the tines catch and the tiller surges forward, let go of the handlebars (do not restrain the machine)
For the exact depth stake and drive-mode guidance for 21AB454A062, follow the owner's manual.
| Root situation | Recommended action | Why |
|---|---|---|
| Small roots scattered in soil | Till slowly; shallow passes first | Reduces snagging and kick-forward |
| Repeated snagging on one spot | Stop; dig and cut the root | Prevents loss of control |
| Thick root you cannot cut by hand tools | Remove root mechanically; do not till through | Protects tine drive and operator |
Roots can make the tines “grab” and propel the tiller unexpectedly. Using the right depth stake setting and drive mode helps you keep traction, protect the gear case, and avoid sudden movement.
Last updated: February 2026
Are 21AB454A062 tillers any good?
Yes. The MTD 21AB454A062 rear-tine gas tiller is a solid, practical choice for home gardens because rear-tine designs typically deliver strong traction and consistent soil mixing; most “not good” experiences come from setup, maintenance, or worn drive components rather than the core tiller design.
A rear-tine tiller like the 21AB454A062 is considered good when it:
- Pulls itself forward without you forcing it
- Breaks soil evenly without excessive bouncing
- Engages and disengages the tines smoothly at the handle
- Tracks straight with stable handle control
- Starts reliably and runs without surging
For model-specific operating and safety guidance (including spark arrester notes and routine cleaning), use the owner's manual.
Most performance complaints trace back to a few service items:
- Clutch cable out of adjustment or stretched: tines slip, hesitate, or will not fully engage
- Loose hardware: vibration, rattles, or controls that drift out of position
- Dirty tine shield and tine area: soil buildup reduces tilling depth and increases drag
- Worn drive components: reduced pulling power or inconsistent tine speed
If your tine engagement feels inconsistent, the tiller clutch cable 746-1117 is a common wear item to inspect on this model.
| What you notice | Likely cause | What to do first |
|---|---|---|
| Tines engage late or slip | Cable stretch or misadjustment | Inspect cable routing and tension; replace if frayed |
| Excess vibration | Loose fasteners or worn hardware | Re-torque hardware; replace missing washers/nuts |
| Soil packs under shield | Normal buildup after use | Clean underside after each use |
| Poor forward pull | Drive wear or setup issue | Check engagement, belt/drive condition per manual |
A rear-tine tiller’s value is in controlled power. When the clutch cable, hardware, and cleaning routine are right, you get deeper, straighter passes with less operator fatigue and better seedbed prep.
Last updated: February 2026
How do I find MTD replacement parts?
For your MTD rear tine gas tiller model 21AB454A062, the fastest way to find the right replacement parts is to match the model number on the tiller to the parts diagrams and parts list, then confirm the part name and part number before ordering. Use the 21AB454A062 owner's manual to verify component names and maintenance details.
- Locate the model number tag on the tiller frame (often near the engine mount, tine shield, or handle support).
- Use 21AB454A062 to identify the correct parts diagram section (handle, tine drive, gear case, wheels, hardware).
- Match the diagram callout number to the part listing (name plus part number).
- Compare your old part to the listing (shape, hole pattern, thread size, cable length).
- Order the exact replacement part number to avoid fit issues.
These are frequently needed items on rear-tine tillers, and they are available for this model:
| What you are fixing | What to look up | Example part on this model |
|---|---|---|
| Tines will not engage or slip | Clutch cable, idler pulley | Tiller clutch cable 746-1117 |
| Loose handles or missing fasteners | Screws, washers, lock washers, cotter pins | Screw 710-0599, lock washer 736-0119, cotter pin 714-0104 |
| Poor traction or damaged wheel | Tire | Tire 734-1796 |
- Use the model number first, not the engine brand, when selecting chassis and tine-drive parts.
- Replace matching hardware as a set when needed (for example, screw plus lock washer).
- If a part is “In Stock” vs. “Check Availability,” plan your repair timing accordingly.
- For wear items (belts, tires), inspect related components at the same time to prevent repeat failures.
MTD tillers often share similar-looking components across model families, but small differences in cable routing, gear case parts, and hardware sizes can prevent proper operation. Using the correct 21AB454A062 diagrams and manual keeps the repair accurate and safe.
Last updated: February 2026
How deep does a rear tine tiller go?
On the MTD 21AB454A062 rear tine gas tiller, tilling depth is controlled by the depth stake (depth bar) and its adjustment holes. For first-time use, we start at 1 inch of depth (second hole from the top) and increase depth gradually over multiple passes; see the owner's manual.
The manual calls out the depth stake as the main depth control, with additional setup and technique affecting how deep the tines actually work.
- Depth stake position (five settings)
- Number of passes (deeper results come from repeated passes)
- Soil conditions (virgin ground, sod, and hard soil require a shallow start)
- Side shield position (helps contain soil as you adjust depth)
- Ground speed and operator control (steady pace prevents bouncing and stalling)
Use these as reliable starting points, then fine-tune with the depth stake.
| Task | Starting depth | How to reach deeper depth safely |
|---|---|---|
| First-time operation | 1 inch | Increase one setting at a time after the first pass |
| Shallow cultivation | 1 to 2 inches | Make one slow pass; avoid over-tilling |
| Breaking sod or hard soil | 1 inch | Make multiple passes, increasing depth gradually |
| Established garden soil | 2 to 6 inches | Increase depth only if the tiller stays stable and doesn’t bog |
We adjust depth using the depth stake hardware described in the manual.
- Shut the engine off; disconnect and ground the spark plug wire
- Remove the clevis pin and hairpin clip
- Move the depth stake to the desired hole (start shallow)
- Reinstall the pin and clip securely
- Reposition the side shields as needed; tighten the wing nuts securely
Starting shallow protects the clutch and drive components, improves traction, and prevents stalling. Gradual depth increases also produce better soil structure than trying to reach maximum depth in one pass.
Last updated: February 2026