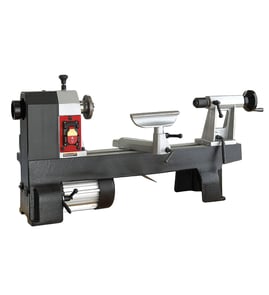


What are the parts of the wood turning lathe?
On the Craftsman 10128910 12-inch metal turning lathe, the main assemblies you will recognize are the headstock (spindle drive), tailstock (work support), carriage and slides (tool movement), and the bed/ways (alignment). Wood lathes use similar core sections, but the tool rest setup is usually different.
Main lathe parts and what they do
- Headstock: Houses the spindle and drive components; this is what turns the work.
- Spindle: The rotating shaft that carries the chuck/faceplate.
- Chuck or faceplate: Holds the workpiece (chucks grip; faceplates screw on).
- Tailstock: Slides along the bed to support the free end of the work.
- Tailstock quill (ram) and center: Extends to apply support pressure.
- Bed and ways: The long base and precision rails that keep everything aligned.
Tool control parts (metal lathe vs. wood lathe)
On a metal lathe like model 10128910, the cutting tool is clamped and moved with slides; on a wood lathe, you typically guide a handheld chisel on a tool rest.
| Area | Metal turning lathe (10128910) | Wood turning lathe (typical) |
|---|---|---|
| Tool support | Tool post on compound/cross slide | Tool rest and banjo |
| Feed | Handwheels, leadscrew/feed rod | Mostly manual tool movement |
| Workholding | Chuck/faceplate/centers | Faceplate/chuck/centers |
Carriage and feed components (common on metal lathes)
- Carriage: Moves the cutting tool along the bed.
- Cross slide: Moves the tool in and out (toward or away from the work).
- Compound rest: Allows angled cuts and fine adjustments.
- Tool post: Clamps the cutting tool.
- Apron: Front of the carriage; contains feed controls on many lathes.
- Leadscrew and/or feed rod: Drives power feed and threading (varies by design).
Why it matters
Knowing these names helps you identify the right repair area (alignment, workholding, feed, or drive) and speeds up parts lookup for the Craftsman 10128910.
For tips on safely testing switches, cords, and motors during troubleshooting, use how to use a multimeter to test electrical parts video.
Last updated: February 2026
What is a chip pan in a lathe machine?
A chip pan on a lathe is the tray mounted under the work area that catches metal chips (swarf), small offcuts, and spilled cutting fluid created during turning, facing, drilling, and other operations on your Craftsman 10128910 12" metal turning lathe.
What the chip pan does (and does not do)
- Collects chips so they do not pile up on the bench, ways, or floor
- Helps keep cutting oil and coolant contained for easier cleanup
- Reduces the chance of chips getting dragged into moving parts during routine work
- Makes it easier to safely dispose of sharp swarf
- Does not replace guarding; chips can still eject toward the operator
Where you will see it and how it is used
On most bench and cabinet lathes, the chip pan sits directly beneath the bed and carriage travel area. During normal operation, chips fall into the pan; you periodically stop the machine and remove chips with a brush or chip hook (not your hands).
Quick safety and cleanup tips
- Power off and let the spindle stop before cleaning
- Use a brush, chip hook, or pliers for stringy chips
- Avoid compressed air; it can drive chips into bearings and lead screws
- Wipe down exposed surfaces after cleanup and apply a light protective oil
Why it matters
Chips are sharp and abrasive. Keeping them contained helps protect the lathe’s ways, lead screw, and cross slide from accelerated wear, and it keeps your work area safer and easier to maintain.
Common terms (so you know you are looking at the right part)
| Term | Also called | What it means |
|---|---|---|
| Chip pan | Swarf tray, drip tray | Tray under the lathe that catches chips and fluid |
| Chips | Swarf | Metal shavings produced during cutting |
| Cutting fluid | Cutting oil, coolant | Fluid used to cool and lubricate the cut |
For more general guidance on safe DIY work practices while servicing tools, see are diy appliance repairs safe.
Last updated: February 2026
What is a good size lathe?
A good lathe size depends on the largest diameter and length you plan to turn. For most home metalworking, a benchtop lathe in the 10 to 12 inch swing range with roughly 18 to 36 inches between centers is a practical, versatile choice; the Craftsman 10128910 is a 12 inch metal turning lathe.
How to choose the right size for your projects
Use these sizing checkpoints to match the lathe to what you actually make:
- Swing (diameter capacity): choose a swing that clears your largest workpiece diameter (plus room for chuck jaws).
- Distance between centers (length capacity): pick a bed length that covers your longest shaft work.
- Spindle bore: larger bores make bar work easier because stock can pass through the headstock.
- Motor power and rigidity: heavier cuts and tougher metals need more mass and horsepower.
- Shop space and power: confirm footprint, bench strength, and available voltage before you commit.
Typical “good size” ranges (home shop)
These ranges cover most hobby and light fabrication work.
| Use case | Common swing | Common between-centers | Notes |
|---|---|---|---|
| Small parts, bushings, spacers | 7 to 9 in. | 10 to 20 in. | Compact, limited for long shafts |
| General home metalworking | 10 to 12 in. | 18 to 36 in. | Best all-around balance |
| Larger home projects | 12 to 14 in. | 30 to 40+ in. | Needs more space and rigidity |
Fit it to the Craftsman 10128910
Because the Craftsman 10128910 is a 12 inch metal turning lathe, it sits in the “general home metalworking” sweet spot. It is a strong choice for:
- Turning bushings and spacers
- Facing and boring small to medium parts
- Light shaft work (within bed length)
- Threading and general repair fabrication
For model-specific replacement components, use the parts list for this lathe on Sears PartsDirect.
Why it matters
Choosing too small limits diameter and length immediately; choosing too large can mean wasted space, higher tooling cost, and a machine that is harder to power and move. Matching swing, bed length, and rigidity to your real projects saves time and improves accuracy.
Last updated: February 2026