How to use a multimeter to test electrical parts video


This video from Sears PartsDirect shows you how to check continuity on wires and electrical parts using a multimeter. Testing continuity can tell you whether electrical current is making it all the way through a circuit. It can also help identify whether a wire is creating a short circuit to the metal frame, a potentially dangerous situation.
For additional repair help, check out our DIY repair help section for repair guides, articles, videos, answers to the most frequently asked questions and troubleshooting tips for appliances, lawn equipment, tools and other products.
Tools and parts needed
Multimeter
Hand tools
Wire connectors
Work gloves
Checking the entire circuit for continuity
Hi, this is Wayne with Sears PartsDirect. Today we're going to talk about checking wire continuity using a multimeter.
If one of your appliances isn’t working, a break in the wires may be to blame. Checking continuity allows you to test whether current is making it all the way through a wire.
First unplug your appliance. To avoid electrical shocks, all continuity checks must be conducted with the appliance unplugged. If an electrical part is connected to the wire, the easiest way to check for continuity is through the entire circuit, because both ends of the circuit will be connected to the control board.
Access the control board. Trace the wires back to the board and measure resistance through the circuit you want to check.
For example, the resistance through a bake element in this range is 15 ohms. If you measure 15 ohms, then you know that all the wires have continuity. You can find the correct resistance value in the appliance’s tech sheet, or by measuring resistance directly at the part.
If the meter shows 1 in the far left digit, or on some meters OL, it means that you have an open circuit and power is not making it all the way through.
You either have a break in the wires or the electrical component is broken.
Checking individual wires for continuity
Before you replace that part, you need to check the individual wires for a break in continuity.
To check continuity on a run of wiring, disconnect both ends of the wire. Set your multimeter to check continuity with a tone. Put one meter lead on one end of the wire and the other meter lead on the opposite end of the wire. The meter signals a tone and shows near 0 ohms of resistance if the wire has continuity.
After checking continuity on that wire, you should also check for continuity from that wire to the metal frame. Sometimes a bare or damaged wire can make contact with the metal cabinet on an appliance, dissipating potentially dangerous levels of current, which could shock or kill.
If you ever see continuity between a wire and the metal frame, do not plug the appliance back in until all wires have been repaired.
Repairing broken wires
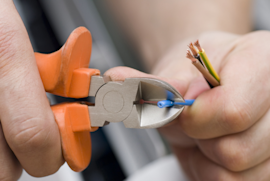
Now, if you see something like this (a broken wire), obviously you know that’s something you’re going to want to repair.
You can repair the wire by splicing it in that location. Cut the wire and strip 1/4-inch of insulation off the wire ends. Reattach the wires using an appropriate wire nut or connector. Make sure that no strands of bare wire are exposed after repairing the wire.
If the wire is used in a range or oven, connect the wires using a ceramic wire nut properly rated for heat. Ceramic wire nuts with a temperature rating of 200 degrees C are used on most ranges and ovens.
If the splice would shorten the wire so much that it no longer fits, splice in a new length of correctly rated wire.
Always check the continuity of the wire you repaired before reassembling the appliance.
Well I hope that this video helped you out today. Be sure to check out our other videos on the YouTube channel, and if you like them, subscribe.
Most common symptoms to help you fix your range hoods
Choose a symptom to see related range hood repairs.
Main causes: bad fan switch, electronic control board failure, faulty user interface control, wiring failure…
Main causes: bad light bulb, broken light switch, bad electronic control, user interface control failure, bad light sock…
Main causes: sentry feature trips due to high cooktop temperature, bad temperature sensor, electronic control board fail…
Main causes: lack of electrical power, bad electronic control board, faulty user interface, fan and light switch failure…
Main causes: clogged air filters, air duct problems, fan motor failure, broken fan blade…
Main causes: loose mounting screws, bad fan motor, damaged fan blade, worn fan motor bearings…
Main causes: electronic control board failure, bad user interface control, light and fan switch failures, wiring failure…
Most common repair guides to help fix your range hoods
These step-by-step repair guides will help you safely fix what’s broken on your range hood.

How to replace a range hood fan motor
If the fan on the range hood won’t run, it’s likely that the fan motor has failed. Follow the steps in this guide to rep…

How to replace a range hood fan switch
The fan switch activates the fan motor in the range hood. If the fan switch is defective, replace it using the detailed …

How to replace a range hood light socket
When you replace a light bulb and it still won’t work, the socket is likely defective. Use the detailed steps in this re…
Effective articles & videos to help repair your range hoods
Use the advice and tips in these articles and videos to get the most out of your range hood.

Learn about all the convenient features on our Sears PartsDirect website that make your parts purchases easier.…

Get answers to frequently asked questions about Sears and Sears PartsDirect.…

Learn how to repair broken, frayed or damaged wires in your appliances.…