Owner’s manual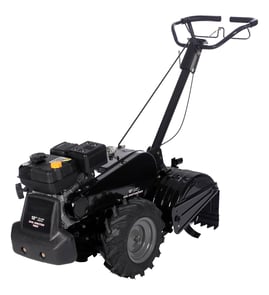

Where is the model number on a tiller?
On a Craftsman rear-tine tiller like model 247299301, the model number is printed on the tiller’s ID label (a sticker or metal tag) attached to the machine frame. Common spots include the tine shield/guard area, the engine area, or the front of the unit; confirm the exact location in the 247299301 owner’s manual.
- Check the tine shield/guard near the tines (often easiest to spot)
- Look on the main frame near the transmission or handle mount
- Check near the engine (around the engine base or nearby frame rail)
- Look on the front of the tiller if you do not see it near the tines
- Wipe dirt and oil off the label; grime can hide the numbers
The ID label typically includes the model number and may also list a serial number. For parts lookup and diagrams, the model number is the key.
| You need this | What it’s used for | Example for this tiller |
|---|---|---|
| Model number | Matching the correct parts diagrams and lists | 247299301 |
| Serial number | Identifying production run details (when applicable) | Varies |
Using the correct model number helps us match you to the right Craftsman parts, such as the tiller drive belt or tine assemblies, and avoids ordering hardware that looks similar but does not fit.
- Look for a second label on another frame surface (sometimes there are multiple)
- Use a flashlight and check the underside of the frame rails
- If the label is damaged, write down any readable digits and compare to the parts list in the 247299301 owner’s manual
Last updated: January 2026
What is the back of a tiller called?
On the Craftsman rear-tine tiller model 247299301, the “back” working end is typically referred to as the tine end or rear tine assembly (the rotating tines and their shields). On this CRT design, the rear tines counter-rotate in forward travel to dig more aggressively; see the 247299301 owner's manual.
Depending on what you are pointing at, people use different terms for the back of a rear-tine tiller:
- Tine end: the rear area where the tines contact the soil
- Rear tine assembly: the full tine set plus mounting hardware
- Tines: the individual blades that dig and mix soil
- Side shields: guards near the tines that help control soil throw
- Depth stake: the drag stake behind the tines that controls tilling depth
This model is a CRT (counter-rotating tine) tiller. That matters because tine direction changes depending on how you are moving.
| Operating mode | What the tines do | Why it matters |
|---|---|---|
| Forward | Tines rotate in reverse | Creates an “uppercut” digging action for deeper tilling |
| Reverse | Tines rotate forward | The manual says do not till in reverse |
Using the right term helps you order the correct parts and troubleshoot correctly. For example, if you say “the back is slipping,” we can narrow it down to the drive belt, tine assemblies, or transmission instead of the engine or handle controls.
If you are repairing the tine end, these are common part types to check:
- Tine assemblies (bent, worn, missing blades)
- Belt and belt cover (slipping, squealing, debris intrusion)
- Click pins and cotter pins (missing retainers can let parts walk off)
- Worm gear and tine input sprocket (grinding, no tine drive)
If you are replacing a worn or damaged tine set, match left vs. right: tiller tine assembly, left 642-04071-4044 and tiller tine assembly, right 642-04072-4044.
Last updated: January 2026
What are the common problems with lawn tillers?
Common problems on the Craftsman 247299301 rear-tine tiller include a no-start or rough-running engine, overheating, wheels or tines not turning, and poor tilling performance. Many issues trace back to fuel quality, ignition parts, drive-belt wear, or incorrect depth and operating technique (see the Craftsman 247299301 owner's manual).
- Engine will not start: stale/contaminated fuel, clogged fuel filter, dirty carburetor, fouled spark plug, or a safety/control not fully engaged
- Engine runs erratically: partially restricted fuel flow, dirty air filter, water in fuel, loose ignition connection
- Engine overheats: debris packed around the engine/muffler, low oil level, overloading the tiller by trying to dig too deep in one pass
- Wheels and/or tines will not turn: worn or broken drive belt, linkage out of adjustment, transmission/drive issue
- Poor tilling performance: depth stake set incorrectly, trying to force depth by pushing down on handlebars, tines tangled with debris
- Shut the engine off and disconnect the spark plug wire before adjustments or inspections.
- Confirm the controls move freely and return normally.
- Check fuel condition (fresh, clean gasoline) and inspect the spark plug.
- Inspect the belt area for damage and missing guards.
- Verify depth stake and side shield settings match the job.
| Symptom | What to inspect | Example part for this model |
|---|---|---|
| Wheels/tines do not move | Belt condition, glazing, cracking, stretching | Tiller drive belt 954-04091 |
| Poor tine action | Bent/worn tine assemblies | Tiller tine assembly, left 642-04071-4044 and tiller tine assembly, right 642-04072-4044 |
| Reverse handling issues | Wheel freewheel setup and pins | Tiller click pin 714-0143A |
This is a CRT (counter-rotating tine) tiller; it is designed to dig by balancing tine action and wheel traction. We recommend avoiding the temptation to push down on the handlebars to force depth because it reduces wheel traction and can make the machine feel like it is fighting you. For reverse, do not till in reverse; lift the handlebars to get the tines off the ground and back up carefully.
Correct depth settings, safe handling (especially in reverse), and basic maintenance prevent belt and transmission strain, improve soil breakup, and reduce tine tangling so the tiller performs consistently.
Last updated: January 2026
How much does a Craftsman rear tine tiller weigh?
The Craftsman rear-tine tiller model 247299301 weighs about 166 lb assembled (typical published spec for this 208cc, 16-inch rear-tine class). For the exact number for your unit and configuration, confirm the weight listing in the 247299301 operator’s manual.
Manufacturers may publish more than one weight value. Use the one that matches what you’re doing (loading, shipping, storage).
- Assembled weight: what you handle day to day
- Shipping weight: includes packaging and can be higher
- Dry weight: no fuel (and sometimes no oil)
- Operating weight: fuel and oil added
| Weight type | What it’s used for | What to expect |
|---|---|---|
| Assembled | Loading ramps, lifting help, tie-down planning | Closest to real-world handling |
| Shipping | Freight, carrier quotes | Higher than assembled |
| Operating | Traction and tilling feel | Slightly higher than dry |
Use the manual specs so you’re matching the manufacturer’s definition.
- Check the Specifications section for weight wording (assembled, shipping, dry)
- Match the spec to your task (transport vs. storage)
- If you added accessories, treat them as extra load beyond the published base weight
Weight affects traction and tine bite in hard soil, and it also determines whether you need ramps, a second person, and proper tie-down points when transporting your Craftsman tiller.
Last updated: January 2026