Owner’s manual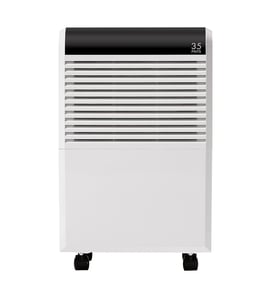

What size dehumidifier do I need for a 12x12 room?
For a 12x12 room (144 sq. ft.), we recommend a small-room dehumidifier; most homes do well with a unit in the 20 to 30 pint per day range, then adjust based on how damp the room actually is. For model-specific operating guidance, use the Kenmore 25150351010 use and care guide.
Quick sizing guide for a 12x12 room
Use room size plus moisture level (musty smell, visible condensation, damp carpet) to pick capacity.
- Light dampness (occasional humidity): 20 pint/day
- Moderate dampness (musty, clammy air): 25 to 30 pint/day
- Very damp (frequent condensation, damp surfaces): 30 to 35 pint/day
- Basement-like conditions: consider stepping up one size
| Room size | Typical capacity range | Best for |
|---|---|---|
| Up to ~200 sq. ft. | 20 to 30 pint/day | Bedrooms, offices, small basements |
| ~200 to 500 sq. ft. | 30 to 50 pint/day | Larger living areas, damp basements |
Setup tips that affect performance
Even the right-size unit will struggle if airflow and conditions are poor.
- Run it with doors and windows closed so it can work in an enclosed area
- Place it on a level floor
- Leave 12 to 18 inches of clearance on all sides for airflow
- Keep the temperature above 65°F for best efficiency
- Clean the air filter every two weeks (a clogged filter reduces moisture removal)
Why it matters
Oversizing can cause short cycling and less consistent humidity control; undersizing can run constantly and still leave the room damp. Matching pint capacity to both square footage and moisture level gives steadier comfort and better energy use.
Last updated: January 2026
What maintenance is required for a dehumidifier?
For the Kenmore 25150351010 dehumidifier, routine maintenance mainly means keeping airflow and drainage clean and safe: clean the air filter regularly, empty and wash the bucket, and wipe the exterior without using water. Follow the cleaning steps in the 25150351010 owner's manual.
Regular maintenance checklist
- Unplug the dehumidifier before any cleaning (the fan can run at high speed during operation).
- Clean the air filter every 2 weeks; operating without the filter can lead to unit failure.
- Empty the bucket and reinstall it correctly; the unit will not run if the bucket is missing or the bucket-full system is triggered.
- Clean the bucket as needed and make sure the float switch moves freely and is not obstructed.
- Clean the exterior with a soft brush or dry towel; do not spray water on the unit.
- Keep the inlet and outlet unblocked and maintain good air circulation around the cabinet.
How often to do what
| Task | Typical frequency | What to look for |
|---|---|---|
| Air filter cleaning | Every 2 weeks | Dust buildup, reduced airflow |
| Bucket emptying | As needed | Bucket-full light, odors, slime |
| Bucket cleaning | Monthly or as needed | Film, mold, stuck float |
| Exterior wipe-down | Monthly | Dust on grill, lint on cabinet |
Safe cleaning steps (quick guide)
- Turn the unit off and unplug it.
- Remove the bucket carefully (watch for sharp edges around internal metal parts).
- Clean the bucket interior; confirm the float switch is free.
- Clean the filter and reinstall it securely.
- Wipe the exterior dry; never wash the dehumidifier with water.
Why it matters
A clean filter and bucket help the Kenmore 25150351010 remove moisture efficiently, prevent nuisance shutoffs (bucket-full/float issues), and reduce strain on the fan and compressor.
Last updated: January 2026
How often do you have to empty a 35 pint dehumidifier?
A 35-pint dehumidifier can need emptying anywhere from once every day to several times per day, depending on room humidity, temperature, and airflow. On the Kenmore 25150351010, the Bucket Full light turns on and the unit automatically shuts off when the bucket is full; empty and reinstall the bucket to restart normal operation (see the 25150351010 owner's manual).
What changes how often you empty it
- Humidity level: higher RH fills the bucket faster.
- Room size and how “sealed” it is: open doors/windows slow performance and can increase run time.
- Temperature: cooler rooms can reduce moisture removal and may trigger defrost cycles.
- Fan speed setting: higher airflow can increase water collection in damp conditions.
- Drain method: bucket vs. gravity drain hose.
Typical emptying frequency (practical guide)
| Room condition | What you’ll usually see | Emptying frequency |
|---|---|---|
| Mild humidity | Light water collection | Every 1 to 3 days |
| Normal damp basement | Steady collection | About once per day |
| Very humid or after flooding | Fast collection | 2 to 4 times per day |
How to empty it correctly on Kenmore 25150351010
- Pull out the bucket using the side handles.
- Carry it using the inside handle.
- Empty it, then reinstall the bucket fully so it seats correctly.
- Confirm the Bucket Full indicator is off and the unit runs.
Option to avoid frequent emptying
If you can route water to a floor drain, you can use the unit’s gravity drain connection with a standard drain hose (hose not included). This is the best setup for basements where the bucket fills quickly.
Why it matters
Emptying on time (or using a drain hose) prevents automatic shutoff, keeps humidity control consistent, and helps avoid water collecting on the floor if the bucket is not seated properly.
Last updated: January 2026
How to clean the filter on a Kenmore dehumidifier?
To clean the filter on your Kenmore dehumidifier model 25150351010, unplug the unit, remove the bucket, slide the air filter out from behind the front grill, then wash it with mild detergent, rinse well, and air-dry it completely before reinstalling (see the 25150351010 owner's manual).
Step-by-step: cleaning the air filter
- Unplug the dehumidifier (important because the fan can run at high speed).
- Pull out the water bucket to access the filter area.
- Locate the air filter behind the front grill, then pull the filter down and away until it slides out.
- Wash the filter with mild detergent.
- Rinse thoroughly.
- Air-dry the filter away from direct sunlight.
- Reinstall the filter and bucket, then restore power.
Quick do and don’t list
- Do disconnect power before cleaning.
- Do air-dry fully before reinstalling (a wet filter can restrict airflow and cause odor).
- Do clean the front grill with a vacuum or soft brush.
- Don’t spray water into the dehumidifier or clean the unit with water.
- Don’t run the unit with the filter removed.
How often should we clean it?
Most dehumidifiers need filter cleaning every 2 to 4 weeks during heavy use (basements, remodeling, dusty areas). If you see dust buildup or reduced airflow, clean it sooner.
| Usage condition | Recommended filter cleaning |
|---|---|
| Normal home use | Every 3 to 4 weeks |
| Dusty area or remodeling | Every 1 to 2 weeks |
| Pets in the home | Every 2 weeks |
Why it matters
A clean air filter helps your Kenmore 25150351010 move air across the coils efficiently, which improves moisture removal, reduces run time, and helps prevent performance issues that can look like “not collecting water.” For deeper maintenance, follow how to clean a dehumidifier.
Last updated: January 2026