Owner’s manual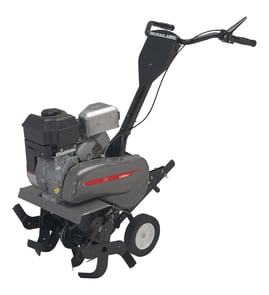




Where to find model number on Craftsman tiller?
On the Craftsman front-tine tiller model 917299014, the model number is printed on the tiller identification decal or label; it’s commonly found on or near the engine area (often around the recoil starter housing or under the engine shroud). Use the model number when ordering parts and looking up diagrams in the 917299014 owner's manual.
Common places to check on a Craftsman tiller
Look for a sticker, metal tag, or printed decal in these spots:
- On the recoil starter housing (pull-start cover)
- Under the engine shroud (near the muffler or spark plug area)
- On the handle/control panel area (near the control panel decal)
- On the frame near the engine mounting area
- Near the belt guard area (close to the drive belt routing)
Quick ID checklist (so you get the right parts)
When you find the label, match these items before you buy parts like a recoil starter or switch kit:
- Tiller model number: 917299014
- Brand: Craftsman
- Product type: front-tine tiller
- Engine model info: some labels also list an engine model; that helps for engine-specific service kits
What the label typically looks like
Most Craftsman tillers use a simple “MODEL NUMBER” format on the decal.
| What you see on the label | What it means | What to do with it |
|---|---|---|
| 917.299014 (or 917299014) | Tiller model number | Use it to match diagrams and chassis parts |
| Engine model (varies) | Engine identification | Use it for engine tune-up and internal engine parts |
Why it matters
Craftsman tillers often share similar frames across multiple models; using the exact model number prevents ordering the wrong belt guard hardware, depth stake parts, or engine service kits.
Last updated: February 2026
Where can I get Craftsman replacement parts?
For Craftsman model 917299014 front-tine tiller replacement parts, we recommend shopping by your exact model number so you get the right fit for items like tines, belts, air filters, and ignition parts. You can buy genuine and compatible parts through Sears PartsDirect and other authorized retailers; always match the part number to your equipment.
Best ways to make sure you get the right part
- Use the full model number 917299014 when searching.
- Confirm the part name and reference number using the exploded views in the 917299014 owner's manual.
- Match the part number on your old part when possible.
- For engine-related items, verify the engine model and type (some Craftsman tillers use engines sourced from different manufacturers).
- If hardware is missing, replace it with the exact style and size (bolt length, thread pitch, and grade matter).
Common replacement parts for this tiller
These are examples of parts customers often replace on a front-tine tiller like the Craftsman 917299014:
| Part type | What it affects | When to replace |
|---|---|---|
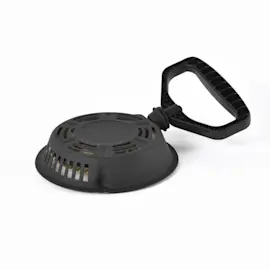
| Recoil starter | Starting | Rope won’t retract, starter slips, or housing is cracked |
| Engine switch | Spark/stop function | Engine won’t shut off, intermittent no-start |
| Air filter | Engine performance | Hard starting, rough running, dirty filter element |
| Depth stake | Tilling depth control | Bent, missing, or won’t hold adjustment |
If you need a recoil starter for this model, the tiller recoil starter 532420603 is a model-listed option.
Why it matters
Using the correct model number and manual diagrams prevents ordering parts that look similar but mount differently. That saves time, avoids returns, and helps your tiller run safely and reliably.
Last updated: February 2026
How to use a tiller with front tines?
To use the front-tine setup on your Craftsman 917299014 tiller, start the engine, set the throttle to a comfortable speed, then squeeze the tine control to engage the tines. Control how aggressively it digs by adjusting the depth stake and by lifting or pressing down on the handles as you move.
Before you start (safe setup)
- Wear safety glasses or eye protection before starting and while tilling.
- Check oil and fuel with the engine level; keep dirt out of the fill areas.
- Make sure the tine control moves freely and returns to the OFF (up) position.
- Keep cables routed so they do not touch the muffler.
- Know your controls: throttle, engine switch, fuel valve, recoil starter.
For control locations and operating steps, use the 917299014 owner's manual.
How to till (basic technique)
- Start with the throttle in a slow position until you get used to the machine.
- Squeeze the tine control to the handle to start tine rotation.
- To help the tiller move forward, lift the handles slightly (this lifts the depth stake out of the soil).
- To slow down or reduce bite, press down on the handles.
- If the tiller strains or shakes, reset the wheel and depth stake position for your soil.
Quick control guide
| What you want | What to do | What changes |
|---|---|---|
| More digging (more bite) | Let the depth stake dig in; keep handles more neutral | Tines pull harder into soil |
| Less digging (more control) | Lift handles slightly | Depth stake lifts, tines bite less |
| Stop tines | Release tine control | Tine rotation stops |
| Stop engine | Throttle to SLOW, engine switch OFF, fuel valve OFF | Engine shuts down safely |
Transporting the tiller (no tilling)
- Tip the depth stake forward until it is held by the stake spring.
- Push handles down to raise the tines off the ground.
- Move the tiller to the new spot.
Why it matters
Depth stake position and handle pressure are the two main “controls” that determine how deep the front tines dig. Getting them right prevents bouncing, reduces operator fatigue, and helps the tiller track straight.
Last updated: February 2026
Are front tine or rear tine tillers better?
Front-tine and rear-tine tillers are “better” for different jobs. Your Craftsman 917299014 is a front-tine tiller; it’s a strong choice for smaller gardens, tighter spaces, and routine soil conditioning, while rear-tine models are typically better for large areas, hard-packed soil, and maximum traction. See the 917299014 owner's manual for control and adjustment details.
Quick comparison: front tine vs rear tine
| Feature | Front-tine tiller (like 917299014) | Rear-tine tiller |
|---|---|---|
| Best for | Small to medium gardens, rows, maneuvering | Large plots, new ground, heavy soil |
| Handling | More “hands-on”; can bounce in hard/dry soil | More stable; pulls itself forward |
| Tilling depth control | Depth stake and wheel height adjustments | Often deeper, more consistent bite |
| Cost and storage | Usually lower cost, easier to store | Usually higher cost, larger footprint |
Choose a front-tine tiller when you want
- Better maneuverability around beds, rows, and tight corners
- Easier transport and storage (lighter, shorter overall)
- Good performance in already-worked soil and seasonal re-tilling
- More control over tilling width by changing tine arrangement
Choose a rear-tine tiller when you need
- More traction and stability in hard-packed soil or sod
- Faster progress on larger areas with fewer passes
- Less operator effort because the machine “drives” the tines from the rear
- More consistent depth in challenging ground
Setup tips that make a front-tine tiller work better
The 917299014 manual calls out adjustments that directly affect how “easy” the tiller feels:
- Set the depth stake and wheel height for shallow tilling in very hard soil, then increase depth gradually
- Avoid tilling when soil is extremely dry (bounce and difficult handling) or very wet (clumping)
- Adjust handle height for comfort and control
- Check tine operation and remove slack from the tine control cable before first use
Why it matters
Matching the tiller style to your soil and garden size reduces bounce, improves tilling quality, and helps prevent belt and tine wear from forcing the machine too deep too fast.
Last updated: February 2026
What kind of engine is on a CRAFTSMAN tiller?
The Craftsman front-tine tiller model 917299014 uses an LCT 208cc low-emission gas engine; the engine model is PLMHKI4600124P=BPQE2. For the exact engine identification and service kit breakdown, use the 917299014 owner's manual.
How to confirm the engine on your specific tiller
We recommend matching what is printed on your machine to the manual and decals so you order the right tune-up and repair parts.
- Check the engine label on the blower housing or valve cover for the LCT model number.
- Verify the tiller model tag shows 917.299014.
- Compare the engine parts breakdown to your engine layout.
- If you are servicing ignition, confirm your on/off switch style before ordering.
- If you are servicing starting issues, confirm your recoil starter style and mounting.
Common engine-related parts customers replace
These parts are commonly involved in no-start, hard-start, or poor-running symptoms on this Craftsman tiller.
| Symptom | Most common checks | Example model-matched part |
|---|---|---|
| Engine will not crank | Starter rope, recoil engagement | Tiller recoil starter 532420603 |
| No spark | Engine switch, wiring, kill circuit | Tiller engine switch service kit 532420598 |
| Runs rough or lacks power | Air intake restriction, fuel quality | Tiller air filter 532420588 |
Why it matters
The engine family and model number determine the correct ignition parts, starter components, and engine service kits. Using the correct LCT 208cc engine identification helps prevent mismatched parts and repeat repairs.
Last updated: February 2026
Are Craftsman tillers any good?
Craftsman tillers, including model 917299014, are a solid choice for typical home garden work when they are maintained and operated as designed. They are built to deliver dependable tilling performance, and most “not good” experiences trace back to worn wear-items (tines, belts, air filter) or skipped tune-ups listed in the 917299014 owner's manual.
What “good” looks like for a tiller
A good front-tine tiller should start reliably, pull itself through soil without excessive bouncing, and keep tine speed consistent under load. For the Craftsman 917299014, we recommend judging it on these practical checkpoints:
- Starts in a few pulls when fuel is fresh and the ignition switch is working
- Tills without needing you to force the handlebars down
- Does not surge or misfire under load
- Maintains safe operation with guards and shields installed
- Holds fasteners tight (especially around the tine and drive areas)
Common strengths and common complaints (and what they usually mean)
| What you notice | What it usually points to | What to do first |
|---|---|---|
| Strong digging in hard soil | Normal for a properly set depth stake | Adjust depth and make shallow passes |
| Excessive vibration or “walking” | Tines catching, depth set too deep | Reduce depth, slow down |
| Hard starting | Fuel, spark plug, switch, air flow | Check fuel, plug, and air filter |
| Parts wearing faster than expected | Wear-items or loose hardware | Follow maintenance schedule and re-torque |
Maintenance that makes the biggest difference
The owner’s manual calls out routine care and safety steps that directly affect performance and durability. Focus on these items first:
- Use fresh unleaded regular gasoline; drain or stabilize fuel for storage
- Use the correct engine oil for temperature (SAE 30 above 32°F; SAE 5W-30 below 32°F)
- Keep the air filter clean; replace when restricted (a clogged filter causes rough running)
- Check bolts and fasteners frequently for tightness
- Do not overload the machine by trying to till too deep at too fast a rate
If you are chasing a no-start caused by a failed kill switch, the tiller engine switch service kit 532420598 is a common repair part for this model.
Why it matters
A front-tine tiller can feel “underbuilt” if it is set too deep, run too fast in hard ground, or operated with worn wear-items. Correct depth settings, proper oil, and basic tune-ups usually restore the strong, steady tilling most owners expect.
Last updated: February 2026
What are the common problems with lawn tillers?
Common problems on a lawn tiller like the Craftsman 917299014 include hard starting, rough running, poor tilling performance, and excessive bouncing or difficult handling. Most issues trace back to fuel, ignition, airflow, belt/tine engagement, or soil and depth-stake setup (covered in the 917299014 owner's manual).
Most common tiller problems (and what they usually mean)
- Engine will not start or starts then dies: stale fuel, dirty air filter, fouled spark plug, or a kill switch issue.
- Engine runs rough or misfires: restricted airflow, fuel restriction, or ignition wear.
- Engine overheats: low or dirty oil, dirty engine air screen, dirty cooling fins, or a partially plugged muffler.
- Tines do not turn (engine runs): tine control not engaged, V-belt out of adjustment, or belt off the pulleys.
- Excessive bounce or difficult handling: soil too hard or dry, or wheels and depth stake set incorrectly.
- Soil balls up or clumps: soil is too wet; wait for better conditions.
Quick checks we recommend before buying parts
- Confirm controls: make sure the tine control is fully engaged.
- Check soil and setup: aim for about 4 to 6 inches tilling depth; adjust wheel height and depth stake for conditions.
- Inspect airflow: clean the engine air screen; replace the air filter if dirty.
- Fuel basics: drain old fuel, clean the tank if contaminated, and verify fuel flow.
- Belt and pulleys: inspect belt routing, tension, and pulley condition.
Symptom-to-fix cheat sheet
| Symptom | Most likely cause | Best first action |
|---|---|---|
| Bounces, hard to control | Soil too hard or depth stake/wheels mis-set | Moisten soil; adjust depth stake and wheels |
| Soil clumps | Soil too wet | Wait until soil dries out |
| Engine runs but tiller will not move | Tine control off or belt issue | Engage control; inspect/adjust V-belt |
| Overheats | Oil/airflow/muffler restriction | Check oil; clean air screen; clean muffler |
Why it matters
Correct depth stake and wheel adjustment reduces bouncing and operator strain, and proper engine airflow and belt engagement prevent overheating and power loss. That means smoother tilling, better soil breakup, and fewer repeat passes.
Last updated: February 2026