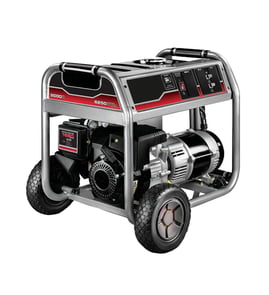

What are the most common issues with PM0401850?
The most common problems we see with the Coleman PM0401850 Powermate generator are no-start conditions, rough running or surging, and no AC output. These issues usually trace to fuel quality, ignition/spark, airflow, or the generator’s output and wiring connections.
Common symptoms and likely causes
- Won’t start: stale fuel, clogged carburetor jets, dirty air filter, fouled spark plug, low-oil shutdown (if equipped)
- Starts then dies: restricted fuel flow, stuck float/needle, choke not opening, vacuum leak
- Surging (hunting): partially clogged carburetor, governor linkage sticking, air leak, fuel cap vent issue
- No AC power at outlets: tripped breaker, bad receptacle, loose wiring, failed capacitor/AVR (if equipped)
- Runs but low/unstable voltage: overloaded circuits, engine speed (RPM) off, poor connections, failing output components
Quick checks we recommend first (safe, fast)
- Turn the fuel valve on; set choke correctly for a cold start.
- Drain old fuel; refill with fresh gasoline (and stabilizer if it will sit).
- Inspect and replace the spark plug if it is wet, black, or cracked.
- Check the air filter; clean or replace if dirty.
- Reset any circuit breakers; unplug all loads and test again.
- Inspect cords and outlets for heat damage or looseness.
What to test next (with basic tools)
Use a multimeter to separate an engine problem from an electrical output problem.
| What you observe | What it usually points to | What to do next |
|---|---|---|
| Engine won’t fire at all | Ignition or fuel delivery | Check spark, then clean carburetor |
| Engine runs smoothly but outlets dead | Breaker, receptacle, wiring, output components | Check breaker continuity and outlet voltage |
| Voltage present but drops under load | Overload or RPM regulation | Reduce load; verify engine speed/governor |
A good starting point for electrical testing is how to use a multimeter to test electrical parts video.
Why it matters
A generator that surges, runs lean, or produces unstable voltage can damage connected equipment and can overheat the generator windings. Fixing fuel and airflow issues early prevents bigger electrical failures.
Last updated: March 2026
What is the 20/20/20 rule for generators?
The 20/20/20 rule is a simple safety checklist we recommend for running a portable generator like the Coleman PM0401850: keep it 20 feet from the home, let it cool 20 minutes before refueling, and use a working carbon monoxide (CO) alarm (often around $20) to help detect dangerous exhaust.
What each “20” means
- 20 feet away: Place the generator outdoors at least 20 feet from doors, windows, vents, and garage openings.
- 20 minutes to cool: Shut the engine off and wait about 20 minutes before adding gasoline.
- $20 CO alarm: Use a CO alarm in the home (and test it regularly) so you get an early warning if exhaust drifts indoors.
Quick setup checklist (portable generator basics)
- Run the generator outside only, never in a garage, shed, basement, or enclosed porch.
- Point the exhaust away from the house and from neighboring homes.
- Use heavy-duty outdoor-rated extension cords in good condition.
- Keep the generator dry; avoid operating in standing water or heavy rain.
- Turn off and unplug loads before shutdown; then restart and add loads gradually.
Why it matters
Portable generators produce carbon monoxide and heat. The 20/20/20 rule helps reduce two common hazards: CO exposure (which can build up quickly indoors) and fuel ignition from refueling a hot engine.
Helpful reference
If you are troubleshooting power output or electrical issues on the PM0401850, our how to use a multimeter to test electrical parts video can help you check basics like voltage and continuity safely.
| Rule step | Primary risk reduced | What to do |
|---|---|---|
| 20 feet away | CO entering the home | Place outdoors, clear of openings |
| 20 minutes cool | Fire during refueling | Shut off, wait, then refuel |
| $20 CO alarm | Undetected CO exposure | Install and test alarms |
Last updated: January 2026
What kind of oil do you put in a Powermate generator?
For the Coleman Powermate generator model PM0401850, we typically recommend SAE 10W-30 small-engine oil for most temperatures. The exact viscosity can vary by climate and engine version, and this model’s oil spec cannot be confirmed from model-specific documentation here, so we match oil weight to operating temperature.
Recommended oil by temperature
Use a quality 4-stroke small-engine oil (conventional or synthetic) in the viscosity that fits your conditions:
- SAE 10W-30: best all-around choice for most users
- SAE 30: good for consistently hot weather
- SAE 5W-30: better for cold-weather starting
- SAE 10W-40: sometimes used in hotter conditions or heavy use
| Outdoor temperature | Common choice | Why it helps |
|---|---|---|
| Below 32°F | SAE 5W-30 | Easier starting, faster oil flow |
| 32°F to 90°F | SAE 10W-30 | Balanced protection and starting |
| Above 90°F | SAE 30 or 10W-40 | Helps maintain viscosity in heat |
How to choose the right oil (quick checklist)
- Use 4-stroke engine oil (do not use 2-cycle mix oil).
- If you run in mixed temperatures, stick with 10W-30.
- For freezing starts, switch to 5W-30.
- If the generator runs long hours in high heat, consider SAE 30 (or 10W-40 if that’s what you already stock).
- Check oil level on a level surface before every run.
Why it matters
The right viscosity helps the PM0401850 engine lubricate quickly at startup and maintain a protective film when hot. Using oil that is too thick in cold weather can cause hard starting; oil that is too thin in extreme heat can increase wear.
Helpful related guidance
If you are confirming the exact model identification before buying maintenance items, use how to find your appliance model number (and what it means for parts).
Last updated: January 2026