- Kenmore refrigerator water filters
- Whirlpool refrigerator water filters
- Samsung refrigerator water filters
- GE refrigerator water filters
- LG refrigerator water filters
- Frigidaire refrigerator water filters
- KitchenAid refrigerator water filters
- Maytag refrigerator water filters
- Kenmore Elite refrigerator water filters
- Estate refrigerator water filters
- GE Profile refrigerator water filters
- Amana refrigerator water filters
- Bosch refrigerator water filters
- Dacor refrigerator water filters
- Electrolux refrigerator water filters
Top DIY repair help
View All Repair Categories
Appliances
Lawn & Garden
Power Tools
Home Improvement
Sports & Leisure
Heating & Cooling
Quick Links
How to replace a lawn mower transmission
less than a minute readMar 19Lyle Weischwill
Repair time and Difficulty
60 minutes or less
Tools Required
- Nut driver set
- Drill driver
- Driver bit set
- Locking pliers
- Pliers
- Socket wrench set
- Wood block
- bungee cords
- Plastic bag
- Work gloves
This DIY lawn mower repair guide gives step-by-step instructions for replacing a lawn mower transmission. The transmission rotates the axle to drive the mower wheels, moving the mower forward. Replace the transmission with a manufacturer-approved lawn mower part if the transmission is locked up or won't drive the wheels when engaged.
Follow this procedure to replace the front-wheel drive transmission on common Craftsman and MTD walk-behind lawn mowers.
A transmission problem is just one reason the wheels of a lawn mower won't drive forward. To learn how to diagnose a lawn mower drive problem, see Lawn Mower Won't Move Troubleshooting Video: Motion Drive Failure.
Instructions
- 1. Disconnect the spark plug wire
Disconnect the spark plug wire from the spark plug.

PHOTO: Disconnect the spark plug.
- 2. Remove the drive cover
Remove the fuel tank cap.
Place a plastic bag over the fuel tank opening and reinstall the fuel tank cap to prevent gasoline from leaking out through the fuel tank cap vent.
Tilt the mower back to lift the front wheels, then secure the mower handle to your work table to hold the mower steady as you remove the bottom-mounting screws.
Remove the drive cover’s bottom-mounting screws.
Release the mower handle from the work table and lower the mower to the upright position.
Remove the drive cover’s top-mounting screws.
Release the height adjuster lever and pull off the drive cover.
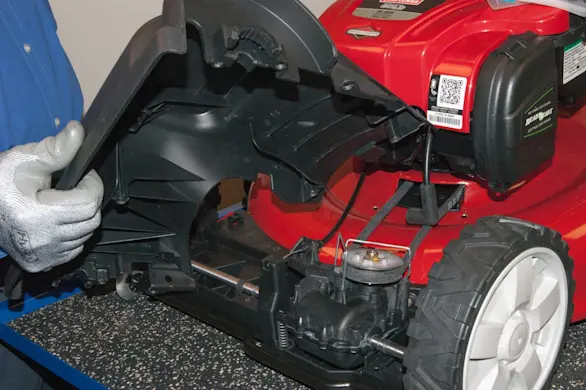
PHOTO: Remove the drive cover.
- 3. Release the ground drive belt
Pull off the transmission belt keeper.
Roll the ground drive belt off the transmission pulley.
Keep tension on the drive belt while attaching one end of the bungee cord to the drive belt and the other end of the bungee cord to the rear discharge chute door lip to keep tension on the drive belt while replacing the transmission.
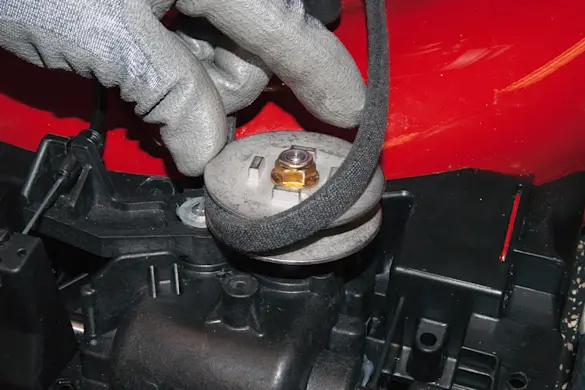
PHOTO: Release the drive belt from the transmission pulley.
- 4. Release the drive control cable
Release the drive cable from the drive control lever.
Remove the drive cable end from the anchor post.
Depress the release tabs and pull the drive cable out of the transmission lever.

PHOTO: Release the drive cable from the anchor post.
- 5. Remove the front wheels
Pry off the left front wheel hubcap.
While holding the front axle stationary, remove the wheel mounting nut.
Pull off the wheel and the dust cover.
Repeat the procedure to remove the right front wheel and dust cover.
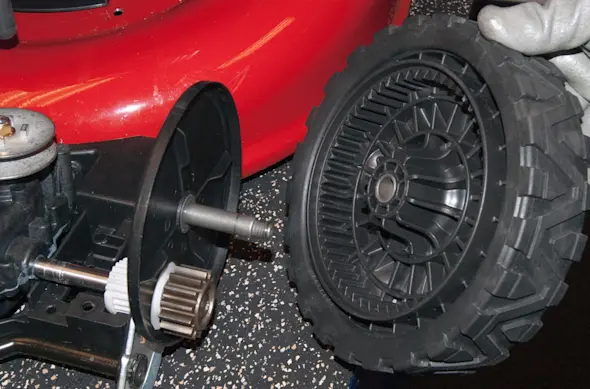
PHOTO: Remove the front wheels.
- 6. Remove the transmission
Attach locking pliers to the left side of the transmission axle to hold the axle stationary while you remove the left drive pinion gear.
While holding the transmission axle still, remove the screw that attaches the left pinion gear to the axle.
Remove the pinion gear and the transmission axle pin.
Repeat the procedure to remove the right side pinion gear and axle pin.
Remove the locking pliers from the transmission shaft.
Remove the transmission axle clip.
Pull the transmission up and disconnect the tension spring pin from the transmission.
Pull the transmission support bearings off the ends of the transmission axle.
Slide the transmission out of the wheel axle assembly.

PHOTO: Remove the pinion gear.
- 7. Install the new transmission
Slide the new transmission into the wheel axle assembly.
Install the support bearings on the ends of the transmission axle.
Position the transmission above the front deck tray and connect the transmission to the tension spring pin.
Reinstall the transmission axle clip.
Reinstall the axle pin and pinion gear on the left side of the transmission axle.
Connect the locking pliers to the transmission axle to hold the axle stationary while you reinstall the pinion gear screw.
Reinstall the pinion gear screw and tighten it securely.
Repeat the procedure to reinstall the axle pin and pinion gear on the right side of the transmission axle.
Remove the locking pliers from the transmission shaft.
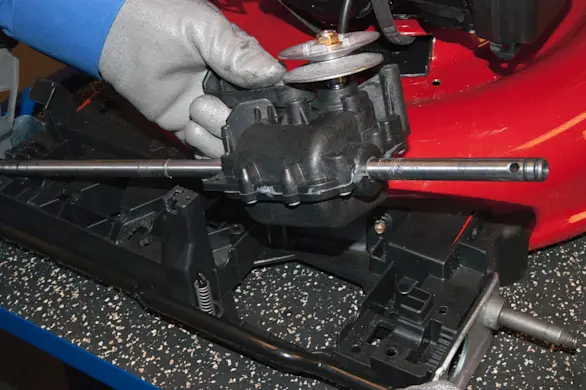
PHOTO: Install the new transmission.
- 8. Reinstall the front wheels
Reinstall the left wheel dust cover.
Push the left wheel onto the axle and reinstall the wheel mounting nut.
Hold the front axle stationary and tighten the wheel mounting nut securely.
Reinstall the left front wheel hubcap.
Repeat the procedure to reinstall the right front wheel.
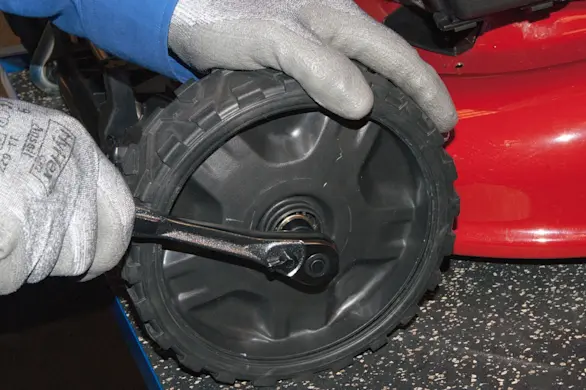
PHOTO: Reinstall the front wheels.
- 9. Reconnect the drive cable
Push the drive cable into the transmission lever and engage the locking tabs.
Reconnect the drive cable end to the anchor post.
Reconnect the drive cable to the drive control lever on the lawn mower handle.
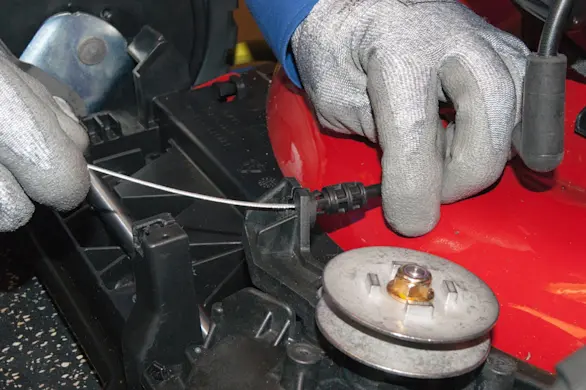
PHOTO: Reinstall the drive cable.
- 10. Reinstall the drive belt and drive cover
Roll the drive belt onto the transmission pulley.
Reinstall the belt keeper.
Put the drive cover in position on the mower and re-engage the height adjuster lever.
Reinstall the drive cover’s top-mounting screws.
Tilt the mower back to lift the front wheels then secure the mower handle to your work table.
Reinstall the drive cover’s bottom-mounting screws.
Look through the opening in the debris shield to make sure the drive belt is still connected to the engine pulley. If the drive belt worked its way off the engine pulley during the repair, follow the steps in the repair guide for drive belt replacement to reconnect the drive belt to the engine pulley.
Release the mower handle from the work table and tilt the mower upright.
Remove the plastic bag from the fuel tank opening and reinstall the fuel tank cap.

PHOTO: Reinstall the drive belt.
- 11. Reconnect the spark plug wire
Push the spark plug wire back onto the spark plug.