Owner’s manual

How to clear and reprogram a garage door opener?
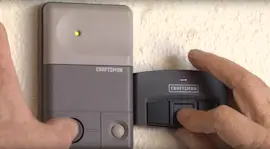
To clear and reprogram a Chamberlain 1255R garage door opener, we erase the opener’s memory by holding the motor unit LEARN button for about 6 seconds until the learn indicator light goes out; then we add each remote or keypad back using the LEARN button programming steps in the owner's manual.
Clear (erase) all remote and keypad codes
- Locate the LEARN button on the motor unit (near the opener’s logic board area).
- Press and hold LEARN until the learn indicator light turns off (about 6 seconds).
- Release the button; all stored codes are erased.
- Reprogram every remote control and any keyless entry keypad you want to use.
What gets erased?
| Item | After erase-all? | What you must do next |
|---|---|---|
| Hand-held remote control | Won’t operate the door | Reprogram the remote |
| Keyless entry keypad | Won’t operate the door | Reprogram the keypad PIN |
| Unwanted/lost remote | Removed from memory | No action needed |
Reprogram a hand-held remote (using LEARN)
- Press and release the LEARN button; the learn light stays on for 30 seconds.
- Within 30 seconds, press and hold the remote button you want to use.
- Release when the opener lights blink (or you hear two clicks if no bulbs are installed).
Reprogram a keyless entry keypad (new PIN)
- Press and release the LEARN button (learn light on for 30 seconds).
- Enter a 4-digit PIN on the keypad.
- Press and hold ENTER; release when the opener lights blink (or you hear two clicks).
Why it matters
Erasing and reprogramming is the fastest way to remove access for a lost remote, fix mismatched programming, and ensure your Security+ system is only paired to the remotes and PINs you trust.
Last updated: February 2026
What are common problems with LiftMaster openers?
Common problems with LiftMaster openers (made by the same Chamberlain family as your Chamberlain 1255R) are power issues, safety sensor misalignment/obstructions, remote or wall control problems (including Lock feature being on), travel or force setting drift, and a motor that hums but will not move the door. For model-specific checks, use the owner's manual.
Most common symptoms and what they usually mean
- Opener does nothing: no power at the outlet, tripped breaker, or a wall switch-controlled outlet.
- Works from remote but not wall control: door control wiring issue, staple short, or a faulty wall control.
- Works from wall control but not remote: Lock feature on, remote needs programming, or antenna/range issue.
- Door reverses and lights blink: safety reversing sensors blocked or out of alignment.
- Motor hums briefly, then stops: door lock engaged, door is binding, or springs are broken (door is too heavy).
Quick checks we recommend (safe, high-impact)
- Confirm the opener has power by plugging a lamp into the ceiling outlet.
- Make sure any manual door locks are disabled.
- Check the safety sensors: clear the doorway, wipe the lenses, and align the sensor “eyes.”
- If the door control has a Lock feature, turn Lock off; then reprogram remotes if needed.
- If the motor overload trips, wait 15 minutes and try again.
- Pull the emergency release and move the door by hand; a properly balanced door should stay at mid-travel.
What the lights and behavior can tell you
| What you see | Most likely cause | What to do next |
|---|---|---|
| Opener lights blink after reversing | Safety sensor issue | Align sensors, remove obstructions |
| Remote range is short | Antenna position, metal interference | Extend antenna down; try a different remote location |
| Door moves by itself | Stuck control button or wiring short | Check wall control and wiring; clear and reprogram remotes |
Why it matters
Most “opener problems” are actually safety sensor alignment, control wiring, or a door that is out of balance. Fixing the root cause prevents repeat reversals, nuisance blinking lights, and stripped gears from forcing a heavy door.
For code-related troubleshooting, we also use the Chamberlain error codes guide to match flashing patterns to the most likely failure.
Last updated: February 2026
What is the average lifespan of a LiftMaster garage door opener?
Most LiftMaster garage door openers last 10 to 15 years with normal residential use. With consistent maintenance and a well-balanced door, it’s common to reach the higher end of that range; heavy daily cycles, harsh temperatures, and an unbalanced door shorten lifespan.
What affects lifespan the most
A garage door opener’s motor and drive system wear based on load and cycles. These factors matter most:
- Door balance and spring condition (an opener should not “lift” a heavy door)
- Daily usage (more open/close cycles equals more wear)
- Temperature and humidity in the garage
- Safety sensor alignment and clean photo eyes
- Force and travel limit settings (misadjusted settings strain the motor)
Maintenance that helps you reach 10 to 15 years (and beyond)
We recommend following the maintenance schedule and safety checks in your opener documentation. For a Chamberlain 1255R, use the 1255R owner's manual as your baseline.
- Monthly: Manually operate the door; if it binds or feels unbalanced, stop using the opener and have the door system serviced
- Monthly: Confirm the door opens and closes fully; adjust travel limits or force only as needed
- Monthly: Repeat the safety reverse test and correct any issues
- Twice a year: Check chain tension (if your unit is chain drive)
- Yearly: Oil door rollers, bearings, and hinges (do not grease the tracks)
When replacement makes more sense than repair
If you’re seeing repeated failures, replacing the opener is usually the better long-term value.
| Symptom | What it usually points to | What to do next |
|---|---|---|
| Motor hums briefly, door does not move | Door spring/door balance issue or overloaded motor | Disconnect trolley; test door by hand; service door system |
| Door reverses and lights blink after reversing | Safety sensor obstruction or misalignment | Clear/align sensors; verify wiring |
| Needs frequent force increases to move door | Door binding or spring problem | Do not increase force; correct door issue |
| Remote range drops or becomes inconsistent | Remote battery or interference | Replace remote battery; reprogram if needed |
Why it matters
A LiftMaster or Chamberlain opener can run for many years, but it’s designed to move a properly balanced door. Keeping the door hardware in good shape reduces strain on the motor, gears, and rail system, which is the biggest driver of opener longevity.
For troubleshooting by light patterns or diagnostic behavior, use our Chamberlain error codes guide.
Last updated: February 2026