- Kenmore refrigerator water filters
- Whirlpool refrigerator water filters
- Samsung refrigerator water filters
- GE refrigerator water filters
- LG refrigerator water filters
- Frigidaire refrigerator water filters
- KitchenAid refrigerator water filters
- Maytag refrigerator water filters
- Kenmore Elite refrigerator water filters
- Estate refrigerator water filters
- GE Profile refrigerator water filters
- Amana refrigerator water filters
- Bosch refrigerator water filters
- Dacor refrigerator water filters
- Electrolux refrigerator water filters
Top DIY repair help
View All Repair Categories
Appliances
Lawn & Garden
Power Tools
Home Improvement
Sports & Leisure
Heating & Cooling
Quick Links
How to replace a garage door opener drive belt
less than a minute readMar 19Lyle Weischwill
Repair time and Difficulty
60 minutes or less
Tools Required
- Step ladder
- Socket wrench set
- Phillips screwdriver
- Slot screw driver
- Wrench set
- Channel lock pliers
- General-purpose grease
- Work gloves
This DIY repair guide explains how to replace the drive belt on a belt-driven garage door opener. The belt connects to the trolley and drives the trolley along the rail to raise and lower the door. If the belt breaks or is worn, replace it with the manufacturer-approved garage door opener part.
Use these steps to replace the drive belt in Craftsman, LiftMaster and Chamberlain garage door openers.
Instructions
- 1. Disconnect power
Use a step ladder to access the garage door opener’s power cord and motor unit.
Unplug the garage door opener.

PHOTO: Unplug the garage door opener.
- 2. Take the garage door opener down
Pull the emergency release rope to release the trolley from the garage door.
Shut the garage door if it's not already closed.
Remove the fastener ring from the straight door arm connected to the outer trolley.
Pull out the clevis pin while supporting the straight arm to disconnect the garage door from the outer trolley.
Lower the straight and curved arms and rest them against the garage door. Use a helper if necessary.
Open the light cover to access the wall control and safety sensor wires connected to the motor unit.
Take a digital photo of the wall control and safety sensor wires connected to the motor unit. You’ll refer to the photo later when reconnecting the wires.
Disconnect the wall control and safety sensor wires from the motor unit.
Close the light cover.
Remove the nuts, bolts and lock washers that secure the motor unit to the ceiling bracket.
Support the motor unit with one hand as you remove the last bolt from the ceiling bracket.
Carefully lower the motor unit down and rest it securely on top of the step ladder.
Climb down the step ladder and lower the motor unit down to the garage floor.
Move your step ladder by the garage door so you can remove the rail from the header bracket.
Remove the fastener ring from the header bracket clevis pin.
Pull the clevis pin out of the rail and header bracket while supporting the rail with one hand.
Lower the rail to the garage floor.

PHOTO: Take down the garage door opener. Tip: You may want to have a helper assist you when taking the garage door opener down.
- 3. Remove the belt
Slide the outer trolley away from the inner trolley.
Using channel lock pliers, carefully squeeze the spring on the spring nut and trolley shaft to create slack in the belt.
Unhook the trolley connector from the front of the trolley and then release the spring tension.
Remove the idler pulley nut and lock washer.
Pull out the idler pulley bolt and slide the idler pulley out of the rail window.
Pull the belt out of the rail window.
Remove the spring nut, tension spring and nut ring from the trolley threaded shaft.
Pull the threaded shaft out of the trolley.
Pry off the master link clip-on spring from the master link cap on the trolley threaded shaft.
Pull off the master link cap and remove the master link bar to disconnect the trolley threaded shaft from the belt.
Remove the screws from the belt cap on the motor unit and pull the belt cap off.
Remove the belt from the garage door opener.

PHOTO: Release the belt. Tip: The spring nut is under heavy tension. Use care when compressing the spring to avoid injury.
- 4. Install the new belt
Lay the new belt beside the rail.
Grasp the end of the belt that has the trolley connector hook and pass approximately 12 inches of the belt through the rail window.
Add general-purpose grease to the idler pulley center hole if it's dry.
Insert the idler pulley into the rail window behind the belt and line up the mounting hole.
Reinstall the idler pulley bolt and tighten it firmly with the lock washer and nut.
Make sure the idler pulley spins freely after tightening the nut.
Hook the new belt trolley connector to the trolley retaining slot.
Route the belt onto the idler pulley and align the remainder of the belt along the rail routing the belt around the motor pulley, making sure not to twist the belt.
Position the trolley threaded shaft next to the loose end of the belt with the flat end of the threaded shaft facing the smooth side of the belt.
Connect the trolley threaded shaft to the new belt by pushing the pins of the master link bar up through the threaded shaft mounting hole and the fitting of the new belt.
Push the master link cap over the master link bar pins and past the pin notches.
Slide the clip-on spring over the master link cap and onto the pin notches until both pins securely lock in place.
Making sure not to twist the belt, insert the trolley threaded shaft through the hole in the trolley.
While holding the belt stationary at the trolley threaded shaft, insert the nut ring and tension spring on the trolley shaft.
Thread the trolley spring nut onto the trolley threaded shaft and tighten the spring nut until it's flush with the end of the threaded shaft.
Reinstall the belt cap on top of the pulley.
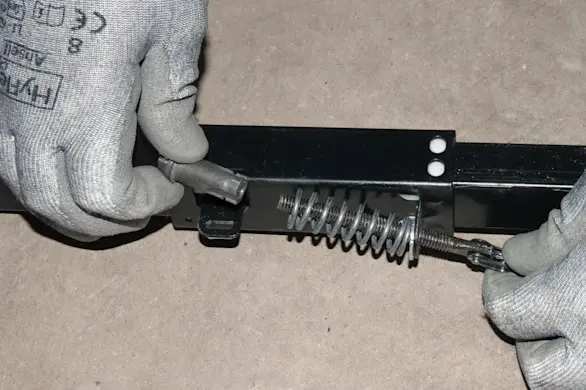
PHOTO: Reinstall the spring nut.
- 5. Reinstall the garage door opener
Reconnect the rail end to the header bracket using the clevis pin and fastener ring.
Position your step ladder under the motor unit ceiling bracket and carefully set the motor unit on top of the step ladder.
Climb the step ladder and reinstall the motor unit to the ceiling bracket using the nuts, bolts and lock washers.
Open the light cover to access the wall control and safety sensor terminals on the motor unit.
Using your digital photo for reference, reconnect the wall control and safety sensor wires to the motor unit.
Close the light cover.
Reconnect the straight door arm to the outer trolley using the clevis pin and fastener ring.
Re-engage the trolley.

PHOTO: Reconnect the door to the trolley. Tip: Reconnect the curved door arm to the straight door arm using the bolts, lock washers and nut if you disconnected the curved arm from the straight arm when freeing the garage door from the outer trolley.
- 6. Reconnect electrical power
Plug in the garage door opener.
- 7. Set the travel limits
Press and hold the black adjustment button until the up button flashes.
Push and hold the up button until the door reaches the desired up position. Toggle the up and down buttons if necessary to achieve the desired up position.
Press and release the black adjustment button to set the up position.
The garage door opener lights will flash twice to indicate that the up position is set, and the down button then flash.
Press and hold the down button until the door is in the desired down position, toggling the up and down buttons as necessary to achieve the desired down position.
Press and release the black adjustment button.
The garage door opener lights will flash twice and the up button will then flash.
Press the up button and the door will move to the programmed up position. Then, the down button will flash.
Press the down button and the door will move to the programmed down position.
The programming is complete.