Installation guide
 Owner’s manual
 Error Codes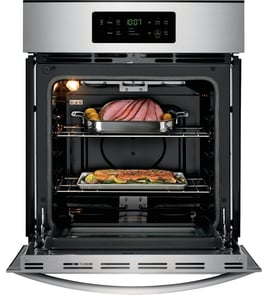
Are all 30 inch wall ovens the same size?
No. “30-inch” wall ovens are not all the same size; 30 inches is a category label, and the actual cabinet cutout width, cutout height, and depth vary by brand and model. For your Kenmore 79040529400 electric wall oven, we recommend confirming the exact cutout requirements in the 79040529400 installation guide.
What “30-inch” usually means (and what varies)
Most 30-inch wall ovens are designed to fit a similar opening, but these dimensions commonly differ:
- Cutout width (the cabinet opening)
- Cutout height (single vs. double ovens vary a lot)
- Cutout depth and door clearance
- Trim overlap (how the decorative trim covers the cutout)
- Electrical junction box location
Key fit checks before you buy or install
Use these steps to avoid a trim gap, cabinet interference, or a door that cannot open fully:
- Measure the existing cutout width, height, and depth in three places (top, middle, bottom).
- Verify the oven’s required door clearance; many installs need about 19 3/8 inches of clearance for the door when open.
- Confirm the cabinet base can support the oven; many wall ovens require support for up to 300 lb.
- Check that the junction box location matches the installation requirements.
- If the trim does not sit flush or you hear noise on convection models, re-check the critical cabinet dimension called out in the install instructions.
Typical “30-inch” wall oven sizing vs. what you should use
| What you’re comparing | Typical expectation | What to rely on for accuracy |
|---|---|---|
| Advertised width | “30-inch class” | Cutout width in the install instructions |
| Height | Varies by configuration | Cutout height range and any height adjustment notes |
| Depth | Varies by design | Required cabinet depth plus door clearance |
Why it matters
A wall oven can be “30-inch class” and still not fit your cabinet opening. Getting the cutout dimensions right prevents cabinet modifications, trim gaps, and installation delays.
Last updated: February 2026
Are electric wall ovens 110 or 220?
Kenmore electric wall ovens like model 79040529400 use a 120/208V or 120/240V (commonly called “220V”) supply, not a standard 120V (110V) receptacle. This oven is hardwired to a junction box on a dedicated, properly grounded circuit sized to the rating plate.
What power supply this wall oven needs
Per the installation requirements, this oven uses a single-phase 3-wire or 4-wire 120/208 or 120/240 Volt, 60 Hz AC electrical supply on a separate circuit (fused on both sides of the line). See the wiring and circuit details in the 79040529400 installation guide.
Typical circuit sizing (what most homes use)
Circuit size depends on whether you have a single or double wall oven and the nameplate rating.
- Single wall oven: up to about 4000W at 240V; typically 30A breaker
- Double wall oven: up to about 8000W at 240V; typically 40A breaker
- Use copper wire sized to the breaker and local code (the guide commonly references #8 AWG)
- Use a dedicated circuit; do not share with other appliances
- Do not use an extension cord
120V vs 240V: quick comparison
| What people call it | What it usually means | Common use |
|---|---|---|
| 110V / 120V | Standard household branch circuit | Lamps, small appliances |
| 220V / 240V | 120/240V supply (two hot legs) | Electric wall ovens, dryers |
| 208V | 120/208V supply (often in condos) | Some built-in ovens |
How to confirm what your oven is actually wired for
We use the rating plate on the oven frame as the final authority for amperage and wiring requirements.
- Locate the rating plate on the oven frame
- Confirm voltage (208/240) and amperage
- Verify you have a junction box (these ovens are typically hardwired)
- Match the breaker size to the nameplate and installation guide
- If wiring looks overheated or connections are loose, stop and have the circuit checked
Why it matters
Using a 120V circuit for a 240V wall oven causes no-heat or weak-heat symptoms and can damage wiring or controls. Correct voltage, grounding, and breaker sizing help the bake and broil elements heat properly and protect the oven control system.
Last updated: February 2026
Can you still buy wall ovens?
Yes, you can still buy wall ovens, and they are widely available in common sizes like 24-inch and 30-inch. If you are replacing a built-in unit like Kenmore 79040529400, match the cutout and electrical requirements first, then choose features and finish.
What to match when replacing an existing wall oven
To avoid cabinet modifications, we recommend matching these items before you shop:
- Cutout width, height, and depth (cabinet opening)
- Oven size class (for this model, the installation guide shows a 24-inch wall oven format)
- Electrical supply (voltage, breaker size, and wiring type)
- Mounting method (front frame screws and anti-tip mounting)
- Vent location and clearance for proper airflow
For the exact cutout and product dimensions for Kenmore 79040529400, use the 79040529400 installation guide.
Typical replacement sizing (quick reference)
Most wall ovens are sold by nominal width, but the cabinet cutout is what matters.
| Nominal wall oven size | Common use case | What you should verify |
|---|---|---|
| 24-inch | Smaller kitchens, older cutouts | Cutout dimensions and depth clearance |
| 27-inch | Mid-size built-ins | Cutout height and trim overlap |
| 30-inch | Most common new installs | Electrical capacity and cabinet width |
Why installation details matter
Wall ovens must be secured to the cabinet to reduce tipping risk, and they should be moved and installed by two or more people. The installation instructions also note these ovens are not approved for stackable or side-by-side installation, so layout planning matters.
If you are keeping your current oven running
If your Kenmore 79040529400 is working but needs a small fix, common maintenance items include the oven light. For example, you can match the correct bulb style using the range oven light bulb 316538904.
Last updated: February 2026
How do I know what model Kenmore oven I have?
For your Kenmore electric wall oven, open the oven door and look along the interior side trim for the serial plate; it lists the model number and serial number. For model 79040529400, that plate is visible with the door open (see the 79040529400 owner's manual).
Where to find the model number on 79040529400
Check these common spots first:
- Interior side trim (left or right) with the door open (most common)
- Side trim area near the front frame opening
- Serial plate label that also lists the serial number and sometimes a lot number/letter
- Installation paperwork that came with the oven (often repeats the model)
What to write down (so you get the right parts)
When you locate the serial plate, record the details below before ordering parts or scheduling service:
- Model number (example: 79040529400)
- Serial number
- Lot number or letter (if shown)
Quick reference table
| Item on serial plate | What it’s used for | Example |
|---|---|---|
| Model number | Matches parts diagrams and compatible parts | 79040529400 |
| Serial number | Identifies production run and revisions | Varies |
| Lot number/letter | Helps narrow exact configuration | Varies |
Why it matters
Kenmore wall ovens can look similar across multiple model series, but parts like a bake element, oven temperature sensor, or control panel can differ by model and production run. Using the serial plate information helps us match the correct replacement part the first time.
Last updated: February 2026
How do I tell how old my Kenmore oven is?
To tell the age of your Kenmore wall oven model 79040529400, we use the serial number from the model and serial plate, then decode it based on the model prefix (the first three digits of the model number). This model uses the 790 prefix, so the serial format tied to that prefix determines the manufacture date.
Step 1: Find the model and serial plate
Check the model and serial plate on the oven, then write down the full serial number exactly as shown (letters and numbers).
- Look for a label that lists Model and Serial
- Common locations include the oven frame area around the door opening
- Record the serial number before cleaning or removing trim
- If the label is hard to read, take a clear photo and zoom in
For label location details specific to this oven family, use the 79040529400 owner’s manual.
Step 2: Decode the serial number using the 790 prefix
Kenmore does not use one universal date code across all models; the decoding method depends on the model prefix. For 790 models, the serial number format tied to that prefix indicates the production date.
What you typically extract from the serial number
| What you’re looking for | What it tells you | Why it helps |
|---|---|---|
| Date code portion | Month and year built | Confirms appliance age |
| Plant/sequence characters | Factory and build sequence | Helps identify the correct format |
Step 3: Confirm you are reading the correct numbers
Misreading one character can shift the decoded date.
- Treat 0 (zero) and O (letter O) carefully
- Treat 1 (one) and I (letter I) carefully
- Copy the serial number from the label, not from memory
- Use the full model number 79040529400 (not a shortened version)
Why it matters
Knowing the manufacture date helps us match the right Kenmore parts and documentation for your 79040529400 wall oven, especially for electrical items like a temperature sensor or control components where revisions can change by production run.
Last updated: February 2026
How do you reset a Kenmore 79040529400 oven?
To reset a Kenmore 79040529400 electric wall oven, turn the oven off, restore power (or cycle power at the breaker), then reset the clock and reselect your cooking function. This clears many control glitches that can happen after a power interruption; see the 79040529400 owner's manual.
Quick reset options (most common)
- Soft reset (control clear): Press STOP/CLEAR once to cancel an active cycle or clear an incorrect entry.
- Power reset (best for glitches): Turn the oven OFF, then switch the circuit breaker OFF for 1 minute, then ON.
- After power returns: Set the time of day, then reselect Bake, Broil, or other functions.
- If “Loc” shows: Cancel Oven Lockout by pressing and holding the lockout key for 3 seconds.
- If the door is locking/unlocking: Wait about 15 seconds for the motorized lock to finish before trying keys again.
Step-by-step: breaker reset (recommended)
- Press STOP/CLEAR to stop cooking.
- Turn the wall oven breaker OFF (double-pole 240V breaker).
- Wait 60 seconds.
- Turn the breaker ON.
- Set the clock, then test Bake at a normal temperature.
What you should see after a successful reset
| Situation | What it means | What to do next |
|---|---|---|
| Display returns to time of day | Control rebooted normally | Set clock, choose a cooking mode |
| “Loc” in display | Control lockout is on | Hold lockout key 3 seconds to cancel |
| Preheat light cycles on/off | Normal temperature cycling | Start cooking when preheat completes |
Why it matters
A reset restores normal operation after a power failure or control input error, and it ensures the oven does not resume cooking unexpectedly when power returns. It also helps you quickly rule out a temporary electronic control issue before checking parts.
Last updated: February 2026
How to read Kenmore model numbers?
Kenmore model numbers are read left to right; the first 3 digits identify the manufacturer source, and the remaining digits identify the specific product series and feature variations. For Kenmore wall ovens like model 79040529400, the model and serial tag is located on the interior side trim and is visible when you open the oven door (see the 79040529400 owner's manual).
Where to find the model number on 79040529400
On this Kenmore electric wall oven, the serial plate is easy to spot once the door is open.
- Open the oven door fully
- Look along the interior side trim (side frame area)
- Find the serial plate with model and serial information
- Write down the full model number and serial number exactly as shown
- Keep the information with your purchase records for parts lookup and service
How Kenmore model numbers are structured
Most Kenmore model numbers follow a consistent pattern that helps identify who built the appliance and what it is.
| Section of model number | What it tells you | Example using 79040529400 |
|---|---|---|
| First 3 digits (prefix) | Manufacturer source code | 790 = wall oven built for Kenmore by a Frigidaire/Electrolux source family |
| Remaining digits | Series, configuration, and feature variations | 40529400 = the specific wall oven version |
Why the prefix matters for parts
The 3-digit prefix helps ensure you match parts to the correct design family. That matters because Kenmore-branded ovens can be built by different manufacturers, and parts like a bake element, temperature sensor, or control panel can vary by prefix.
Tips for ordering the right parts
Use the complete model number and the serial information from the serial plate.
- Match the full model number (all digits)
- Use the serial number to confirm production run changes
- Compare the part description to your symptom (heat issue, light issue, control issue)
- For common lighting repairs, confirm the bulb type before ordering a replacement such as the range oven light bulb 316538904
Last updated: February 2026
What are the parts of an electric oven?
An electric wall oven like Kenmore model 79040529400 is built around heating elements, controls, and airflow parts that work together to cook evenly and vent heat safely. The most common parts you will see are the bake and broil elements, oven control, temperature sensor, oven light components, racks, door assembly, and venting/blower parts (on some models). See the 79040529400 owner's manual for the feature layout and operating basics.
Core electric oven parts (what they do)
- Bake element: provides the primary heat for baking (typically the lower element).
- Broil element: provides high, top-down heat for broiling.
- Electronic oven controls: clock, timer, and temperature control functions.
- Oven temperature sensor: tells the control board the actual oven temperature.
- Oven vent and trim vent outlet: releases warm air for proper air circulation.
- Cooling blower/fan (some models): helps keep internal electrical components cooler; it can run after the oven is turned off.
- Oven light system: bulb, lens/cover, and socket so you can see inside the cavity.
Common replaceable parts for model 79040529400
If you are troubleshooting a no-heat, wrong-temp, or no-light issue, these are frequent service parts for this model:
| Symptom | Most likely part area | Example part for this model |
|---|---|---|
| Oven light out | Light bulb or socket | Range oven light bulb 316538904 |
| Oven temp off | Temperature sensing | Frigidaire range oven temperature sensor 316217002 |
| Uneven or no bake heat | Heating circuit | Frigidaire range bake element 318255101 |
Why it matters
Knowing the main oven components helps you narrow down the problem faster. For example, a temperature complaint often points to the sensor or control logic, while a “no heat” complaint often points to an element, wiring connection, or power supply issue.
Quick safety and install notes we follow
- Shut off power before servicing electrical parts or replacing the oven light.
- Do not line the oven bottom with foil unless your manual specifically recommends it.
- For built-in installations, cabinet cutout dimensions and electrical requirements must match the 79040529400 installation guide.
Last updated: February 2026