Owner’s manual
 Error Codes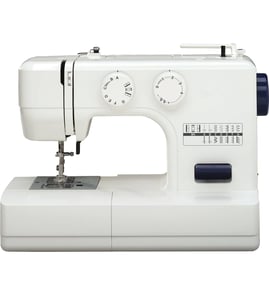

How do I know what model my sewing machine is?
The model number for your Kenmore sewing machine is printed on the nomenclature (ID) plate on the back of the machine. For Kenmore model 15813571, use that exact model number when looking up parts and the correct instructions in the owner's manual.
Where to look on the machine
Check these common spots first (with the machine turned off):
- The back of the sewing machine (most common for Kenmore)
- Near the base or lower rear housing
- Around the free arm area or underside edge (depending on cabinet/cover style)
- On a metal or foil nomenclature plate with printed text
What the model number looks like (and what to write down)
For Kenmore machines, the model number is typically a numeric string. Write it down exactly as shown.
- Record the model number (example: 15813571)
- If present, record the serial number too (often used for identification and service history)
- Copy any prefixes/suffixes exactly as printed
Quick ID checklist
| Item to record | Example | Why it matters |
|---|---|---|
| Model number | 15813571 | Ensures correct parts list and diagrams |
| Serial number | Varies | Helps distinguish production runs |
| Brand | Kenmore | Confirms the correct manual family |
Why it matters
Using the correct model number prevents ordering the wrong repair parts and helps match the right adjustments and controls (stitch width, stitch length, feed dog control, presser foot pressure) described in the manual.
If you are ordering parts
When ordering repair parts, we use the model number plus the part description (for example: motor belt, light bulb, needle threader, presser feet). The owner's manual also explains where the model plate is located and what information to provide.
Last updated: February 2026
What is a mechanical sewing machine?
A mechanical sewing machine (like the Kenmore 15813571) is a dial-and-lever style machine where you set stitch width, stitch length, and reverse stitching using physical controls instead of a digital display. It is built for straightforward, hands-on stitch selection and adjustment.
How a mechanical machine works on the Kenmore 15813571
On this model, key stitch settings are controlled with knobs and marked reference points:
- Stitch width control changes how wide a zigzag or decorative stitch is; higher numbers make a wider stitch.
- Straight stitching requires the stitch width control set to the red dot.
- Stitch length control changes stitch length based on stitches per inch; the middle range (about 10 to 12 stitches per inch) is the most commonly used.
- Reverse stitch control is used for backtacking; you hold it while sewing to feed fabric backward and lock the seam.
For the exact control locations and markings, use the owner's manual.
Mechanical vs. electronic: quick comparison
| Feature | Mechanical sewing machine | Electronic sewing machine |
|---|---|---|
| Stitch selection | Dials/knobs | Buttons/menu, often a screen |
| Adjustments | Manual, immediate | Digital, often more presets |
| Best for | Basic sewing, simple repairs, learning fundamentals | Convenience features, more automation |
Why it matters
Mechanical machines are popular because the controls are direct and predictable. When you are troubleshooting stitch quality, fabric feeding, or backtacking, you can quickly confirm settings like stitch width (red dot for straight stitch) and stitch length without navigating menus.
Good habits that help any mechanical machine sew better
We recommend these basics before you start sewing:
- Use a straight, sharp needle and match needle size to fabric and thread.
- Change needles often, especially with synthetic blends.
- Pull thread tails about 4 inches behind the presser foot before starting.
- Test stitches on a scrap of fabric (double thickness) and adjust length/width as needed.
Last updated: February 2026
Who made Kenmore 15813571 sewing machines?
Kenmore model 15813571 sewing machines were built for Sears under the Kenmore brand by a contract manufacturer, and the 158 model prefix is widely associated with Japanese-made Kenmore machines. For model identification details and service information, use the owner's manual.
How to confirm the maker on your specific machine
We recommend checking the machine itself because Kenmore sewing machines were produced by multiple factories over the years.
- Look for the nomenclature (ID) plate on the back of the sewing machine; it lists the model number and other identifying details.
- Confirm the model number reads 15813571 exactly.
- Check for any additional codes or markings near the model tag (often used for factory identification).
- Match your machine’s controls and covers to the diagrams in the manual (for example, needle plate, stitch width control, stitch length control).
- Use the model number when ordering parts or requesting service information.
What the model number tells you
Kenmore sewing machine model numbers often use a prefix that points to a manufacturing source.
| What you see | What it usually means | What to do next |
|---|---|---|
| Model starts with 158 | Commonly associated with Japanese contract-built Kenmore machines | Verify with the ID plate and manual diagrams |
| Model starts with 385 | Commonly associated with a different Kenmore production line | Use the correct manual and parts list for that prefix |
Why it matters
Knowing who built the machine helps you choose compatible items like needles, presser feet, bobbins, belts, and motor components, and it reduces mistakes when you reference diagrams or a parts list.
Last updated: February 2026
When was the Kenmore 15813571 sewing machine made?
The Kenmore 15813571 is part of Kenmore’s vintage 158-series mechanical sewing machines, which were produced primarily in the 1970s into the early 1980s. For the most accurate dating, we use the model’s manual and identification markings (model plate and any serial tag) to narrow the production run.
How to date a Kenmore 158-series machine
We recommend checking these items first:
- Confirm the exact model number on the machine’s ID plate: 158.13571 is often shown with a dot on the badge
- Look for a serial number or additional code on the underside or rear of the machine
- Compare your machine’s features and accessories (presser feet, stitch controls, needle plate style) to the diagrams in the 15813571 owner's manual
- Check whether your manual groups your machine with similar models (many Kenmore manuals cover multiple 158 variants)
- If you are restoring the machine, match replacement items by description (for example: bobbin case, needle clamp, presser foot) rather than by appearance alone
What the manual tells us (and why it matters)
The documentation for this style of Kenmore zig-zag machine shows it was published for a family of closely related models (for example, 1357/1525/1660/1947). That grouping is typical of Kenmore’s 158-era mechanical designs and helps confirm the general timeframe and parts style even when the exact build year is not printed on the cover.
Quick reference: what you can and cannot use to date it
| Item you check | What it’s good for | What it’s not good for |
|---|---|---|
| Model number (158.13571) | Identifies the correct parts family | Pinpointing an exact year by itself |
| Manual model groupings | Confirms design generation and compatible accessories | Exact manufacturing date |
| Serial number / code tag | Best way to narrow production window | Ordering parts without matching descriptions |
Why it matters
Knowing the approximate production era helps you choose compatible needles, presser feet, and common wear items (like bobbin-winder rubber rings) and avoid “almost fits” parts that cause skipped stitches, thread breaks, or timing issues.
If your machine is acting up while you’re bringing it back into service, our DIY symptom guides can help you troubleshoot common mechanical problems such as sewing machine locks up or sewing machine fabric not moving.
Last updated: February 2026
How to set tension on Kenmore 15813571 sewing machine?
On the Kenmore 15813571 sewing machine, set tension by sewing a test seam and adjusting the top thread tension control until the top and bobbin threads “lock” in the middle of the fabric layers. Make tension changes with the presser foot down; then retest.
Quick steps to dial in top thread tension
- Thread the machine correctly and install a new, correct-size needle for your fabric.
- Put the presser foot down before adjusting tension.
- Sew a test line on a double layer scrap of the same fabric.
- If the top thread lies flat on top and the stitch looks pulled tight, turn the tension control to lower numbers.
- If loops or loose top thread show on the underside, turn the tension control to higher numbers.
- Re-test after each small change until stitches look balanced.
What “balanced tension” looks like
Balanced tension means the top and bobbin threads interlock between the fabric layers, not on the top or bottom surface.
| What you see on the stitch | What it means | What to adjust |
|---|---|---|
| Threads lock on the top surface; top thread looks tight/flat | Top tension too tight | Turn top tension to lower numbers |
| Top thread shows on the underside (loopy/loose) | Top tension too loose | Turn top tension to higher numbers |
| Fabric puckers badly even when stitches look balanced | Both tensions may be too tight | Reduce top tension first; then check bobbin tension only if needed |
Bobbin tension: adjust less often
We adjust bobbin tension far less frequently than top tension. If you are getting consistent puckering or imbalance after correct threading, correct needle, and top tension tuning, then bobbin tension is the next place to check. Use the bobbin case screw in tiny increments and re-test on scrap.
Why it matters
Correct tension prevents puckering, thread breaks, skipped stitches, and uneven seams. It also helps the feed system move fabric smoothly so stitch length and zigzag width look consistent.
For diagrams of the tension control and stitch examples, follow the tension section in the owner's manual.
Last updated: February 2026