Get free shipping on your order, with any water filter subscription. Find my filter

Open Hamburger Menu
Sears Parts Direct
Tips to find your model number
KitchenAid KXD4636YSS0 30" & 36" retractable downdraft vent system

KitchenAid KXD4636YSS0 30" & 36" retractable downdraft vent system Parts

Here are the diagrams and repair parts for KitchenAid KXD4636YSS0 30" & 36" retractable downdraft vent system, as well as links to manuals and error code tables, if available.

By Schematic
SELECT DIAGRAM
?

This is the number corresponding to the part on the diagram / schematic

Browse Parts for KXD4636YSS0 30" & 36" Retractable Downdraft Vent System

  • Downdraft Vent Top Trim Clip for KitchenAid KXD4636YSS0 - Part WPW10421518

    Ventilation parts diagram

    Clip

    Part #W10421518

    Replaced by #WPW10421518

    Info Icon
    Manufacturer substitution
    This part replaces W10421518. Substitute parts can look different from the original.
    This item is not returnable
    In Stock
    $8.16
    11% OFF Phone Price : $9.16Info Icon
    Minus Item
    Qty
    Plus Item
  • Control Button for KitchenAid KXD4636YSS0 - Part WPW10681777

    Ventilation parts diagram

    Control Button

    Part #W10681777

    Replaced by #WPW10681777

    Info Icon
    Manufacturer substitution
    This part replaces W10681777. Substitute parts can look different from the original.
    In Stock
    $44.29
    12% OFF Phone Price : $50.29Info Icon
    Minus Item
    Qty
    Plus Item
  • Downdraft Vent Switch Panel Trim, 36-in (stainless) for KitchenAid KXD4636YSS0 - Part WPW10421497

    Ventilation parts diagram

    Downdraft Vent Switch Panel Trim, 36-in (stainless)

    Part #W10421497

    Replaced by #WPW10421497

    Info Icon
    Manufacturer substitution
    This part replaces W10421497. Substitute parts can look different from the original.
    In Stock
    $224.07
    5% OFF Phone Price : $236.07Info Icon
    Minus Item
    Qty
    Plus Item
  • Motor for KitchenAid KXD4636YSS0 - Part W10398274

    Ventilation parts diagram

    Motor

    Part #W10398274

    The manufacturer no longer makes this part, and there's no substitute part

  • Downdraft Vent Top Trim for KitchenAid KXD4636YSS0 - Part WPW10421498

    Ventilation parts diagram

    Decorative Trim

    Part #W10421498

    Replaced by #WPW10421498

    Info Icon
    Manufacturer substitution
    This part replaces W10421498. Substitute parts can look different from the original.
    In Stock
    $194.91
    6% OFF Phone Price : $206.91Info Icon
    Minus Item
    Qty
    Plus Item
  • Spring for KitchenAid KXD4636YSS0 - Part WPW10469579

    Ventilation parts diagram

    Spring

    Part #W10469579

    Replaced by #WPW10469579

    Info Icon
    Manufacturer substitution
    This part replaces W10469579. Substitute parts can look different from the original.
    This item is not returnable
    In Stock
    $28.93
    Minus Item
    Qty
    Plus Item
  • Screw for KitchenAid KXD4636YSS0 - Part WPW10422765

    Ventilation parts diagram

    Screw

    Part #W10422765

    Replaced by #WPW10422765

    Info Icon
    Manufacturer substitution
    This part replaces W10422765. Substitute parts can look different from the original.
    In Stock
    $48.22
    Minus Item
    Qty
    Plus Item
  • Covr-swtch for KitchenAid KXD4636YSS0 - Part W11666423

    Ventilation parts diagram

    Oven Switch

    Part #W10398343

    Replaced by #W11666423

    Info Icon
    Manufacturer substitution
    This part replaces W10398343. Substitute parts can look different from the original.
    In Stock
    $120.13
    Minus Item
    Qty
    Plus Item
  • Range Hood Vent Damper for KitchenAid KXD4636YSS0 - Part WPW10291572

    Ventilation parts diagram

    Range Hood Damper

    Part #W10291572

    Replaced by #WPW10291572

    Info Icon
    Manufacturer substitution
    This part replaces W10291572. Substitute parts can look different from the original.
    In Stock
    $120.84
    9% OFF Phone Price : $132.84Info Icon
    Minus Item
    Qty
    Plus Item
  • Downdraft Vent Installation Hardware Kit for KitchenAid KXD4636YSS0 - Part W11188522

    Ventilation parts diagram

    Hardware

    Part #W10422167

    Replaced by #W11188522

    Info Icon
    Manufacturer substitution
    This part replaces W10422167. Substitute parts can look different from the original.
    In Stock
    $102.93
    10% OFF Phone Price : $114.93Info Icon
    Minus Item
    Qty
    Plus Item

KitchenAid 30" & 36" Retractable Downdraft Vent System KXD4636YSS0 FAQs

Yes. For the KitchenAid KXD4636YSS0 retractable downdraft vent system, the venting system must terminate to the outside for proper operation; it should not exhaust into an attic or any other enclosed space (see the KXD4636YSS0 owner's manual).

What “vented outside” means for this model

The ductwork needs to carry cooking smoke, vapors, and odors from the downdraft vent to an exterior wall or roof cap.

  • Terminate the duct at an exterior wall cap or roof cap
  • Do not terminate the duct in an attic, crawlspace, or other enclosed area
  • Use heavy (rigid) metal vent for best performance
  • Keep duct length and elbows to a minimum to maintain airflow
  • Seal duct joints and the exterior opening to prevent leaks

Ducting do’s and don’ts (quick reference)

Item Recommended Avoid
Duct material Heavy (rigid) metal vent Plastic or metal foil vent
Termination point Outside (wall or roof cap) Attic or enclosed area
Elbows Up to three 90° elbows Back-to-back elbows
Wall cap style Proper vent cap 4-inch laundry-type wall caps

Why it matters

Downdraft systems rely on ducted airflow to pull smoke and odors down and out. If the duct does not vent outdoors, performance drops sharply and moisture, grease, and odors can build up in the home.

If airflow seems weak even with proper ducting, a clogged or damaged grease filter is a common cause. For this model, check and clean or replace the downdraft vent grease filter W10422877 as needed.

Last updated: January 2026

Yes, a downdraft vent can work for everyday cooking, but it is most effective when you use it the way KitchenAid designed it for model KXD4636YSS0: start the vent before cooking, use the right pan placement, and adjust blower speed to match the heat and smoke.

How to get the best performance from a downdraft vent

We see the biggest performance gains when airflow is started early and the cooking setup helps the vent “capture” smoke and steam.

  • Turn the vent on before you start cooking.
  • Use the rear, larger element/burner area for tall pots and high-smoke cooking.
  • Increase the blower speed as smoke and steam increase.
  • Expect to use a slightly higher heat setting than normal when the vent is running.
  • On gas cooktops, reduce blower speed or increase flame if the flame becomes unstable.

For the exact operating steps and usage notes for KXD4636YSS0, follow the KXD4636YSS0 owner's manual.

What “works” means for downdraft ventilation

Downdraft systems pull air sideways and down, so results depend heavily on capture and airflow. They typically perform best for:

  • Light to moderate sautéing and simmering
  • Odors and low to medium steam
  • Cooktops where an overhead hood is not practical

They are typically less effective for:

  • High-heat searing and wok cooking
  • Very tall stockpots on front burners
  • Heavy smoke events (for example, charring)

Quick comparison: downdraft vs. overhead hood

Feature Downdraft vent (like KXD4636YSS0) Overhead range hood
Best at Everyday vapors and odors near the intake Capturing rising heat, smoke, and grease
Most sensitive to Pan placement and timing Hood height and coverage
Common use case Island or open sightline kitchens Most standard cooktop installs

Why it matters

Using the vent correctly improves capture, reduces lingering odors, and helps keep grease from settling on cabinets and nearby surfaces. It also helps avoid gas flame issues by matching blower speed to burner settings.

Last updated: January 2026

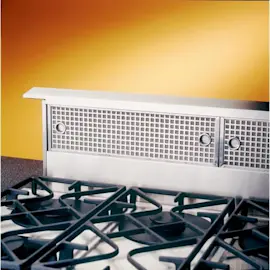
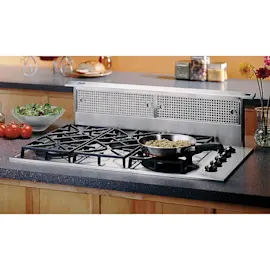
Downdraft extractors like the KitchenAid KXD4636YSS0 are ideal when you want ventilation without an overhead hood; the vent rises when needed to help remove smoke, cooking vapors, and odors. The tradeoffs are more installation planning and reduced capture with tall cookware.

Pros of a downdraft extractor

  • Saves overhead space and keeps sightlines open (great for islands and open layouts)
  • Retractable design stays out of the way when not cooking
  • Helps remove smoke, vapors, and odors from the cooktop area
  • Can be a clean, built-in look compared with a canopy hood

Cons and common limitations

  • Tall pots can reduce capture; placing large or tall utensils on the rear element/burner improves results
  • You may need a higher heat setting than normal when the vent is running
  • On gas cooktops, airflow can affect flame stability; reducing blower speed or increasing the flame setting improves performance
  • Installation is more complex; duct routing, blower configuration, and electrical connections must be planned (see the KXD4636YSS0 owner’s manual)

Quick comparison: downdraft vs. overhead hood

Feature Downdraft extractor (retractable) Overhead hood
Visual impact Low Medium to high
Best for Islands, open layouts Most kitchens
Tall cookware capture Often weaker Often stronger
Gas flame interaction Possible Less common
Install complexity Higher Varies (often simpler)

Tips to get the best performance

  • Turn the vent on before you start cooking
  • Use the rear cooking zone for tall stockpots and large pans
  • If a gas flame wavers or igniter keeps sparking, reduce blower speed or increase the flame setting
  • Keep airflow strong by cleaning the grease filter regularly; replace it if it is bent or heavily loaded (example: downdraft vent grease filter W10422877)

Why it matters

Downdraft ventilation is the right choice when an overhead hood is not practical, but performance depends on cookware height, burner placement, and keeping filters clean so the blower can move air efficiently.

Last updated: January 2026

Most common symptoms to help you fix your downdraft ventilation systems

Choose a symptom to see related downdraft vent repairs.

Main causes: lack of electrical power, up/down activation switch failure, bad vent gear motor…

Main causes: clogged grease filters, air duct problems, fan motor failure, broken blower wheel…

Main causes: electrical power failure, up/down activation switch problems, vent gear motor failure…

Main causes: fan control switch failure, bad blower fan motor, broken blower wheel, wiring failure…

Main causes: problems with the vent limit switches, up/down activation switch failure…

Most common repair guides to help fix your downdraft ventilation systems

These step-by-step repair guides will help you safely fix what’s broken on your downdraft vent.

How to replace a downdraft vent up/down switch

How to replace a downdraft vent up/down switch

The up/down switch starts the gear motor to raise and lower the air vent. Replace the up/down switch if defective.…

Repair time and Difficulty

 15 minutes or less
How to replace a downdraft vent gear motor

How to replace a downdraft vent gear motor

The gear motor raises and lowers the air vent when you push the activating switch. Replace the gear motor if defective.…

Repair time and Difficulty

 15 minutes or less
How to replace a downdraft vent fan control switch

How to replace a downdraft vent fan control switch

The fan control switch activates the blower motor and controls the fan speed. Replace the fan control switch if it's not…

Repair time and Difficulty

 15 minutes or less

Effective articles & videos to help repair your downdraft ventilation systems

Use the advice and tips in these articles to get the most out of your downdraft vent.

How to enjoy all the online benefits we offer on our Sears PartsDirect website

How to enjoy all the online benefits we offer on our Sears PartsDirect website

Learn about all the convenient features on our Sears PartsDirect website that make your parts purchases easier.…

Wiring schematic symbols explained video

Wiring schematic symbols explained video

Learn some of the most common symbols found in a wiring diagram and what they mean.…

How to use a multimeter to test electrical parts video

How to use a multimeter to test electrical parts video

Learn how to use a multimeter to check for wiring problems in an appliance that's not working…

Parts & More

Bottom-Mount Refrigerator
Cd Player
Dishwasher
Dryer
Front-Engine Lawn Tractor
Gas Chainsaw
Gas Leaf Blower
Gas Range
Gas Snowblower
Lawn Sweeper
Microwave
Range Hood
Room Air Conditioner
Side-By-Side Refrigerator
Washer
Workbench