Installation guide
 Owner’s manual
 Error Codes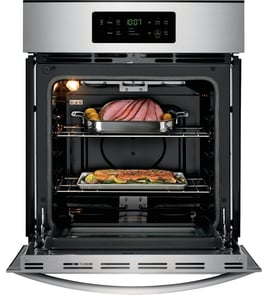

Are there 36 inch wall ovens?
Yes. 36-inch wall ovens exist, but they are less common than 24-inch, 27-inch, and 30-inch sizes. For your Kenmore Pro wall oven model 79042003601, the installation guide focuses on 30-inch class cutouts, so a true 36-inch wall-oven cabinet opening is typically a different product size category; confirm your cutout before shopping. See the 79042003601 installation guide for cutout and clearance rules.
Common wall-oven widths you will see
Most wall ovens are sold by nominal width (the cabinet opening they fit), not the exact outside measurement.
- 24-inch: compact kitchens, smaller capacity
- 27-inch: common in older homes and some premium lines
- 30-inch: most common standard size
- 36-inch: specialty size, usually higher-end and fewer model choices
What the 79042003601 installation info tells us
The installation instructions for this Kenmore Pro wall oven show 30-inch wall oven diagrams and key safety and clearance notes.
- Cutout base must support up to 300 lb (single wall oven guidance)
- Allow at least 21 inches of clearance in front for the door when open
- Cutout depth (often called “dimension G”) is critical so trim sits flush
- Do not remove side/back spacers (they center the oven and prevent heat buildup)
- These ovens are not approved for stackable or side-by-side installation
Quick sizing check before you buy
Use this checklist to avoid ordering the wrong size wall oven.
- Measure the cabinet cutout width, height, and depth (not just the old oven)
- Confirm whether you have a single or double wall-oven cutout
- Verify electrical supply (typically 208/240V junction box for built-in ovens)
- Check door swing and required front clearance
- Match the oven’s required cutout to your measurements in the 79042003601 owner’s manual
Typical comparison (nominal sizes)
| Nominal wall-oven size | Availability | Best fit for |
|---|---|---|
| 24-inch | Common | Small kitchens, condos |
| 27-inch | Moderate | Some older cutouts |
| 30-inch | Very common | Most standard cabinetry |
| 36-inch | Limited | Specialty, larger capacity |
Why it matters
A 36-inch wall oven usually requires a different cabinet opening and sometimes different electrical and support requirements. Matching the cutout dimensions first prevents installation delays and return hassles.
Last updated: February 2026
How long does an electric wall oven last?
A Kenmore Pro electric wall oven like model 79042003601 typically lasts about 16 years with normal use and basic maintenance; many units run 10 to 20 years depending on cooking frequency, cleaning habits, and how well heat and airflow are managed.
What affects wall oven lifespan most
- Heat management and ventilation: Keep the oven vent area clear so the cooling blower can do its job.
- Self-clean use: Frequent self-clean cycles add high-heat stress to wiring, controls, and door locks.
- Door seal condition: A worn gasket leaks heat, forcing longer run times.
- Electrical supply quality: Loose connections or incorrect circuit sizing can shorten component life.
- Spill control: Heavy baked-on spills increase smoke and heat load during cleaning.
Quick maintenance checklist (high impact)
- Wipe up major spills after the oven cools to reduce smoke and flare-ups during self-clean.
- Use self-clean only when needed; run the kitchen exhaust fan during the cycle.
- Confirm the oven is installed with proper clearances and support; follow the 79042003601 installation guide.
- If baking temperatures seem off, test the sensor and replace it if needed (common wear item): frigidaire range oven temperature sensor 316217002.
- If the display or controls act erratically, inspect wiring connections and consider control diagnostics using the 79042003601 owner's manual.
Typical lifespan by component (what usually fails first)
| Component | Common symptom | Typical fix |
|---|---|---|
| Temperature sensor | Overheats or underheats | Replace sensor, then verify temps |
| Control board/display | Dead display, random beeps, no heat command | Check power, wiring, then replace board if needed |
| Door seal | Heat leaks, longer preheat, uneven cooking | Replace gasket |
| Convection fan/motor | Noisy fan, poor convection | Replace motor or fan parts |
Why it matters
Knowing the expected 16-year lifespan helps you decide whether to repair or replace. If your 79042003601 is near that age and needs a major control board or door assembly, comparing repair cost to replacement value is the practical next step.
Last updated: February 2026
Can you replace the oven heating element in a Kenmore oven?
Yes. On the Kenmore Pro wall oven model 79042003601, you can replace a failed heating element (typically the bake element) by shutting off power, removing the element mounting screws, pulling the element forward to access the wires, transferring the wires to the new element, and reinstalling it. Use the 79042003601 owner's manual for model-specific access and safety steps.
Safety first (do this every time)
- Turn OFF the circuit breaker to the wall oven; confirm the display is dark.
- Let the oven cool completely before touching any internal parts.
- Avoid contact with any heating element; it can stay hot after use.
- Use work gloves; sheet metal edges inside the cavity can be sharp.
- If wiring insulation looks brittle or burned, stop and repair the wiring before installing the new part.
Basic replacement steps (bake element)
- Remove oven racks for working room.
- Remove the screws securing the element to the rear wall of the oven cavity.
- Gently pull the element toward you a few inches to expose the wire terminals.
- Disconnect the wires (hold the connector, not the wire).
- Connect wires to the new element terminals, then push excess wire back through the opening.
- Reinstall mounting screws, reinstall racks, restore power, and test Bake.
What to check if the new element still will not heat
| Symptom | Most common cause | What we check next |
|---|---|---|
| No heat in Bake, Broil works | Open bake element or loose connection | Terminal tightness, wire condition |
| Oven heats erratically | Temperature sensing issue | Frigidaire range oven temperature sensor 316217002 |
| No heat and controls act odd | Control/relay problem | Control board connections, relay board |
Why it matters
A weak or open heating element causes long preheat times, underbaking, and uneven results. Replacing the element restores normal temperature control and helps prevent overheating of wiring and connectors.
Last updated: February 2026
What does PF mean on Kenmore Elite oven?
PF on a Kenmore oven means the power supply was interrupted; on Kenmore Pro wall oven model 79042003601, the display flashes “PF” after the oven is first plugged in or after a power outage. Clear it by pressing the Clock pad, then reset the time.
How to clear PF and get the oven working again
- Press Clock once to stop “PF” from flashing.
- Use the up/down arrow (scroll) pads to set the correct time.
- Wait about 5 seconds for the control to accept the new time.
- Try Bake or Broil again after the clock is set.
- If PF returns, check for a loose plug, tripped breaker, or a flickering power source.
For the exact button names and clock-setting steps for this model, follow the 79042003601 owner's manual.
What PF usually points to (and what to check)
PF is almost always a symptom of lost power, not a failed cooking part. Start with the basics:
- House breaker: A wall oven typically uses a dedicated 120/240V (or 120/208V) circuit; a weak breaker can trip or drop power.
- Terminal connections: Loose or overheated connections can cause intermittent power loss.
- Power cord or junction box: Look for heat damage, discoloration, or a burnt smell.
- After a storm or outage: PF is normal until the clock is reset.
Quick troubleshooting guide
| What you see | What it means | What to do |
|---|---|---|
| PF flashes once after outage | Normal power interruption | Press Clock, set time |
| PF keeps coming back | Ongoing power drop | Check breaker, wiring, connections |
| Display is blank | No power to control | Verify supply voltage and connections |
If you suspect a wiring issue, shut off power before inspecting. The 79042003601 installation guide covers the required electrical supply and safe connection practices.
Why it matters
Until the clock is set, many control functions stay locked out; clearing PF restores normal operation and helps you confirm whether you have a one-time outage or an ongoing electrical problem.
Last updated: February 2026
How many watts does a Kenmore oven use?
For the Kenmore Pro wall oven model 79042003601, the exact wattage depends on the rating listed on the appliance serial plate. In general, wall ovens commonly fall in the 4,800 to 7,200 watt range at 240V, which typically uses a 30A dedicated circuit (see the 79042003601 installation guide).
Where to find the exact wattage for model 79042003601
We use the oven’s serial plate as the source of truth for wattage and electrical requirements.
- Look for the serial plate on the oven frame (often visible with the door open) or another location shown in the 79042003601 owner’s manual
- Find the wattage consumption value on that plate
- Match that wattage to the recommended breaker size in the installation requirements
- Confirm whether your home supply is 120/240V or 120/208V (both are common)
Typical circuit sizing by wattage (what the installer uses)
The installation requirements group wall ovens by wattage to select the correct circuit protection.
| Oven wattage (240V) | Recommended circuit | What it means for use |
|---|---|---|
| Less than 4,800W | 20A | Lower-power wall ovens |
| 4,800W to 7,200W | 30A | Most common range |
| 7,200W to 9,600W | 40A | Higher-power units |
| 9,600W and up | 50A | Very high output |
Why it matters
Wattage drives the breaker/fuse size, wire sizing, and safe operation. If the circuit is undersized, you can get nuisance trips, slow preheat, or overheating at connections.
If you are troubleshooting power or heating issues
If the oven is not heating correctly or you see intermittent power, check these common causes:
- Loose or overheated connections at the terminal block (a frequent failure point)
- A failing oven temperature sensor affecting temperature control
- A problem on the control board or relay board
- Incorrect supply voltage (208V can reduce heating performance vs 240V)
If you suspect a connection issue, the terminal block 5304409888 is a common replacement part for this model.
Last updated: February 2026