 Owner’s manual
 View engine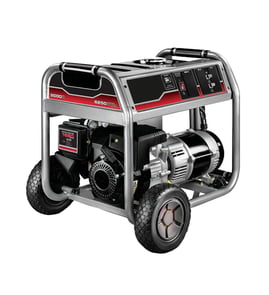




What are the most common issues with 580326301?
The most common problems we see with the Craftsman 580326301 generator are no-start or hard-start conditions, low or no AC output, and tripped breakers or dead outlets. These issues usually trace to fuel delivery, ignition/battery starting, or the output and protection components.
Common symptoms and what they usually point to
- Won’t start (recoil or electric start): stale fuel, clogged carburetor passages, fouled spark plug, low oil shutdown, weak battery
- Cranks but won’t fire: ignition/spark issue, fuel not reaching the cylinder, choke/throttle not set correctly
- Runs but no power at outlets: tripped breaker, bad receptacle, failed regulator, stator/rotor output problem
- Breaker trips under load: overloaded circuit, shorted cord/tool, failing breaker
- Intermittent power: loose wiring connections, worn receptacle contacts, failing regulator
Parts that commonly relate to these issues (for model 580326301)
If your troubleshooting points to a failed component, these model-matched parts are commonly involved:
- Snapper generator battery 193043GS (electric start problems)
- Snapper generator electric start switch 77282GS (no crank or intermittent crank)
- Generator circuit breaker, 30-amp 706178 (no output at 30A circuit or nuisance trips)
- Generac generator receptacle 68759GS (dead/loose outlet)
- Regulator 205858GS and briggs & stratton stator 194006AGS (low or no AC output)
Quick checks we recommend before replacing parts
- Turn the generator off and let it cool.
- Verify fuel is fresh and the fuel valve is on (if equipped).
- Check oil level; many units will not run if oil is low.
- Reset breakers and test with a known-good load.
- Inspect cords and plugs for heat damage or cuts.
Fast diagnosis guide
| Symptom | Most likely area | Good next step |
|---|---|---|
| No crank (electric start) | Battery, start switch, wiring | Load-test battery; inspect switch and terminals |
| Runs, no AC output | Breaker, receptacle, regulator/stator | Reset breaker; test outlet; check output per manual |
| Breaker trips | Overload/short, breaker | Reduce load; try different cord; replace breaker if weak |
Why it matters
A generator that starts but produces unstable or no power can damage connected equipment. Fixing the root cause (fuel, starting circuit, or output regulation) restores safe, usable voltage.
For model-specific operating checks and electrical test points, follow the owner's manual.
Last updated: March 2026
What is the 20/20/20 rule for generators?
The 20/20/20 rule is a generator safety reminder: run your Craftsman generator 580326301 about 20 feet from the house, let it cool for about 20 minutes before refueling, and spend about $20 on a carbon monoxide (CO) alarm. Confirm safe operation details in the 580326301 owner's manual.
How to apply it to a portable generator like 580326301
The manual’s safety guidance focuses on preventing toxic exhaust exposure and fire risk. Use the 20/20/20 rule as a quick checklist, then follow the model-specific operating and clearance instructions.
Safe setup checklist
- Operate the generator outdoors only; never in a garage, shed, RV compartment, or any enclosure.
- Keep exhaust from entering through doors, windows, soffit vents, and ventilation intakes.
- Maintain at least 5 ft of clearance on all sides (and overhead) for ventilation.
- Point the muffler and exhaust away from occupied areas; account for wind direction.
- Use heavy-duty, well-insulated extension cords rated for the amperage and length you need.
What each “20” means
| “20” item | What to do | What it prevents |
|---|---|---|
| 20 feet | Place the generator about 20 ft from the home | CO drifting into living spaces |
| 20 minutes | Wait about 20 minutes before refueling | Fuel ignition on hot surfaces |
| $20 CO alarm | Buy an affordable CO alarm and use it | Undetected CO exposure |
Why it matters
Generator exhaust contains toxic fumes, including carbon monoxide. Distance, ventilation, cooldown time, and CO detection work together to reduce the risk while you power loads through the generator’s receptacles and circuit breakers.
Last updated: January 2026
Where to check generator model number?
On a Craftsman generator like model 580326301, the model number is typically printed on the generator’s rating/ID label. We most often see that label on the frame near the control panel, on a side rail, or close to the engine area.
Common places to look on the generator
- On the control panel housing (near outlets, breakers, or switches)
- On the frame rail below the control panel
- Near the engine recoil starter or engine shroud
- On the base frame near the wheels/handle area
- On a metal or foil rating plate riveted to the frame
What the label usually includes
The ID label often lists more than just the model number. Look for fields like these:
| Label item | What it’s used for |
|---|---|
| Model number | Matching parts and manuals to your exact unit |
| Serial number | Identifying production run and service history |
| Electrical ratings | Confirming volts/amps and receptacle output |
Tips to make the number easy to read
- Wipe dust and oil off the label with a damp rag; dry it fully.
- Use a flashlight at an angle to highlight stamped or faded print.
- Take a phone photo and zoom in to confirm each digit.
- Write the number down exactly as shown (including any dashes or suffixes).
Why it matters
Using the exact model number helps us match the correct Craftsman generator parts (like a circuit breaker, stator, or start switch) and prevents ordering a look-alike part that will not fit.
For diagrams and model identification details, use the 580326301 owner's manual.
Last updated: January 2026