Installation guide
 Owner’s manual
 Error Codes



Why is my Whirlpool side by side refrigerator not making ice but water works?
When your Whirlpool WRS586FLDB00 dispenses water but won’t make ice, the most common causes are the ice maker being turned off, a kinked supply line reducing flow to the ice maker, or the unit needing time and flushing after a new install or filter change. Use the WRS586FLDB00 owner’s manual to confirm the ice maker and dispenser steps for your exact setup.
- Confirm the ice maker is turned on (some models have an on/off switch or arm).
- Make sure the refrigerator is connected to the water supply and the shutoff valve is fully open.
- Inspect the water source line behind the refrigerator for a kink; straighten it to restore flow.
- If this is a new installation or the water system was recently opened, flush the water system and wait.
- Check for ice jammed in the ejector area; a jam can stop cycling.
The manual guidance is clear: after connecting to a water source and flushing the system, allow time for production.
| Situation | What to expect | What to do |
|---|---|---|
| New installation or water line reconnected | Ice may not start right away | Wait 24 hours for ice to begin |
| Normal operation after startup | Output ramps up | Wait 72 hours for full production |
| First ice after startup | May contain impurities/air | Discard the first 3 batches |
Water can still dispense even when the ice maker side has a restriction or a component issue.
- If cubes are small or hollow, suspect restricted flow or low pressure.
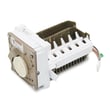
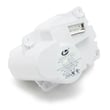
- If the ice maker never cycles, the ice maker assembly can be the failure point; for this model, see the refrigerator ice maker assembly WPW10251076.
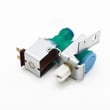
- If you suspect a fill problem to the ice maker, a valve can be involved; for this model, see the refrigerator water inlet valve WPW10341320.
Ice makers need consistent water flow and enough time to freeze and harvest. A kinked line, an “off” setting, or trapped air after installation can stop ice production even while the water dispenser still seems normal.
Last updated: January 2026
How wide is a 24.5 cu ft refrigerator?
Most 24.5 cu. ft. refrigerators are built around a 36-inch class cabinet, and the Whirlpool WRS586FLDB00 installation requirements call for a 36 in (91.44 cm) minimum cabinet cut-out width. For the exact fit in your kitchen, we recommend measuring your opening and comparing it to the clearances in the WRS586FLDB00 installation guide.
Refrigerator width can be described a few different ways. For a correct fit, we measure all of these:
- Cabinet opening (cut-out) width: the space between cabinets or walls
- Refrigerator case width: the body of the refrigerator (often slightly under 36 inches on “36-inch” models)
- Door swing clearance: extra space needed so doors open fully
- Side and top ventilation clearance: space for airflow around the cabinet
Based on the installation information for this model:
| Fit item | What to plan for | Why it matters |
|---|---|---|
| Minimum cabinet cut-out width | 36 in | Allows the refrigerator to slide into the opening |
| Side and top ventilation | 1/2 in each side and top | Helps cooling performance and efficiency |
| Rear clearance | 1 in behind | Provides airflow and room for connections |
| Door swing next to a fixed wall | 2 in minimum on each side (varies by setup) | Prevents doors from binding and improves access |
If the refrigerator sits against an extended wall and you want to remove the crisper pans easily, the guidance calls for more cabinet opening width (a wider opening is recommended in that situation).
A refrigerator that is “36-inch wide” on paper can still rub cabinets, trap heat, or limit drawer removal if the opening is tight. Planning for cabinet cut-out width plus door swing and ventilation clearances prevents installation headaches and cooling problems.
Last updated: January 2026
Is side by side or bottom freezer better?
A bottom-freezer refrigerator is typically better for everyday convenience because fresh food sits at eye level and you bend less. A side-by-side like the Whirlpool WRS586FLDB00 is often better when you want easy access to frozen foods and a narrower door swing in tight kitchens.
- Choose bottom freezer if you want the most-used items (fresh food) easiest to reach.
- Choose side-by-side if you want equal access to fridge and freezer and better fit in narrow spaces.
- Choose based on your habits: fresh-food heavy vs frozen-food heavy.
| Feature | Side-by-side (WRS586FLDB00 style) | Bottom freezer |
|---|---|---|
| Fresh food access | Good, but shelves can be narrower | Best, most items at eye level |
| Freezer access | Very convenient, more organized | Convenient, but often requires bending |
| Door swing clearance | Usually better in tight aisles | Often needs more clearance |
| Large/wide items | Can be harder to fit (pizza boxes, platters) | Often easier to fit |
- Kitchen layout: Side-by-side doors are narrower, so they work well when an island or wall is close.
- Storage style: Side-by-side gives more vertical freezer shelving; bottom freezer often gives deeper bins.
- Ergonomics: Bottom freezer reduces bending for fresh food, which most households use most often.
- Ice and water use: Many side-by-sides include in-door dispensing; keeping the water system maintained helps performance.
- Keep air vents clear so cold air can circulate; blocked vents can cause uneven temperatures.
- Minimize long door openings to reduce temperature swings and moisture.
- If you have dispenser or ice issues, start with basic water supply checks and filtration maintenance.
- For model-specific features and storage guidance, use the WRS586FLDB00 owner’s manual.
- For water and ice maintenance best practices, see how to prevent water dispenser and ice maker problems.
The “better” style is the one that matches how you cook, shop, and move in your kitchen. Choosing the right layout reduces food waste (better organization), improves comfort (less bending), and helps your refrigerator run more efficiently.
Last updated: January 2026
How to reset ice maker whirlpool side by side?
On the Whirlpool WRS586FLDB00 side-by-side refrigerator, the most reliable “reset” is to turn the ice maker OFF, then ON again using the built-in control (switch or wire shutoff arm, depending on ice maker style). This restarts ice production without forcing the mechanism.
Use the method that matches what you see in your freezer door.
- Style 1 (On/Off switch behind the ice bin):
- Remove the ice storage bin to access the switch.
- Slide the ice maker control to OFF (right).
- Wait 30 to 60 seconds.
- Slide the control back to ON (left).
- Reinstall the bin until the release lever clicks.
- Style 2 (wire shutoff arm):
- Lift the wire shutoff arm until it clicks into OFF (arm up).
- Wait 30 to 60 seconds.
- Lower the arm to ON (down).
- Make sure the freezer door closes tightly.
For diagrams and the exact bin removal steps for WRS586FLDB00, use the WRS586FLDB00 owner's manual.
- Confirm the ice storage bin is fully seated; the dispenser may not work if it is not pushed in all the way.
- Do not force the wire shutoff arm up or down.
- If the bin is out or the door is open, the sensor cover (“flipper door”) can stop ice production.
- If cubes are clumped, separate them with a plastic utensil (never use anything sharp).
- Clean the ice delivery chute and bin; empty and clean about every 2 weeks to reduce clogs and odors.
If ice stops dispensing after holding the dispenser pad too long, wait a few minutes; the dispenser can pause and then reset itself.
| Symptom | What to do | Why it helps |
|---|---|---|
| Ice clumps or jams | Switch from crushed to cubed briefly, then clear clumps | Clears the chute and reduces re-jamming |
| Slow ice or water flow | Check for a clogged filter or low water pressure | Poor flow prevents proper filling |
| No ice after bin removal | Reinstall bin and close door firmly | Sensors stop production when “open” |
Resetting by cycling the ice maker control protects the ice container and dispenser mechanism, and it helps you avoid damage that can happen when you pry at stuck ice.
Last updated: January 2026