Owner’s manual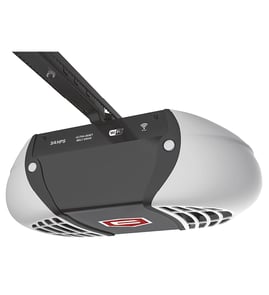

How do I know what model my garage door opener is?
Your Craftsman garage door opener’s model number is printed on a label on the powerhead (the motor unit mounted to the ceiling). On many units, you can find it under a light lens cover; once you locate it, match that number to the correct parts list and instructions in the owner's manual.
Where to look on the opener
Check these common label locations on the powerhead:
- Under the front light lens cover
- Under the left light lens cover (when you are facing the garage door)
- On the side panel opposite the hanging antenna wire
- On the end panel near the wiring terminals or control buttons
What the model number looks like
A model number is usually a mix of numbers and letters. For this page, the model is 13953650SRT.
| What you see | What it means | What to do next |
|---|---|---|
| 13953650SRT | Full model number | Use it to match parts and troubleshooting steps |
| Serial number | Manufacturing identifier | Keep it for records, but use the model number for parts |
| FCC ID | Radio compliance ID | Not used for parts lookup |
Why it matters
Using the exact model number helps us point you to the right wiring diagrams, remote programming steps, and troubleshooting procedures (especially for wall control, safety sensors, and remote range issues).
Helpful next steps after you find it
- Compare the label to the model shown on this page: 13953650SRT
- Use the troubleshooting section in the owner's manual for symptoms like “remote works but wall control doesn’t”
- If you see diagnostic flashes or error indicators, use Craftsman error codes to narrow down the failure
- Record the model number and keep it near your garage door opener for future reference
Last updated: February 2026
How to find a compatible garage door opener?
To find a compatible garage door opener or accessory for your Craftsman model 13953650SRT, we match the opener’s learn button type, remote style, and programming method shown in the owner's manual. This model is an SRT series opener that learns remotes through the “SRT” (learn) button on the back panel.
Identify what you are trying to make compatible
Compatibility depends on whether you are replacing the whole opener or adding an accessory.
- Remote control (handheld transmitter)
- Keyless entry keypad
- Wall control (door control button)
- Safety sensors (photo eyes)
- Smart control add-on (if applicable to your setup)
What we know for model 13953650SRT (SRT series)
The manual describes this opener as an SRT series unit that programs accessories using the SRT (learn) button.
Remote and keypad capacity (typical for this model)
| Accessory type | What to check | What the manual indicates |
|---|---|---|
| Portable remotes | Learn button programming | Works with up to four SRT portable remotes |
| Keyless entry | Learn button + Enter button | Works with one Multi-Function Keyless Entry |
Quick compatibility checklist (before you buy)
Use this list to avoid ordering the wrong remote/keypad.
- Confirm the opener is Craftsman 13953650SRT (label on the motor head).
- Confirm it has an “SRT” (learn) button on the back panel.
- Decide if you need a remote or a keyless entry (they program differently).
- If you are adding a new button on an existing 3-function remote, plan to erase and reprogram all remotes.
- If you see diagnostic flashes or behavior that suggests a fault, check Craftsman error codes first.
Why it matters
Using the wrong remote technology (or programming method) leads to “won’t learn” symptoms that look like a bad receiver. Matching the SRT learn-button programming method keeps setup simple and avoids unnecessary parts swapping.
Last updated: February 2026
Is it cheaper to repair or replace a garage door opener?
Repair is cheaper for a Craftsman garage door opener like model 13953650SRT when the problem is a simple adjustment or a small electrical/control issue; replacement is the better value when the opener has repeated failures, the motor/drive system is worn, or repair costs start approaching the price of a new unit. For model-specific adjustment and safety steps, use the 13953650SRT owner's manual.
Quick decision guide (repair vs replace)
- Repair when the door is basically sound and you need:
- Limit or force adjustments
- Safety sensor alignment/cleaning
- Wall control or remote troubleshooting
- Wiring connection checks (with power disconnected)
- Replace when you have:
- Frequent breakdowns or intermittent operation
- Major drive or motor problems
- Safety reverse problems that return after correct adjustments
- An opener that is past its typical service life
Typical costs and what they usually mean
Costs vary by area, but these ranges help you decide:
| Item | Typical cost range | Best fit when |
|---|---|---|
| Basic service call and minor repair | $100 to $250 | Adjustments, sensors, controls |
| Moderate repair | $250 to $500 | Electrical or mechanical issues that are still isolated |
| New opener (unit only) | $200 to $600+ | You want a fresh start or modern features |
| New opener (installed) | $400 to $1,000+ | You want turnkey replacement |
Checks to do before spending money
These are common, high-impact checks that often restore operation without major parts:
- Run the safety reverse test (the manual describes using a 1-inch board/2x4 laid flat) and re-test after any adjustment.
- Verify the door is balanced and lubricated; an unbalanced door can prevent proper reversing and can make the opener act “weak.”
- Review limit and force settings; weather and seasonal changes can require re-adjustment.
- Disconnect power before removing covers or servicing wiring.
For symptom-based troubleshooting (blinking lights, diagnostic patterns, etc.), use Craftsman error codes.
Why it matters
A garage door opener that is out of adjustment or paired with a poorly balanced door can fail the safety reverse system. That increases the risk of property damage and injury, and it often leads to repeat service calls if the underlying door hardware issue is not corrected first.
Last updated: February 2026
How to find out garage door opener type?
For Craftsman model 13953650SRT, the quickest way to identify the opener type is to check the opener’s back panel for the “SRT” (learn) button and indicator light. That “SRT” label identifies it as an SRT series opener and determines which remotes and programming steps it uses (see the owner's manual).
Where to look to identify the opener type
Check these common ID points on the powerhead (motor unit) mounted to the ceiling:
- Back panel: look for the “SRT” (learn) button and an indicator light
- Model label: confirm the model number 13953650SRT on the rating/ID sticker
- Wall control: note whether you have a basic door control button or a multi-function control console
- Remote style: many SRT units use a 3-function remote control
- Safety sensors: confirm photo-eye safety reversing sensors are installed and aligned
What “SRT” changes (programming and compatibility)
If your opener has the “SRT” learn button, it uses SRT programming steps:
- To add a remote: press and hold the chosen remote button, then press and release the SRT (learn) button; the opener light flashes once, then release the remote button.
- To erase all remote codes: press and hold the SRT button until the indicator light turns off (about 6 seconds), then reprogram each remote.
| What you’re identifying | What to look for | What it tells you |
|---|---|---|
| Opener type/series | “SRT” learn button on back panel | SRT series programming method |
| Remote setup method | Learn button + light flash confirmation | How to add/erase remotes |
| Door requirements | Balanced door, no binding/sticking | Prevents false reversals and strain |
Why it matters
Using the correct opener type prevents wasted time when programming remotes, setting up keyless entry, or troubleshooting issues like a door that will not close. It also helps you follow the right safety and adjustment steps for your specific Craftsman system.
Safety notes before troubleshooting
Garage doors and hardware are under extreme tension. Before you adjust anything:
- Remove any ropes attached to the door
- Disable door locks so the opener is not fighting a locked door
- Test door balance (door should stay at mid-travel when released)
- Keep children away from wall controls and remotes
For error or diagnostic light patterns, use our Craftsman error codes reference.
Last updated: February 2026
What are the common problems with Craftsman garage door openers?
Common problems on a Craftsman garage door opener like model 13953650SRT are power or control issues (won’t run from wall control or remote), safety reversing sensor problems (door won’t close), and travel or force issues (door won’t open fully). Our owner's manual troubleshooting chart covers these symptoms and the fastest checks.
Most common symptoms and what they usually mean
- Opener won’t operate from wall control or remote: outlet has no power, a door lock is engaged, the door is frozen to the floor, or the motor overload protector tripped.
- Remote has short range: antenna is not hanging down fully, remote location in the vehicle is poor, or metal doors and foil-backed insulation are reducing signal.
- Door won’t close: safety reversing sensors are blocked or misaligned.
- Door won’t open completely: travel limits or up-force need adjustment.
- Motor hums briefly then stops: door is locked, springs are broken, or the drive system is out of phase after chain removal and reinstall.
- Opener is noisy: vibration transfer into framing, loose hardware, or dry moving points.
Quick checks we recommend before replacing parts
- Confirm power: plug a lamp into the opener outlet; reset the breaker if needed.
- Disable door locks: a locked door can make the opener act “dead” or hum.
- Check the safety sensors: clear obstructions and align the sensor “eyes.”
- Test door balance (important): pull the emergency release and move the door by hand; it should stay at mid-travel when properly balanced.
- Let the motor cool: if it stopped after repeated cycles, wait about 15 minutes and try again.
Symptom-to-fix guide
| Symptom | Most likely cause | Best next step |
|---|---|---|
| No response from wall control or remote | No power, lock engaged, overload tripped | Verify outlet power; wait 15 minutes; unlock door |
| Door won’t close | Sensor blocked/misaligned | Clean and align sensors |
| Short remote range | Antenna position, interference | Extend antenna downward; re-check remote position |
| Hums then stops | Locked door, spring issue | Unlock door; do a manual balance test |
Why it matters
Most “opener problems” are actually door, sensor, or power issues. Fixing those first prevents unnecessary force adjustments and reduces wear on the drive system and motor.
For diagnostic light patterns and model-specific troubleshooting steps, use Craftsman error codes.
Last updated: February 2026