
Can the blades on an electric hedge trimmer be replaced?
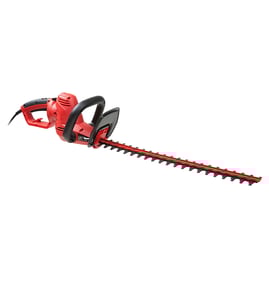
Yes. On the Black & Decker TR1700 hedge trimmer, the blade set is typically replaceable as an assembly; you remove the fasteners that hold the cutter bar to the gearbox/housing, then install the correct replacement blade set and recheck safe operation before trimming.
Before you start (safety and setup)
- Unplug the corded trimmer before touching the blade area.
- Wear cut-resistant gloves; the teeth can cut even when the tool is off.
- Clean off sap and debris so fasteners and the blade rail are visible.
- Take a quick photo of the blade stack and spacers so you can reassemble correctly.
Basic blade replacement overview
Most electric hedge trimmers follow the same process:
- Remove the blade cover/guard (if equipped).
- Remove the screws/bolts securing the blade assembly to the housing.
- Separate the blade assembly carefully; note any washers, spacers, or guides.
- Inspect the drive area (eccentric, crank, or gear linkage) for cracks or stripped teeth.
- Install the new blade assembly, tightening fasteners evenly.
- Verify the blade moves freely by hand (with power disconnected) before plugging in.
What to check while it’s apart
| Checkpoint | What you’re looking for | What it affects |
|---|---|---|
| Blade rail and teeth | bends, chips, heavy rust | cut quality and vibration |
| Blade guides/spacers | missing, worn, misaligned | binding and overheating |
| Gearbox/drive link | damage, looseness, metal shavings | noise, no-move symptoms |
| Fasteners | stripped heads, loose threads | safety and alignment |
Why it matters
A bent or binding blade set can overload the motor and gearbox, causing poor cutting, excess heat, and premature failure. Replacing the blade assembly and correcting alignment restores cutting performance and helps protect the drive components.
Getting the right replacement blade
Use your exact model number TR1700 when searching so you match the correct Type 1 configuration. Start with the parts list for this model, or search by model on Sears PartsDirect.
Helpful DIY reference
If you need to troubleshoot a “won’t run” condition after a blade strike, use a meter to confirm power through the switch and cord: how to use a multimeter to test electrical parts video.
Last updated: February 2026
Can you spray WD-40 on hedge trimmer blades?
Yes. For your Black & DECKER TR1700 hedge trimmer, we use WD-40 as a cleaner and rust inhibitor on the blades, not as the main long-term lubricant. It helps loosen sap and moisture, but a light machine oil or blade spray is better for ongoing cutting performance.
Best way to use WD-40 on hedge trimmer blades
- Unplug the trimmer (corded) or remove the battery (cordless) before touching the blades.
- Brush off clippings, then wipe the blade teeth with a rag.
- Spray a light coat of WD-40 on both sides of the blade bar.
- Run the trimmer for 5 to 10 seconds to distribute it, then wipe off excess.
- Follow with a few drops of light oil on the blade teeth for longer-lasting lubrication.
When WD-40 is a good choice (and when it is not)
| Task | WD-40 works well | Better option |
|---|---|---|
| Remove sap, pitch, and grime | Yes | Degreaser plus wipe-down |
| Prevent rust after cleaning | Yes | Light oil film for storage |
| Long-term blade lubrication | No | Clipper oil, light machine oil, or blade lubricant spray |
| Dusty, sandy trimming conditions | Limited (can attract debris) | Dry wipe-down plus light oil only |
Why it matters
Clean, lightly lubricated blades cut cooler and smoother, which reduces motor load and helps prevent premature wear on the blade bar, gears, and drive components.
Parts and help
If your TR1700 starts cutting poorly even after cleaning and oiling, inspect for bent teeth, loose fasteners, or a damaged blade bar. We also recommend confirming the exact model identification before ordering any replacement items; how to find your appliance model number (and what it means for parts) helps you match parts correctly. For broader parts lookup by model, use Sears PartsDirect.
Last updated: February 2026
Is it worth repairing a hedge trimmer?
Yes, repairing a Black & Decker TR1700 hedge trimmer is worth it when the problem is simple (dull blades, loose hardware, damaged cord, dirty vents) and the tool is otherwise in good shape; replace it when the motor, gearbox, or internal electricals are failing or the repair cost approaches the price of a new trimmer.
Quick decision checklist
- Repair if it runs but cuts poorly after cleaning and sharpening.
- Repair if it will not start due to a basic power issue (outlet, extension cord, cord damage).
- Repair if it is vibrating because of loose screws, a bent tooth, or debris in the blade set.
- Replace if it smells like burning, trips breakers repeatedly, or has heavy sparking.
- Replace if the blade drive/gearbox is grinding loudly or the blades will not move under load.
What to check first (fast troubleshooting)
- Power and cord: Confirm the outlet works; inspect the cord for cuts, crushed spots, or a loose strain relief.
- Blade condition: Clean sap and debris; sharpen and lightly deburr the cutting edges.
- Mechanical drag: With the trimmer unplugged, check for jammed twigs and verify the blades slide freely.
- Overheating: Clear vents and remove packed debris around the motor housing.
Repair vs replace: typical cost and effort
| Symptom | Most common cause | Typical fix | Usually worth it? |
|---|---|---|---|
| Cuts poorly | Dull or dirty blades | Clean, sharpen, lubricate | Yes |
| Loud vibration | Loose fasteners, bent blade tooth | Tighten, clean, inspect blades | Yes |
| Will not start | Cord/outlet issue, switch issue | Inspect cord, test switch | Often |
| Grinding noise | Worn gears/drive | Internal drive repair | Often no |
Why it matters
A hedge trimmer that vibrates, overheats, or binds can damage the blade drive and motor quickly. Catching simple issues early (cleaning, sharpening, cord inspection) extends tool life and improves cut quality.
Parts and model matching
For TR1700 repairs, match parts by the full model identification (including TYPE) before ordering. We list model-specific parts on the TR1700 parts page, and you can also search by model number on Sears PartsDirect. For model ID help, use how to find your appliance model number (and what it means for parts).
Last updated: February 2026
Can you sharpen a Black and Decker electric hedge trimmer?
Yes. You can sharpen the cutting blades on a Black & Decker TR1700 hedge trimmer as long as the blades are not bent, cracked, or missing teeth. A light touch-up restores cutting performance; severely damaged blades should be replaced instead of sharpened.
Safety first (before you touch the blades)
- Unplug the trimmer (corded) or remove the battery (cordless) before servicing.
- Wear cut-resistant gloves and eye protection.
- Clamp the trimmer or the blade bar securely to a bench so it cannot move.
- Keep your hands behind the cutting edge at all times.
- Clean off sap and debris first so you can see the cutting edges clearly.
How we sharpen an electric hedge trimmer blade
- Clean the blades: Wipe off sap, then dry.
- Inspect: If you see cracks, heavy nicks, or bent sections, do not sharpen; replace the blade set.
- Match the factory bevel: Most hedge trimmer teeth have a single bevel; sharpen only that beveled face.
- Use the right tool: A flat mill file works well for hand sharpening; a rotary tool can work if used gently.
- File each tooth evenly: Use smooth strokes in one direction, keeping the same angle on every tooth.
- Deburr lightly: Remove any burrs carefully so the blades slide smoothly.
- Lubricate: Apply a light coat of blade oil and run the trimmer briefly to distribute it.
Quick check: sharpen vs. replace
| Condition | What we recommend | Why |
|---|---|---|
| Dull but teeth are intact | Sharpen | Restores cut quality with minimal material removal |
| Small nicks on a few teeth | Light sharpening | Prevents snagging and tearing |
| Bent blade bar, cracks, missing teeth | Replace blade set | Sharpening will not correct unsafe damage |
Why it matters
Sharp blades reduce motor load, improve cut quality, and help prevent overheating on your Black & Decker TR1700. Keeping the blade set clean and lubricated also slows wear on the gear drive and reciprocating mechanism.
Parts and model help
If you decide the blade set or internal components need replacement, use your TR1700 model number to match the correct diagrams and parts list, then search by model on Sears PartsDirect. For model ID tips, use how to find your appliance model number (and what it means for parts).
Last updated: February 2026