Installation guide
 Owner’s manual
 Error Codes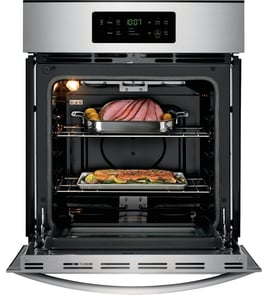




How to find wall oven model number?
For Kenmore wall oven model 79048733900, the model and serial number are printed on the serial plate located along the interior side trim and visible when you open the oven door. Use that full model number when ordering parts or checking installation requirements in the 79048733900 owner’s manual.
Where to look on the oven
Check these common locations in this order:
- Open the oven door and look along the interior side trim for the serial plate
- For double-oven setups, check the lower oven interior side trim first
- Use a flashlight and look for a metal or foil label with Model and Serial fields
- Write down the model number, serial number, and any lot number/letter shown
What the serial plate looks like (what to copy)
The label typically includes:
- Model number (example format: 790.XXXXXXX)
- Serial number
- Lot number or letter (often used for parts lookups)
| Item to record | Why it matters |
|---|---|
| Model number | Ensures parts match your exact wall oven configuration |
| Serial number | Helps confirm production details for correct replacement parts |
| Lot number/letter (if shown) | Can narrow down part variations within the same model |
Why it matters
Kenmore wall ovens can share similar styling across multiple models, but internal parts like the bake element, temperature sensor, wiring harness, and control components can differ. Using the exact model number from the serial plate helps us match the correct parts and documentation the first time.
Last updated: January 2026
Are all 30 inch wall ovens the same size?
No. “30-inch” is a category, not an exact measurement. For the Kenmore 79048733900 wall oven, the installation guide shows a 30-inch nominal width, but the actual oven and cabinet cutout dimensions vary by brand and model, so you must measure your opening and compare it to the specs in the 79048733900 installation guide.
What “30-inch” usually means (and what varies)
Most 30-inch wall ovens are designed to fit a 30-inch cabinet opening, but these dimensions commonly differ:
- Cutout width (the cabinet opening)
- Cutout height (single vs. double oven)
- Cutout depth (critical for trim to sit flush)
- Overall oven width/height/depth (the appliance itself)
- Clearance needs (door swing and airflow)
Typical 30-inch single wall oven sizing (what to compare)
Use this as a quick checklist when swapping a wall oven. Then confirm the exact numbers in the 79048733900 installation guide.
| Dimension type | Typical for “30-inch” class | Why it can differ |
|---|---|---|
| Cutout width | About 28 1/2 in. to 29 in. | Trim style and side clearances vary |
| Cutout height (single) | About 27 1/4 in. | Control panel and trim height vary |
| Cutout depth | About 23 1/2 in. minimum | Needed so the oven sits correctly and trim meets cabinet |
Why it matters
If the cutout is even slightly off, the oven trim may not sit tight to the cabinet, the unit may not center correctly, or you may end up forcing the fit. That can lead to poor airflow and overheating around the cabinet opening.
Installation notes we recommend following
These points help prevent fit and heat issues during replacement:
- Keep the oven centered in the opening (spacers, if equipped, help with this)
- Plan for door clearance; allow about 21 inches in front for the door when open
- Confirm the cabinet base can support the oven weight (30-inch models are typically heavier)
- Treat cutout depth as a must-match dimension
- Follow junction box placement and electrical routing guidance for your setup
Last updated: January 2026
How do I reset a Kenmore oven?
To reset your Kenmore wall oven model 79048733900, turn the oven OFF, then restore power (or wait for power to return) and reset the clock and oven function. This clears most control glitches and gets normal Bake and Broil operation back on track; see the 79048733900 owner's manual.
Quick reset options (most common)
- Power reset: Switch the oven circuit breaker OFF for 1 minute, then ON.
- Cancel a cooking mode: Press Cancel/Off to stop Bake, Broil, or Timer functions.
- After a power outage: Turn the oven OFF; when power resumes, reset the clock and reselect the cooking mode.
- Unlock the controls (if locked): Press and hold the Oven Lockout pad for about 3 seconds until the lock indicator clears.
What “reset” does (and does not do)
| Reset type | What it fixes | What it will not fix |
|---|---|---|
| Breaker power reset | Frozen keypad, blank or stuck display, random beeps | Failed bake element, bad sensor, wiring damage |
| Cancel/Off | Wrong mode selected, accidental programming | Temperature calibration issues |
| Lockout toggle | “Loc” or door locked behavior | Heating problems |
If the oven still will not heat after a reset
These checks help separate a control issue from a heating or sensor problem:
- Confirm the display is set to BAKE and a temperature is selected.
- Wait a few minutes; some ovens delay element energizing during preheat.
- If baking is uneven or consistently off, use the thermostat adjustment steps in the 79048733900 owner's manual.
- If the oven overheats, underheats, or throws temperature-related errors, the oven temperature sensor is a common suspect; see frigidaire range oven temperature sensor 316217002 and the guide how to replace a temperature sensor on an electric wall oven.
Why it matters
A proper reset restores safe, predictable operation after a power interruption and clears minor electronic glitches. If symptoms return quickly, focusing on the temperature sensor, bake element, or wiring harness prevents repeat shutdowns and poor baking results.
Last updated: January 2026