How to replace a temperature sensor on an electric wall oven

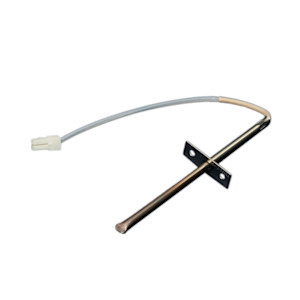
This step-by-step repair guide shows how to replace the temperature sensor on an electric wall oven. The sensor measures the oven temperature and sends that data to the oven control board, which maintains the set oven temperature. If the temperature sensor malfunctions, the oven becomes too hot or won't get hot enough. If the temperature sensor fails completely, the control panel displays an error code. Replace the oven temperature sensor using a manufacturer-approved replacement part.
The video below shows an electric range, but the basic repair is the same. Use this procedure to replace the oven temperature sensor in many Kenmore, Frigidaire, Whirlpool, KitchenAid, Maytag, Amana, Electrolux, GE, LG and Samsung electric wall ovens.
Instructions
- 01.
Shut off power to the oven
Shut off all electricity to the oven.
Warning: Electric ovens and ranges typically have 2 house fuses or a double breaker, one for each 120-volt leg of the 240-volt power. To prevent electrical shock and damage to the control board, remove both fuses or shut off both breakers (if a clip connects the double breakers, shutting off one should shut off both). - 02.
Remove the mounting screws
Remove the oven racks. Find the temperature sensor probe in the top left corner of the back wall of the oven interior. Using a 1/4-inch nut driver, remove the 2 hex head screws from the base of the temperature sensor probe.
Tip: If you can't complete this repair because the door gets in your way, remove the door, following instructions in your owner's manual. You might need help lifting the door off the oven. Set the door on a pad. - 03.
Access the wire connector
Carefully pull the oven temperature sensor probe forward into the oven interior. The wires connected to the probe have enough slack that you can pull it a just few inches—far enough to disconnect the wires. As you pull, use needle-nose pliers to guide the wire harness connector through the hole in the oven wall.
Tip: If you cannot feed the connector into the oven, check your owner’s manual for how to pull the oven from the cabinet. Remove the exterior back panel to access the plug. - 04.
Disconnect the wire harness
Holding the connector with needle-nose pliers, depress the locking tab on the plug and disconnect the plug from the sensor probe. Don't let the connector slip back through the hole, or you must remove the back panel of the oven to retrieve it.
- 05.
Install the new temperature sensor probe
While holding the connector with a pair of needle-nose pliers, snap it into the plug of the new probe.
Push the wire into back wall of the oven. Position the new sensor probe and line up the holes for the mounting screws. Insert the mounting screws and tighten firmly using a nut driver.
Tip: If the plug doesn't fit the original wire harness connector, use a wire cutter to snip off the plug and the wire harness connector. Strip the 1/2" of insulation from the wires and make the connection with ceramic wire nuts. - 06.
Restore power
Turn on the electricity to the wall oven.
Most common symptoms to help you fix your wall oven
Choose a symptom to see related wall oven repairs.
Main causes: bad oven door lock assembly, faulty electronic control board, wiring failure…
Main causes: broken bake element, bad bake burner igniter, tripped thermal switch, control system failure…
Main causes: faulty oven temperature sensor, control system problem, weak burner igniter, damaged oven element…
Main causes: lack of gas supply, broken igniter, tripped circuit breaker, broken oven element, tripped thermal fuse, con…
Main causes: lack of electrical power, bad electronic control board, faulty oven control thermostat…
Main causes: broken broil element, faulty broil burner igniter, control system failure…
Most common repair guides to help fix your wall oven
These step-by-step repair guides will help you safely fix what’s broken on your wall oven.

How to replace a wall oven thermal fuse
The thermal fuse trips to prevent the over from excessively overheating. The oven won't heat again until you replace the…

How to replace a wall oven control thermostat
Get your oven temperature under your control by replacing a faulty oven control thermostat.…

How to replace wall oven door hinges
If your oven door flops open fast, it's time to replace the hinges. Follow these step-by-step instructions to do it your…
Effective articles & videos to help repair your wall oven
Use the advice and tips in these articles and videos to get the most out of your wall oven.

Get tips on completing essential holiday cleaning tasks to brighten your home.…

Learn about all the convenient features on our Sears PartsDirect website that make your parts purchases easier.…

Get answers to frequently asked questions about Sears and Sears PartsDirect.…
