Installation guide
 Owner’s manual
 Error Codes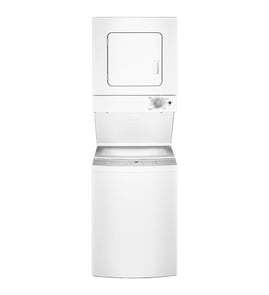







Does Kenmore make a stackable washer/dryer?
Yes. Kenmore makes stackable washer and dryer options, including stacked laundry centers like model 41790812992, where the washer and dryer are built as one vertical unit to save floor space. For installation clearances and hookups, use the 41790812992 installation guide.
What “stackable” means for Kenmore laundry
Kenmore laundry can be “stackable” in two common ways:
- Stacked laundry center: factory-stacked, one-piece unit (like Kenmore 41790812992)
- Stacked pair: separate washer and dryer stacked with a manufacturer stacking kit (varies by model)
- Side-by-side: separate units placed next to each other (not stacked)
How to confirm what you have (or what will fit)
Use these quick checks before buying parts or planning an install:
- Look for the model tag and match it to 41790812992
- Confirm you have a 240-volt electric dryer connection available (common for electric laundry centers)
- Verify the space allows the dryer door to fully open
- Confirm water supply and drain setup meets requirements
- Check venting path and length for safe dryer exhaust
Key installation requirements to plan around
The installation instructions for this Kenmore laundry center call out common rough-in needs.
| Item | Typical requirement for this unit type | What to verify at home |
|---|---|---|
| Electrical | 240V for electric dryer | Correct outlet and circuit |
| Drain height | 33 to 96 inches from washer bottom | Standpipe or laundry tub height |
| Drain capacity | Must carry away water fast enough | No slow drain or backups |
| Location | Indoors, protected from weather | No outdoor or exposed install |
For exact dimensions and spacing guidance, follow the 41790812992 installation guide and the 41790812992 owner's manual.
Why it matters
“Stackable” affects everything from closet clearances to venting, drain height, and electrical supply. Matching the correct Kenmore configuration helps prevent install problems and ensures you order the right parts for your laundry center.
Last updated: February 2026
How to remove front panel from Kenmore stackable washer?
On the Kenmore 41790812992 stacked laundry center, the removable “front panel” you can access without major disassembly is the dryer front access panel. You remove two screws, drop the panel down to release the bottom tabs, then pull it off; follow the steps shown in the installation guide.
What you can remove from the front (and what it’s called)
On this model, there are two common “front” panels people mean:
- Dryer front access panel (service access; easiest to remove)
- Washer front panel (cabinet panel; removal is a deeper teardown)
- Control console/top panel (often removed first for cabinet work)
Steps to remove the dryer front access panel
Use this method when you need access for venting, leveling, or basic service.
- Unplug the laundry center.
- Locate the two screws securing the front access panel to the dryer cabinet.
- Remove the two screws.
- Lower the panel until the bottom tabs disengage from the cabinet.
- Pull the panel away and set it aside.
If you meant the washer front panel
Washer cabinet access typically involves removing the top and releasing cabinet fasteners. If your goal is to reach the drain system, we usually start by checking for a clog, a kinked hose, or a failing pump.
- Look for slow drain, no drain, or water left in the tub
- Inspect the drain hose routing and standpipe setup
- Check for pump noise (humming) without draining
If the pump is the issue, the correct replacement for this model is the washer drain pump 137221600.
Quick comparison
| Panel you’re removing | Typical reason | Difficulty |
|---|---|---|
| Dryer front access panel | Service access, venting, leveling | Easy |
| Washer front panel | Drain/pump, tub, motor access | Moderate to advanced |
Why it matters
Removing the correct panel first prevents broken tabs, stripped screws, and extra disassembly. On stacked laundry centers like the Kenmore 41790812992, the dryer access panel is designed for quick removal, while washer cabinet panels are not.
Last updated: February 2026
What is the capacity of the Kenmore 400 Series washer?
The Kenmore 41790812992 stacked laundry center is not a “Kenmore 400 Series washer” model; washer capacity varies by the exact model number. For your 41790812992, use the 41790812992 owner's manual to confirm the washer tub capacity listed for this specific laundry center.
How to find the correct capacity for your exact model
We recommend checking the capacity in the model-specific specs section because “400 Series” is a marketing family name used across multiple designs.
- Locate the model tag and confirm it reads 41790812992
- Check the Specifications or Features section in the manual
- If the manual lists capacity in cu. ft., use that number for load sizing
- If it lists max dry load height, follow that guidance for consistent cleaning
- Use the same capacity number when comparing replacement parts or accessories
What you can use as a practical load-sizing rule
Even when you do not have the cu. ft. number in front of you, the manual guidance for this style of washer is a reliable way to avoid overloading.
| What to check | What “good” looks like | What happens if you exceed it |
|---|---|---|
| Dry load height in tub | Below the top row of holes (typical guidance) | Poor agitation, out-of-balance spins, longer dry times |
| Water level selection | Matches load size | Poor rinsing or leftover detergent |
| Spin balance | Load distributes evenly | Vibration, incomplete spin, damp clothes |
Why it matters
Capacity affects cleaning performance, spin efficiency, and wear on key components like the drive system and drain pump. Overloading commonly leads to out-of-balance conditions and draining or spinning complaints.
Related help for Kenmore 417 laundry centers
If you are troubleshooting instead of just sizing loads, use Kenmore 417 laundry center -washer error codes to match symptoms to the right checks.
Last updated: February 2026
What is the life expectancy of a Kenmore washing machine?
For a Kenmore stacked laundry center like model 41790812992, the washer portion typically lasts 10 to 15 years with normal household use, proper installation, and routine maintenance. Consistent overloading, poor draining, and neglected cleaning shorten life; timely repairs often extend it.
Typical lifespan and what changes it
Most laundry center washers land in this range:
| Use and care level | Typical life expectancy |
|---|---|
| Light use, good maintenance | 12 to 15 years |
| Average family use | 10 to 12 years |
| Heavy use, frequent overloading | 7 to 10 years |
Maintenance that adds years
We recommend these habits for Kenmore laundry centers to reduce wear on the motor, pump, bearings, and tub:
- Keep loads balanced; avoid packing the basket tight.
- Use the correct detergent amount; excess suds can affect draining and rinsing.
- Check pockets and use a mesh bag for small items to help prevent pump clogs.
- Inspect fill hoses and the drain hose routing periodically for kinks or leaks.
- Address new noises, slow draining, or vibration early (small issues become big repairs).
Quick “repair or replace” checkpoints
These signs help decide whether a repair is worth it on a 41790812992 laundry center:
- Age under 8 years: repairs are usually worthwhile.
- Age 10 to 15 years: repair makes sense if the issue is isolated (pump, valve, switch).
- Repeated leaks or bearing noise: plan for a larger repair decision.
| Symptom | Common related part/system | Example part for this model |
|---|---|---|
| Won’t drain or drains slowly | Drain pump, drain path | Washer drain pump 137221600 |
| Won’t fill or fills incorrectly | Water inlet valve, screens | Water valve 134190200 |
| Loud rumble during spin | Spin bearing/tub support | (bearing service varies by symptom) |
Why it matters
A realistic life expectancy helps you plan maintenance and avoid emergency breakdowns. It also helps you compare the cost of a repair (like a drain pump or water valve) against the remaining useful life of the washer.
For model-specific operating and care guidance, follow the maintenance and use recommendations in the 41790812992 owner's manual.
Last updated: February 2026
Where to find the model number on a Kenmore laundry center?
On Kenmore stacked laundry center model 41790812992, we find the model number on the serial plate inside the dryer door (on the inside of the door opening). This label also lists the serial number, which you will want when ordering parts or checking installation requirements.
Where to look on the unit
Check these common label locations first:
- Inside the dryer door opening on the serial plate (most common for this model)
- Along the dryer door frame (door jamb area)
- On the back panel of the laundry center (less common)
- Inside the lower washer access area (if your unit has a service panel)
For the exact label location and how it is referenced in the documentation, use the 41790812992 owner's manual.
What to write down (and why)
Record these items exactly as shown on the serial plate:
- Model number (example: 41790812992)
- Serial number
- Purchase date (helpful for your records)
- Fuel type and electrical requirements (important for installation and troubleshooting)
Quick reference table
| Item on label | What it’s used for |
|---|---|
| Model number | Matching the correct diagrams and parts for your laundry center |
| Serial number | Identifying production variation when ordering certain parts |
| Electrical info | Confirming correct power supply and safe installation |
If your washer and dryer are separate pieces
Some setups look like a “stacked laundry center” but are actually a washer with a separate dryer stacked on top. In that case, there are typically two different model numbers, one for the washer and one for the dryer.
Why it matters
Using the correct model number helps us match the right Kenmore parts and repair information the first time, especially for fit-critical items like a dryer lint filter 5304516871 or electrical components.
Last updated: February 2026