Owner’s manual
 Error Codes



How do I know if my compressor is bad in my Kenmore freezer?
If your Kenmore upright freezer model 25329111991 is not holding temperature and you also notice constant running, unusual compressor noises, or repeated breaker trips, the compressor (or the sealed system around it) is a top suspect. Confirm power and airflow basics first, then check for sealed-system symptoms before replacing parts.
Quick signs the compressor (or sealed system) is the problem
- Freezer runs almost nonstop but temperatures stay warm
- Clicking or buzzing at the compressor area followed by the unit stopping
- Compressor shell is very hot and cooling performance is still poor
- Breaker trips or the unit repeatedly shuts off under load
- Frost pattern looks “wrong” (little to no frost on the evaporator when it should be cooling)
Rule out common look-alikes first
Before blaming the compressor, we check these because they cause the same “not freezing” complaint:
- Power quality/outlet issues: Low or high household voltage can damage the motor; avoid extension cords and outlets controlled by a wall switch (see the 25329111991 owner's manual).
- Condenser airflow: Dirty or blocked condenser area can cause long run times and poor cooling.
- Door seal leaks: A leaking gasket pulls in warm, moist air and can mimic a weak compressor; inspect the freezer door gasket 5304507199 for gaps, tears, or looseness.
- Defrost system problems: Heavy frost buildup can block airflow and warm the cabinet.
What to check and what it usually means
| What you observe | What it points to | What we do next |
|---|---|---|
| Runs constantly, still warm | Sealed system or airflow issue | Clean condenser, verify fan airflow, then evaluate sealed system |
| Repeated click every few minutes | Start device/overload or compressor | Test start components, then compressor if start parts test good |
| Breaker trips when it tries to start | Electrical short or locked rotor | Unplug, inspect wiring, then test compressor circuit |
| Warm cabinet, gasket not sealing | Air leak | Correct door alignment, replace gasket if needed |
Why it matters
A true compressor or sealed-system failure is a higher-skill repair and misdiagnosis wastes time and money. Checking power, airflow, and door sealing first helps you pinpoint whether you need a simple fix (like a gasket) or a sealed-system diagnosis.
Last updated: February 2026
Where is the model number on a Kenmore upright freezer?
On the Kenmore upright freezer model 25329111991, the model and serial number plate is typically located on the upper left wall inside the freezer compartment. This label is the fastest way to confirm the exact model number before ordering parts or using troubleshooting steps in the owner's manual.
Where to look first (most common spot)
For upright models like 25329111991, we recommend checking these areas in order:
- Upper left interior wall inside the freezer (most common)
- Side wall inside the cabinet, near the front opening
- Around the door opening (cabinet frame area)
- Lower front area behind the kick plate (if your unit has one)
- Rear exterior panel (less common, but possible)
What the label looks like
The plate is usually a small sticker or metal tag that includes:
- Model number (for example, 25329111991)
- Serial number
- Electrical ratings (volts/amps)
- Sometimes the manufacturing date code
Why it matters
Kenmore model numbers often look similar, and even a one-digit difference can change which door gasket, light switch, or wiring harness fits. Using the exact model number helps us match the correct diagrams and replacement parts for your freezer.
Quick checklist before ordering parts
Use this checklist once you find the label:
- Write down the model number and serial number exactly as shown
- Take a clear photo of the plate for reference
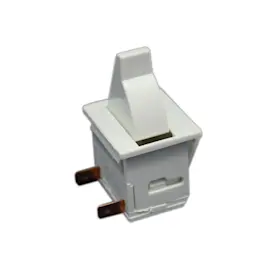
- Use the model number when selecting parts like the freezer door gasket 5304507199 or light plunger 297243800
Common label locations by freezer type
| Freezer type | Typical model/serial plate location |
|---|---|
| Upright freezer | Upper left wall inside the freezer |
| Chest freezer | Left exterior wall |
Last updated: February 2026
Why is my upright freezer leaking water on the floor?
Water on the floor around your Kenmore upright freezer model 25329111991 usually comes from defrost water not draining correctly (a blocked drain opening or drain tube) or from warm, moist air leaking in around the door and creating excess condensation. Use the defrost drain steps in the 25329111991 owner's manual to drain water into a pan and prevent overflow.
Most common causes
- Defrost drain left open or drain plug missing: warm air enters and creates moisture.
- Ice or debris blocking the drain opening: water backs up and spills inside, then out.
- Drain pan overflow during manual defrost: pan fills faster than expected.
- Door not sealing: humid air enters, causing heavy frost and meltwater.
- Freezer not level: door may not close easily, leading to moisture problems.
What to do (safe, practical steps)
- Unplug the freezer and protect the floor with towels.
- Check the internal drain plug on the freezer floor; pull it out during defrosting, then reinstall it when finished.
- If your unit has a base panel, remove the base panel screws and locate the external drain tube under the freezer; place a shallow pan under it.
- Defrost any ice around the drain area using warm water (no sharp tools).
- Level the freezer so the door closes easily when left halfway open; adjust the front leveling feet as needed.
Quick diagnosis guide
| What you see | Most likely issue | Best next step |
|---|---|---|
| Water appears during/after defrosting | Drain pan overflow or drain tube not positioned over pan | Use a larger shallow pan; monitor and empty as needed |
| Water appears even when not defrosting | Door leak causing condensation and meltwater | Inspect gasket contact; clean sealing surfaces |
| Frost builds up quickly, then water shows up | Door not sealing or door misalignment | Level unit; check gasket for gaps |
Parts that commonly relate to leaks
If you find the door is not sealing well, replacing the gasket often fixes the root cause of condensation and frost.
Why it matters
Water leaks can lead to slippery floors and can also signal a door-seal or airflow issue that increases frost buildup and makes the freezer work harder. Keeping the drain closed after defrosting and keeping the freezer level prevents repeat leaks.
Last updated: February 2026