- Kenmore refrigerator water filters
- Whirlpool refrigerator water filters
- Samsung refrigerator water filters
- GE refrigerator water filters
- LG refrigerator water filters
- Frigidaire refrigerator water filters
- KitchenAid refrigerator water filters
- Maytag refrigerator water filters
- Kenmore Elite refrigerator water filters
- Estate refrigerator water filters
- GE Profile refrigerator water filters
- Amana refrigerator water filters
- Bosch refrigerator water filters
- Dacor refrigerator water filters
- Electrolux refrigerator water filters
Top DIY repair help
View All Repair Categories
Appliances
Lawn & Garden
Power Tools
Home Improvement
Sports & Leisure
Heating & Cooling
Quick Links
How to replace a freezer electronic control board
less than a minute readMay 20Lyle Weischwill
Repair time and Difficulty
45 minutes or less
Tools Required
- Phillips screwdriver
- Slot screwdriver
- Nut drive
This DIY repair guide explains how to replace an electronic control board in a freezer. The electronic control board starts and stops the compressor and fans to maintain the freezer temperature.
Because other parts can also affect the operation of the fans and compressor, have a local freezer repair expert test the board to confirm it's the problem. Replace the electronic control board with the manufacturer-approved freestanding freezer part.
This repair guide and video shows how to replace the electronic control board in Kenmore, Frigidaire, Crosley, Gibson, and Kelvinator upright freezers.
Instructions
- 1. Disconnect the electrical power
Unplug the freezer or shut off the circuit breaker for the freezer.
Move highly perishable food to a cooler or other cooled space. The freezer will be without power for about 45 minutes, which shouldn't affect most frozen foods.
- 2. Remove the front grille
Remove the screws holding the grille at the base of the freezer and pull the grille off.
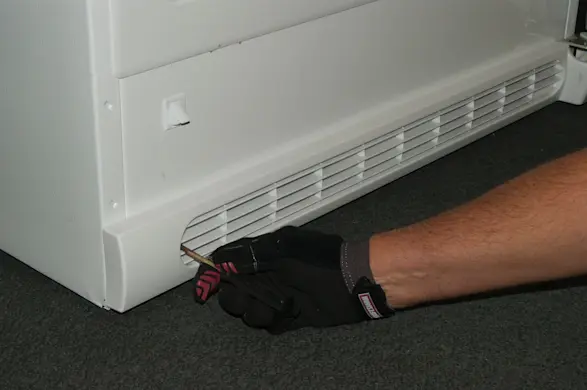
PHOTO: Remove the grille screws. 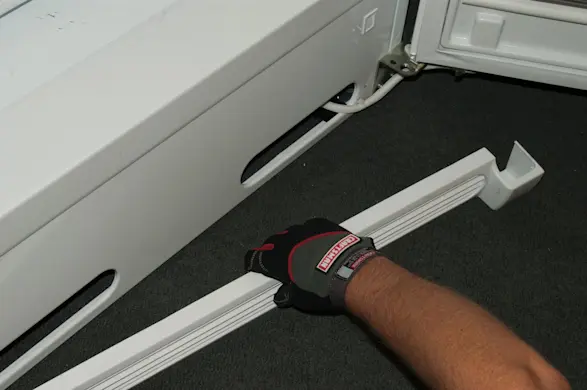
PHOTO: Remove the grille.
- 3. Remove the rear machine compartment cover
Move the freezer away from the wall.
Remove the rear machine compartment cover screws and pull off the cover.
Warning: The freezer is heavy. Use a helper to move the freezer away from the wall.

PHOTO: Remove the rear cover screws. 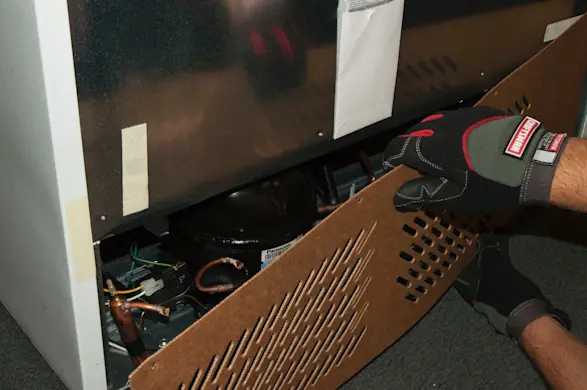
PHOTO: Remove the rear cover.
- 4. Remove the electronic control
Remove the screw from the electronic control board cover.
Pull out the electronic control board cover and release it from the cabinet base. The electronic control board wires are still connected.
Set the electronic control board on the floor just behind the grill.
From the front of the freezer, pull the electronic control board through the grill opening.
Release the wire harness latch on the notch in electronic control board cover.
Take a digital picture of the wire connections on the control board before disconnecting.
Disconnect the wires from the electronic control board.
Release the locking tabs and remove the electronic control board from the cover.
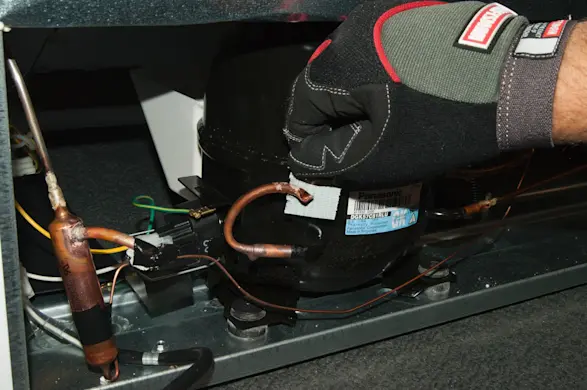
PHOTO: Tape sharp tips of copper tubing to prevent scratching your arm. 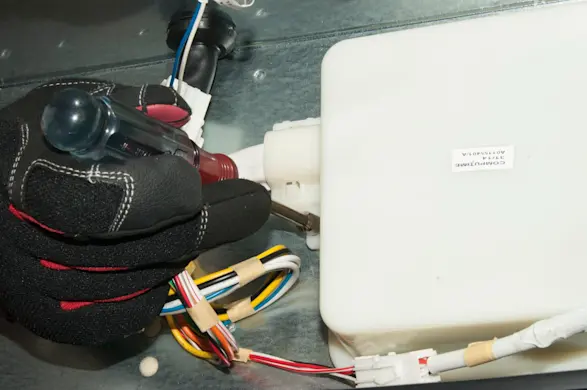
PHOTO: Remove the control board housing screw. 
PHOTO: Pull the control board out. 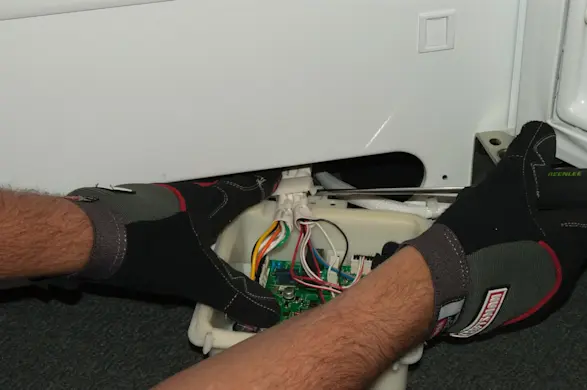
PHOTO: Release the wire harness locking tab. 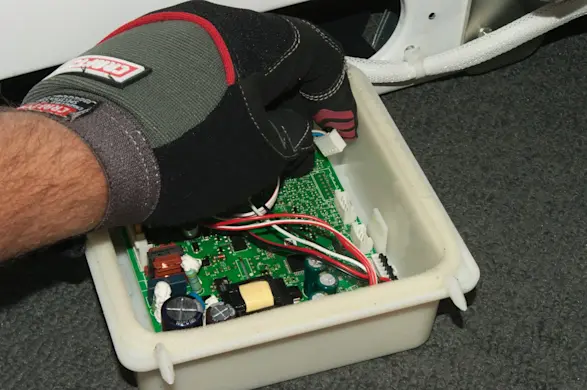
PHOTO: Disconnect all wires from the control board. Warning: Sharp, crimped tubing is exposed in the machine compartment. Place tape over the tips of exposed copper tips to protect your arms before reaching into the machine compartment.
- 5. Install the new electronic control board
Carefully push the new electronic control board into the cover and snap it into place.
Reinstall the wire harness in the notch of the electronic control board cover and snap the wire harness latch closed.
Reconnect the wires on the electronic control board, using your digital picture as a guide.
Push the electronic control board and cover carefully into the bottom of the cabinet through the grill opening.
Mount the electronic control board cover to the base of the freezer.
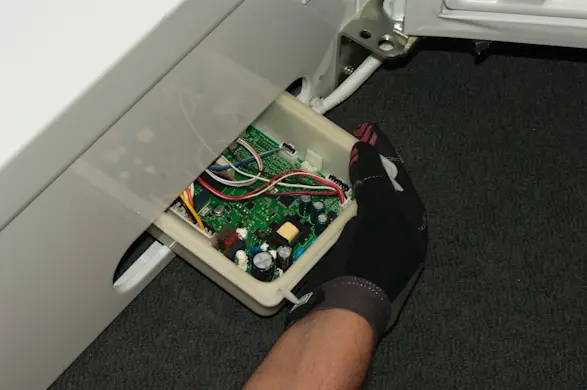
PHOTO: Connect the wires and push the control board into the cabinet. 
PHOTO: Mount the control board to the base of the cabinet.
- 6. Reassemble the covers
Place the rear machine compartment cover on the back of the freezer and reinstall the mounting screws.
Reinstall the front grille.
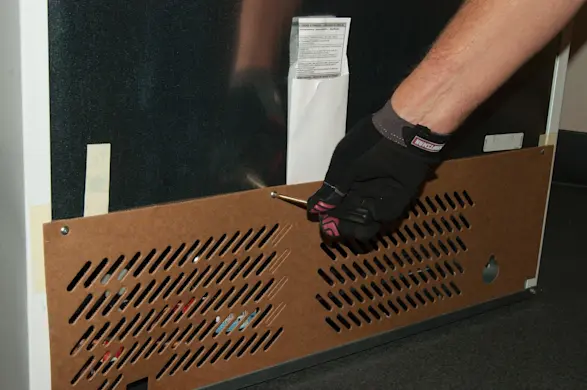
PHOTO: Reinstall the rear cover. 
PHOTO: Reinstall the grille.
- 7. Restore electrical power
Plug in the freezer or turn on the house circuit breaker to restore power.