
What degree is a paslode F-350S?
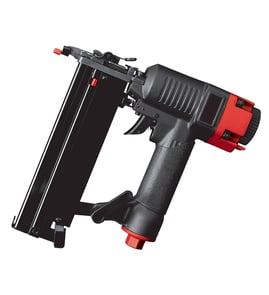
The Paslode F-350S PowerMaster Plus strip framing nailer is a 30-degree nailer, meaning it’s designed to use 30-degree paper-tape collated framing nails for common framing and decking work.
The “degree” refers to the angle of the nail strip in the magazine, not the angle the nail enters the wood.
- Uses 30-degree framing nail strips (angled magazine)
- Helps fit between studs and in tighter spaces than many straight-magazine nailers
- Commonly used for framing, sheathing, and decking applications
- Degree must match the collation style (often paper tape for 30-degree)
- Nail length and shank type still need to match your job and local code requirements
Use this as a fast way to confirm you’re buying the right nails for your Paslode F-350S.
| What to match | What to look for | Why it matters |
|---|---|---|
| Nail angle | 30-degree | Prevents feed and jamming issues |
| Collation type | Paper tape (typical for 30-degree) | Wrong collation can misfeed |
| Nail length | Job-dependent | Too long can split wood; too short reduces holding |
| Nail gauge/shank | Job-dependent | Affects strength and code compliance |
Using the correct 30-degree nails helps your F-350S feed smoothly, reduces jams, and protects wear parts like the driver and magazine components.
Last updated: February 2026
What is better, a 16 gauge or 18 gauge nailer?
A 16-gauge vs 18-gauge comparison applies to finish and brad nailers, not the Paslode F-350S. The Paslode F-350S is a framing nailer that drives framing nails for structural fastening; for trim work you would choose a separate 16-gauge finish nailer or 18-gauge brad nailer.
If you are choosing between finish nailers for trim and molding:
- 16 gauge: stronger hold for heavier trim; larger hole to fill
- 18 gauge (brad): smaller hole for cleaner finish; less holding power
- Lower gauge number means a thicker nail
- Thicker nails increase split risk on thin or brittle stock
- Brad nails often need glue when the joint must resist movement
| Task | Better choice | Why |
|---|---|---|
| Baseboards, door/window casing | 16 gauge | More holding power in thicker trim |
| Small molding, returns, delicate trim | 18 gauge | Smaller holes, less splitting |
| Light furniture trim and crafts | 18 gauge | Minimal surface damage |
| Trim under tension or prone to shifting | 16 gauge | Better long-term grip |
The Paslode F-350S power master plus strip nailer is built for framing-style fastening, not finish nails or brads. Use it for jobs like framing lumber, sheathing, and other structural connections where nail size and holding strength are the priority.
Using the wrong nailer leads to poor results: finish nailers can under-hold structural work, and framing nailers leave oversized holes and can damage trim. Matching the tool to the job gives better strength, appearance, and fewer callbacks.
For safe DIY habits that also apply to power tools, review are diy appliance repairs safe.
Last updated: February 2026
What kind of nails are used in the paslode F-350S?
The Paslode F-350S power master plus strip nailer is designed to run framing nails in the common 2 inch to 3-1/2 inch range; it is typically used with clipped-head strip nails and, in some setups, round-head (Roundrive-style) nails. For best results, match the nail style and collation angle to your magazine and nosepiece.
Use nails that match these basics:
- Length: 2 inch to 3-1/2 inch (typical framing range)
- Type: framing nails (paper-tape or plastic-collated, depending on the magazine)
- Head style: clipped head is common; round head may be supported with the correct configuration
- Shank: smooth, ring, or screw shank (choose based on holding power needs)
- Gauge: most framing nailers use 0.113 inch to 0.131 inch diameter nails (match what your driver and nose accept)
These checks prevent jams, double-feeds, and misfires:
- Confirm the collation angle printed on the nail strip box matches your nailer magazine.
- Verify the head style (clipped vs round) matches your nosepiece and magazine setup.
- Make sure the nail diameter is within the framing range your tool is set up to drive.
- Inspect the magazine for broken plastic or paper debris; debris causes feed issues.
- If nails are consistently not seating, check air pressure and fastener spec together.
| What you are doing | Nail length to start with | Shank suggestion | Why |
|---|---|---|---|
| General framing | 3 inch to 3-1/4 inch | Smooth or ring | Strong, common size |
| Sheathing | 2 inch to 2-3/8 inch | Ring | Better withdrawal resistance |
| Treated lumber | 3 inch to 3-1/2 inch | Coated ring/screw | Helps with corrosion and grip |
Using the correct nail style for the F-350S protects the driver blade, reduces nail jams, and helps you get consistent depth-of-drive. Nail head style and collation angle are the two most common causes of “wrong nails” problems on framing nailers.
For help confirming the exact model number before ordering supplies or parts, use how to find your appliance model number (and what it means for parts).
Last updated: February 2026