- Kenmore refrigerator water filters
- Whirlpool refrigerator water filters
- Samsung refrigerator water filters
- GE refrigerator water filters
- LG refrigerator water filters
- Frigidaire refrigerator water filters
- KitchenAid refrigerator water filters
- Maytag refrigerator water filters
- Kenmore Elite refrigerator water filters
- Estate refrigerator water filters
- GE Profile refrigerator water filters
- Amana refrigerator water filters
- Bosch refrigerator water filters
- Dacor refrigerator water filters
- Electrolux refrigerator water filters
Top DIY repair help
View All Repair Categories
Appliances
Lawn & Garden
Power Tools
Home Improvement
Sports & Leisure
Heating & Cooling
Coil surface element on range not heating video
less than a minute readMar 09Lyle Weischwill
This video shows how to troubleshoot a range coil surface burner that won't heat. Learn how to test the coil surface element, the control switch and the wiring that connects these components to determine the problem and get your stovetop element working again.
For more troubleshooting videos, repair guides or DIY tips, check out our range DIY repair help page.
Hi, Wayne here from Sears PartsDirect. Today we’re going to help you figure out what’s wrong when a coil surface element—more commonly called a burner—on your range won’t heat.
A failed element, wiring failure or a broken surface element control switch can keep the element from working.
In this video, I’ll guide you through the troubleshooting steps to help you find out which part failed.
Tools and supplies you may need
Nut driver
Multimeter
Before you start, unplug the range to disconnect electrical power.
Check the surface element
First, let's check for a broken surface element. With the element cool to the touch, pull the element out. Using the multimeter, measure the resistance through the element prongs.
The meter should measure between 20 and 40 ohms if the element is good.
Replace the element if the meter measures infinite resistance.
Check the wiring between the element switch and element
If the element is okay, we'll check the wiring between the element switch and the element.
Lift the cooktop and check the wiring connections on the element's terminal block. You’ll have to replace the surface element wiring harness and terminal block if wires are disconnected, the insulation around the wires is melted or if the plastic body of the terminal block is melted.
Check the wiring between the element's terminal block and the back of the range. Replace the wiring harness if it’s melted or otherwise damaged.
If you find no visible wiring damage, note the color of wires going to the element, then lower the cooktop and reinstall the surface element.
Even if you see no physical wiring damage, a break inside the insulation or damage to a section of wire we haven't checked could prevent the element from heating.
So let’s check resistance through the wiring from the control switch to determine whether the element wiring is okay.
Pull the range forward so you can remove the screws that hold the back shield on the control panel and pull off the shield.
Find the control switch for the surface element that isn’t working. Take a picture of the wires connected to the switch to help you reconnect the wires later. This switch has plastic wire harness connectors that you can only insert in the switch in the correct location, but it’s always a good idea to have a photo as a reminder.
Disconnect the wires going to the element.
On this range, brown wires supply current to the surface element that’s not working.
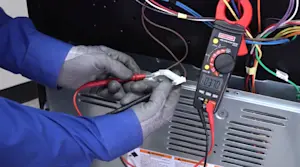
Measure resistance through the brown wires.
The meter should measure approximately the same resistance as it measured through the coil element, 20-40 ohms.
If the meter measures infinite resistance, a break in the wiring is preventing the element from heating. Replace the wire harness between the element switch and the element.
Test the element switch
If wiring between the switch and the element is okay, check the internal contacts in the element switch.
Pull the remaining wires off the element switch.
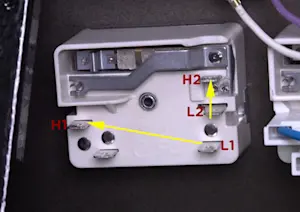
The spades have labels—L1, H1, L2 and H2.
When you turn the switch on, internal contacts in the surface element control switch let current flow from the L1 spade to the H1 spade and from the L2 to H2 spade. Each set of spades supplies 120 volts of the 240 volts required to heat the element. If either contact is broken, current won’t flow and the element won’t heat.
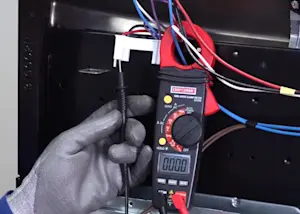
Let’s start by checking the L1-to-H1 contact using a multimeter.
Turn on the surface element control knob.
With your multimeter set to measure resistance, touch one meter lead to the L1 spade and the other meter lead to the H1 spade:
If the multimeter measures OL, the internal switch contact isn’t working, so you need to replace the surface element control switch. This should fix your burner heating problem.
If the measurement is near 0 ohms of resistance across these spades, the first internal contact in the control switch is sending current to the surface element and working okay.
To test the second contact in the surface element control switch, touch one meter lead to the L2 spade and the other meter lead to the H2 spade.
If the multimeter measures OL, replace the surface element control switch because the switch’s internal contact isn’t sending current to the element through the spades.
If it measures near 0 ohms of resistance across L2 and H2, the control switch is okay.
Check the element switch supply wiring
Because we’ve confirmed that the element, element switch and wiring from the switch to the element are all okay, a break in the wires supplying current to the element control switch is preventing the element from heating.
First, check the black wire that connects to the L1 spade on the surface element control switch.
Remove the terminal block cover.
Measure the resistance between the end of the black wire that connects to the L1 spade on the switch and the black wire on the terminal block.
If the wire is okay, the multimeter measures near 0 ohms. A measurement of OL means the wire is broken, so find and repair the break in the black wire going to the control switch.
If the black wire is okay, measure the resistance between the red wire that connects to the L2 spade on the switch and the red wire on the terminal block. If the wire is okay, the multimeter measures near 0 ohms of resistance. If not, find and repair the break in the red wire going to the control switch.
Reconnect the wires to the element switch using your digital photo as a guide and reassemble the range. There! You’re ready to start using the coil element again.
We hope this video helps you out today. Check out our other videos on the Sears PartsDirect YouTube Channel and subscribe for notifications when we post new videos.