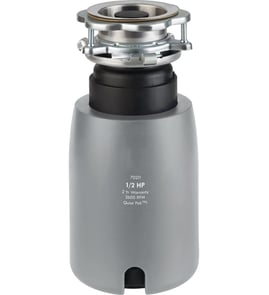

What is the average life of a garbage disposal?
Most garbage disposals last 10 to 12 years on average, and a typical overall range is 8 to 15 years. For a Kenmore garbage disposal model 6011, lifespan depends most on what you grind, how often you run it, and whether the unit is kept clear of jams and corrosion.
Typical lifespan ranges
| Usage and care level | Typical lifespan |
|---|---|
| Light use, good habits | 12 to 15 years |
| Normal household use | 10 to 12 years |
| Heavy use, poor habits | 8 to 10 years |
What shortens a disposal’s life
These habits wear the motor, grinding components, and seals faster:
- Pouring grease, oil, or fat into the sink (it coats and traps debris)
- Grinding fibrous foods (celery, corn husks, onion skins) that can wrap and stall the unit
- Putting in bones, fruit pits, or hard shells that can chip or jam the grind ring
- Running the disposal with too little water (more heat and friction)
- Letting small clogs linger (backpressure and leaks can follow)
How to make your Kenmore 6011 last longer
- Run cold water before, during, and 10 to 20 seconds after grinding
- Feed scraps slowly instead of dumping a full bowl at once
- Cut large scraps into smaller pieces to reduce stalling
- If it jams, shut power off and clear it safely before restarting
- Keep odors down with routine cleaning (avoid harsh drain chemicals)
Why it matters
A disposal near end-of-life often starts showing up as frequent resets, louder grinding, slow draining, or small leaks at the housing or sink flange. Replacing worn parts early can prevent a sudden failure that leaves the sink unusable.
Parts and repair help
We list replacement parts by model so you can match fit and electrical specs correctly. Start with the parts list for Kenmore 6011, or search by model number on Sears PartsDirect.
Last updated: February 2026
Why don't plumbers like garbage disposals?
Plumbers often dislike garbage disposals because they are a common source of drain clogs, leaks, and jam-related service calls when they are used like a trash can. With a Kenmore 6011 garbage disposal, correct use (cold water, small batches, and the right foods) prevents most of the problems plumbers get called to fix.
What typically causes the problems
Most disposal-related plumbing issues come from what goes into the unit and what happens after it leaves the grinding chamber.
- Grease, oil, and fat: they cool and coat the drain line, trapping debris
- Starchy foods (rice, pasta, potatoes): they swell and turn gummy in the trap and branch drain
- Coffee grounds: they pack into a dense sludge that settles in low spots
- Eggshells and fibrous peels: they can contribute to buildup and tangles
- Large amounts at once: they overload the grind chamber and slow the drain
- Not enough water: it fails to carry ground waste through the trap and into the main line
Best-use rules that reduce clogs and call-outs
These habits keep the disposal, sink trap, and drain line flowing.
| Do this | Avoid this | Result |
|---|---|---|
| Run cold water before, during, and after grinding | Running little or no water | Better carry-through, less buildup |
| Feed small amounts steadily | Dumping a bowl of scraps at once | Fewer jams and stalls |
| Grind only soft food scraps | Treating it like a compost bin | Less pipe loading |
| Let it run 10 to 20 seconds after grinding | Shutting off immediately | Flushes the trap and branch line |
Why it matters (beyond the disposal)
Even if the Kenmore 6011 grinds food well, the drain system still has to transport that material. The sink trap, horizontal runs, and older piping are where ground waste tends to settle and form stubborn blockages, which is why plumbers see disposals as “clog multipliers” when misused.
Parts and repair help
If you are troubleshooting a jam, leak, or no-power symptom, we recommend matching parts by the exact model number and using safe DIY practices. We also keep general repair and safety resources available through Sears PartsDirect.
Last updated: February 2026
Are all garbage disposals universal fit?
Most garbage disposals are not a universal fit. Many units (including typical Kenmore 6011-STYLE disposals) mount to a standard kitchen sink drain opening, but the mounting hardware, discharge outlet position, overall height, and electrical setup vary and can affect whether a replacement fits your sink and under-cabinet space.
What is “standard” and what is not
Most disposals are designed around a common sink drain opening size, but these areas often differ between brands and models:
- Mounting system style (3-bolt mount vs. other mount rings)
- Overall height and diameter (clearance to cabinet floor and side walls)
- Discharge outlet height and direction (lines up with your trap and drain)
- Dishwasher inlet port (present or not, and where it sits)
- Power connection (corded plug-in vs. hardwired)
Quick fit checklist before you buy
Use this checklist to avoid a mismatch when replacing a Kenmore garbage disposal:
- Measure cabinet clearance from sink bottom to cabinet floor
- Note where the drain trap sits relative to the disposal outlet
- Confirm whether you need a dishwasher connection
- Check if your current unit is plug-in or hardwired
- Identify the mount type currently on the sink (so you know if you can reuse it)
Common replacement scenarios
| Scenario | What it usually means | What to plan for |
|---|---|---|
| Same mount style | Swap is simpler | Reuse existing sink flange and mount ring if compatible |
| Different mount style | Swap is more involved | Replace mount hardware and possibly adjust plumbing |
| Outlet doesn’t line up | Drain connection won’t meet | Reposition trap or use approved plumbing adjustments |
Why it matters
A disposal that “fits the drain” can still fail to fit your cabinet or plumbing. Getting the mount type, outlet position, and electrical connection right prevents leaks, vibration noise, and rework.
Ordering help
If you do not see the exact replacement parts you need listed for Kenmore model 6011, we recommend searching by model number on Sears PartsDirect to match the correct disposal and compatible hardware.
Last updated: February 2026
Can you buy parts for a garbage disposal?
Yes. You can buy replacement parts for a Kenmore garbage disposal model 6011; common service items include the sink flange and mounting hardware, splash guard, stopper, reset components, and electrical connection parts. Start with the model-based parts list, then use Sears PartsDirect to search by model number if you need additional options.
What parts are commonly replaceable on a garbage disposal?
Most garbage disposals are designed so you can replace wear items and sealing parts without replacing the entire unit.
- Splash guard (helps reduce backsplash and noise)
- Stopper (helps hold water in the sink)
- Sink flange and mounting ring (supports the disposal under the sink)
- Fiber/rubber gaskets and seals (helps stop leaks at the sink or discharge)
- Discharge tube and hardware (connects to the drain)
- Power cord or wire connector parts (for electrical hookup)
Quick guide: repair part vs. full replacement
Use this as a practical way to decide what to buy.
| Symptom | Most likely fix | Typical outcome |
|---|---|---|
| Leak at the sink flange | Replace flange gasket, reseat mounting | Stops water at the top seal |
| Leak at discharge | Replace discharge gasket/tube hardware | Stops leak at drain connection |
| Loud rattling | Remove foreign object, inspect splash guard | Restores normal grinding sound |
| Won’t run but hums | Free jam, press reset, check power | Restores operation if motor is OK |
Before you order: confirm the exact model and configuration
Kenmore model 6011 parts can vary by production run and how the unit is wired.
- Verify the model number from the disposal label (usually on the housing under the sink)
- Note whether your unit is hardwired or uses a plug-in power cord
- Check if the issue is a leak, a jam, or a no-power condition; each points to different parts
- If the unit is seized, leaking from the body, or repeatedly trips the reset, replacement is typically the better fix
Why it matters
Buying the right garbage disposal parts keeps the mounting and sealing surfaces watertight, prevents drain leaks, and restores safe operation. Matching parts to the exact model number also reduces returns and repeat repairs.
Last updated: February 2026
Is it cheaper to repair or replace a garbage disposal?
For Kenmore garbage disposal model 6011, repairing is cheaper for minor problems (jam, reset trip, loose connection, sink-flange seep). Replacing is cheaper for major failures (leak from the bottom, cracked housing, failing motor) or when the unit is 10+ years old.
Quick decision guide
- Repair if it hums but will not grind; it is usually a jam.
- Repair if it lost power once; reset, breaker, switch, or outlet is often the cause.
- Repair if it leaks at the sink flange or mounting ring; reseating and sealing typically fixes it.
- Replace if it leaks from the bottom (motor area); internal seals or housing have failed.
- Replace if it repeatedly trips the reset or breaker after jams are cleared.
- Replace if it smells burnt or stalls under light load; the motor is failing.
Typical cost comparison (what usually wins)
| Problem type | Common fix | Cheaper choice |
|---|---|---|
| Jam or humming | Clear jam, press reset | Repair |
| No power | Check breaker, switch, outlet | Repair |
| Leak at sink flange | Reseal/reseat mount | Repair |
| Leak from bottom | Replace disposal | Replace |
| Frequent resets, loud grinding | Replace disposal | Replace |
Why it matters
Disposals run in constant moisture. Once the motor seals or housing start leaking, reliability drops quickly and repeat failures become more likely, so replacement prevents ongoing clogs and plumbing mess.
What to check first (safe, practical)
- Turn off power at the switch and breaker.
- Press the reset button once.
- If it hums, free the impellers using the manual turn feature (often an Allen socket underneath).
- Confirm the outlet has power; use how to tell if a fuse is blown for a quick electrical check.
If you decide to replace, match mount style, feed type, and horsepower; you can search options by model number on Sears PartsDirect.
Last updated: February 2026