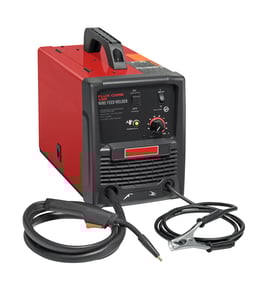

Is the Lincoln AC-225 a good welder?
Yes. The Lincoln AC-225 is a solid, dependable stick (SMAW) welder for home shops and light fabrication; it is known for simple controls, durable construction, and consistent arc performance when it is set up with the right input power and electrodes.
A “good” welder is one that matches your typical jobs and power setup. The AC-225 is a strong fit when you want a straightforward AC stick welder for mild steel projects like brackets, gates, and general repairs.
Common strengths
- Simple, rugged design with fewer electronics to fail
- Good value for occasional to regular hobby use
- Works well with common stick electrodes (for example, E6011 and E6013)
- Handles dirty or painted steel better than many small wire-feed setups
If your work needs cleaner, lower-spatter welds or thin sheet metal control, a different process can be a better match.
- Thin sheet metal is harder with stick welding (burn-through risk)
- AC-only output can limit how smoothly some rods run compared to DC
- Not ideal for aluminum or precision cosmetic welds
| Your typical work | AC-225 fit | Why |
|---|---|---|
| Farm and general repair | Good | Stick welding tolerates less-than-perfect metal prep |
| 1/8 in. to 1/4 in. mild steel | Good | Common range for home fabrication |
| Auto body / thin sheet | Not ideal | Heat control is more difficult with stick |
| Clean, “pretty” weld appearance | Mixed | Technique and rod choice matter more with AC |
Choosing a welder that matches your material thickness, power supply, and finish expectations saves time and reduces issues like sticking rods, excessive spatter, and weak weld penetration.
If you are maintaining your Lincoln AC-225 (cleaning connections, checking cables, replacing worn electrical components), use the model number AC-225 to match parts correctly. If you do not see what you need listed, search by model on Sears PartsDirect.
Last updated: February 2026
What's better, AC or DC welding?
For most stick-welding jobs, DC is better because it gives a smoother arc, easier starts, and typically cleaner-looking welds with less spatter. AC is still a strong choice on a Lincoln AC-225 when you need a simple, rugged setup and good performance on certain electrodes.
| Feature | AC welding | DC welding |
|---|---|---|
| Arc feel | More “flutter” in the arc | Smoother, more stable arc |
| Starts and restarts | Can be a little harder | Usually easier |
| Spatter | Often more | Often less |
| Electrode options | Works well with AC-rated rods | Works with a wide range of rods |
| Best fit | Basic, durable stick welding | Higher control and appearance |
AC welding is a great fit when you want dependable stick welding with fewer variables and you are running common AC-friendly electrodes.
- You are using AC-rated rods (for example, E6011 is commonly used on AC)
- You want a simple machine setup with fewer polarity decisions
- You are doing general repair work where ultimate bead appearance is not the top priority
- You are working in conditions where arc stability is “good enough” and reliability matters most
DC is the go-to when you want more control over the puddle and a more consistent arc.
- You want smoother welds and easier arc starts
- You are welding thinner material and want better control of heat input
- You care about bead appearance and reducing cleanup time
- You want to choose polarity (DCEN vs DCEP) to match the rod and the job
Choosing AC vs DC affects arc stability, spatter, and how easy it is to control the weld puddle. That directly impacts weld quality, cleanup time, and how confidently you can run the electrode you need for the metal thickness and joint type.
If you are maintaining your Lincoln AC-225 welder (leads, clamps, switches, and other wear items), start with the parts list for your exact model, or search by model number on Sears PartsDirect.
Last updated: February 2026
How thick of metal can a Lincoln AC 225 weld?
On a Lincoln AC-225 stick welder, we typically see solid results on about 1/8 inch steel in a single pass, and thicker material (often 1/4 inch and beyond) by using multiple passes, proper joint prep, and the right electrode. For exact capability, your settings, rod choice, and power supply matter most.
- Joint design and prep: A beveled V-groove on thicker plate lets you reach full penetration.
- Electrode type and diameter: Common choices like 6011, 6013, and 7018 behave differently.
- Amperage and duty cycle: Higher amps increase penetration but can overheat the machine if pushed continuously.
- Base metal type: Mild steel is more forgiving than stainless or unknown alloys.
- Fit-up and cleanliness: Rust, paint, oil, and gaps reduce weld quality.
These are typical outcomes for an AC stick welder in the 225-amp class when technique and prep are good.
| Material thickness | Typical approach | What to expect |
|---|---|---|
| 16 ga to 1/8 in | Single pass fillet or butt | Strong welds with manageable heat |
| 1/8 in to 1/4 in | Single pass (some joints), or 2 passes | Penetration depends heavily on bevel and fit-up |
| 1/4 in to 1/2 in | Multi-pass with bevel | Full-strength joints are achievable with proper prep |
| Over 1/2 in | Multi-pass, heavy bevel, controlled heat | Often better with higher-output equipment for production work |
- Bevel both edges on plate thicker than about 1/4 inch.
- Run a root pass, then fill and cap passes; chip/brush between passes.
- Match rod to the job (for example, 6011 for dirty steel and penetration; 7018 for stronger, cleaner welds).
- Use a short arc length and steady travel speed to avoid lack of fusion.
- Confirm your input power (correct voltage and breaker size) so the welder can deliver full output.
Thickness capability is really about penetration and fusion, not just whether you can “stick metal together.” Proper prep and multi-pass technique let an AC-225 class welder produce safe, durable welds on thicker steel.
For repair and maintenance items (leads, clamps, connectors, and other welder-related parts), start with the parts list for your Lincoln AC-225; for broader model-based lookup and ordering, use Sears PartsDirect.
Last updated: February 2026
How many amps does a Lincoln AC 225 welder pull?
A Lincoln AC-225 welder’s input current draw depends on your line voltage and the welding output setting. At maximum output, most AC-225 class transformer stick welders are typically on a 50-amp, 230V branch circuit; lower weld settings draw less current.
- Output amps (welding amps): the knob setting that controls arc heat (up to 225A class)
- Input amps (line current): what the welder pulls from your electrical circuit while welding
- Duty cycle: how long you can weld in a 10-minute period at a given output
| Rating on the welder | What it affects | Example of what you use it for |
|---|---|---|
| Output amperage | Weld heat and rod capability | Choosing electrode size and settings |
| Input amperage | Breaker, wire size, plug | Preventing breaker trips and voltage drop |
For an AC-225 class welder, plan around these common electrical requirements:
- Voltage: typically 230V input
- Breaker size: commonly 50A (dedicated circuit)
- Wire/cord: sized to match the breaker and run length (voltage drop matters)
Use the welder’s nameplate to confirm the rated input:
- Find the data plate/nameplate and look for input amps (often shown as “Input,” “Primary amps,” or “I1”)
- Note the rated output and duty cycle tied to that input rating
- Match your breaker, receptacle, and wiring to the nameplate rating
Correct input-amp planning prevents nuisance trips, overheated wiring, and weak arc performance caused by voltage drop, especially on long runs or undersized extension cords.
If you’re replacing electrical items like a power cord, switch, or internal wiring, match parts to the AC-225 model listing; you can also search by model number on Sears PartsDirect.
Last updated: February 2026