Owner’s manual


Do downdraft vents need to be vented outside?
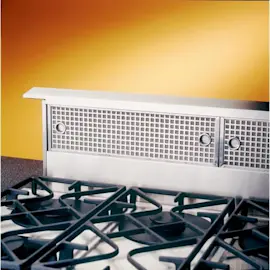
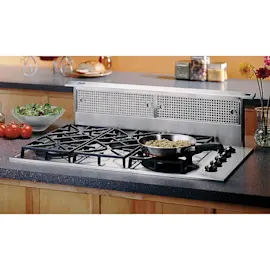
For the Whirlpool UXD8636DYS0 retractable downdraft vent system, we install it as a ducted vent that exhausts out of the cabinet (bottom, left, or right) and then routes through ductwork to the home’s exterior. This model is designed for outside venting rather than recirculating air back into the kitchen (ductless).
What the UXD8636DYS0 supports for venting
The installation instructions for this downdraft vent describe ducted exhaust routing options from the cabinet:
- Exhaust direction options: bottom, left, or right
- Openings in the wall or ceiling around the duct path must be sealed
- A grounded electrical outlet is required
- For best performance, run the blower before cooking starts
For the exact cabinet cutout and venting direction details, use the owner's manual.
When outside venting is required (and why)
Outside venting is required when the vent system is built to move smoke, vapors, and odors out of the home through ductwork. That matters because:
- It removes moisture that can otherwise linger in cabinets and on surfaces
- It reduces cooking odors instead of just filtering them
- It helps keep grease from settling back into the kitchen
Quick decision guide
| Setup | What it means | Typical result |
|---|---|---|
| Ducted to exterior | Air is exhausted outside | Best odor and moisture removal |
| Ductless/recirculating | Air is filtered and returned to room | Odors and moisture can remain |
Installation notes that affect venting performance
These items commonly make the difference between “works” and “works well”:
- Keep duct runs as short and straight as possible
- Seal duct joints properly to prevent air leaks
- Confirm the cooktop overlaps the vent edge as specified in the instructions
- If you use tall cookware, place it on the rear element to improve capture
Why it matters
Downdraft systems pull air downward, so they rely heavily on correct duct routing and good airflow. Proper outside venting helps the blower move air efficiently and keeps the kitchen more comfortable during high-heat cooking.
Last updated: February 2026
What are the cons of a downdraft range?
Downdraft ventilation like the Whirlpool UXD8636DYS0 is less effective than an overhead hood for capturing smoke and steam, especially with high-heat cooking and tall pots. It can also affect gas burner flame stability and may require higher heat settings while the vent is running (as noted in the owner's manual).
Main drawbacks to plan for
- Weaker capture of smoke and steam: Pulling air downward fights natural heat and vapor rise, so heavy searing and wok cooking can overwhelm it.
- Tall cookware gets in the way: Large stockpots can block airflow; placing tall items on rear burners helps, but does not eliminate the limitation.
- Gas performance side effects: Downdraft airflow can destabilize flames; on flame-sensing ignitions it can even cause repeated sparking unless you reduce blower speed or increase the flame.
- More installation complexity: Ducting, sealing wall and ceiling openings, and meeting electrical requirements add time and cost.
- Cabinet space tradeoff: Many installs require removing a drawer and fixing the drawer front permanently, reducing usable storage.
What we recommend for best results (if you already have downdraft)
- Turn the vent on before you start cooking.
- Use rear burners for tall pots and high-smoke cooking.
- If you have a gas cooktop, reduce blower speed first if the flame wavers.
- If the igniter keeps sparking on a lit burner, increase the flame setting or lower blower speed.
- Keep filters clean; a loaded grease filter reduces airflow and makes performance worse.
Downdraft vs. overhead hood (quick comparison)
| Feature | Downdraft vent | Overhead hood |
|---|---|---|
| Smoke capture at high heat | Fair | Strong |
| Tall pot performance | Often limited | Usually better |
| Impact on gas flames | Possible | Minimal |
| Cabinet/storage impact | Often reduces space | Usually none below cooktop |
Why it matters
Ventilation affects comfort, odors, and grease buildup. With downdraft systems, cooking technique and blower speed choices matter more, especially on gas cooktops where airflow can change flame behavior.
Last updated: February 2026
Is a downdraft vent worth it?
Yes, a downdraft vent is worth it when you need ventilation at an island or open-plan cooktop and an overhead hood is not practical. For the Whirlpool UXD8636DYS0 retractable downdraft vent system, it supports everyday odor and vapor removal, but it captures smoke and grease less effectively than a properly sized overhead hood.
When a downdraft vent makes sense
- You want clear sightlines (no hood blocking views)
- You are replacing an existing downdraft with a like-for-like setup
- You cook mostly at moderate heat (simmering, sautéing, light frying)
- You can run proper ducting and seal openings as required
- You plan to turn the vent on before cooking starts
What performance to expect
Downdraft ventilation pulls air down while heat and steam rise, so high-smoke cooking is harder to capture. The UXD8636DYS0 use guidance also notes you may need higher heat settings while the vent runs; on gas cooktops, higher blower speeds can affect flame stability.
| Cooking situation | Typical result with downdraft | Best practice |
|---|---|---|
| Boiling, simmering | Usually good | Start vent early; use rear burners |
| Searing, heavy smoke | Often limited | Use higher speed early; reduce smoke at the pan |
| Gas burners | Flame can waver | Lower blower speed or increase flame setting |
| Tall stockpots | Airflow can be blocked | Put tall cookware on rear burners |
Tips to get the best results on UXD8636DYS0
- Run the vent before you begin cooking
- Use rear burners for large or tall cookware
- If a gas flame wavers, decrease blower speed or increase the flame setting
- Keep the grease filter clean so airflow stays strong (a clogged filter reduces capture)
Why it matters
Better capture means less grease on cabinets and fewer lingering cooking vapors. If maximum smoke capture is your priority, an overhead hood typically wins; if design and sightlines matter most, a downdraft is a strong fit.
For model-specific operating details and clearances, follow the owner's manual.
Last updated: February 2026
How much does downdraft ventilation cost?
A Whirlpool downdraft ventilation system like model UXD8636DYS0 has two main costs: the vent system itself and the installation work (cabinet cutout, electrical, and ducting). Total cost is driven more by installation complexity than by the vent size alone.
What you pay for
- Vent system and components: the retractable vent, blower, controls, and trim
- Installation labor: fitting the unit, securing it, and verifying operation
- Ducting and venting materials: elbows, transitions, damper, and exterior termination
- Cabinet and countertop work: cutout, drawer modifications, and clearance adjustments
- Maintenance parts over time: grease filters, switches, and control pieces
Typical budget ranges (industry norms)
These ranges are typical for retractable downdraft vent systems and standard installs.
| Cost item | Typical range | What makes it go up |
|---|---|---|
| Downdraft vent system (unit) | $900 to $2,500 | premium finishes, higher airflow, included blower options |
| Installation labor | $400 to $1,500 | tight cabinetry, complex routing, limited access |
| Ducting materials | $75 to $500 | long runs, multiple elbows, special transitions |
| Electrical work (if needed) | $150 to $600 | adding an outlet, running new circuit, access issues |
Model-specific installation details that affect cost
The UXD8636DYS0 installation requirements can add labor time. The UXD8636DYS0 owner’s manual covers key items such as:
- Exhaust routing options (bottom, left, or right)
- Cabinet depth guidance (designed for 24-inch cabinet depth)
- Countertop cutout and positioning requirements
- Grounded electrical outlet requirement
Ongoing ownership costs
Routine cleaning and occasional replacement of the grease filter helps airflow and reduces noise. If you need a replacement, use the exact part listed for your configuration, such as the downdraft vent grease filter W10422878 or the downdraft vent 36-inch model grease filter W10425128.
Why it matters
Downdraft vents often require more cabinetry and duct planning than an overhead hood; budgeting for duct routing and cabinet modifications prevents surprises and helps the vent perform correctly.
Last updated: February 2026