


Can I use .095 trimmer line?
Yes, you can use .095-inch trimmer line on many Homelite trimmers, but on the Homelite ST-185 it only works well if the cutting head and eyelets are designed for that diameter; if the head is sized for thinner line, .095 can jam, feed poorly, or overload the engine.
Quick fit check (before you buy line)
- Remove the spool and look for a line size range molded into the head or spool.
- If the line binds when you hand-pull it through the eyelets, it is too thick.
- If bump-feed stops working or the line will not advance, step down in diameter.
- If the engine bogs down in normal grass, use a thinner line or shorten the line length.
- If you see melted line on the spool, the diameter is too large or the spool is overfilled.
What changes when you go thicker
Thicker line can last longer in abrasive weeds, but it also needs more torque to spin and can reduce RPM on a smaller gas trimmer.
| Line diameter | Best use | Common downside |
|---|---|---|
| .065 to .080 | Light to medium trimming | Wears faster in heavy weeds |
| .080 to .095 | Medium to heavier weeds | More load; can jam if head is small |
| .095 and up | Heavy brush-capable setups | Often too much for small heads/engines |
Why it matters
Using the correct line diameter helps the ST-185 cut cleanly, feed line consistently, and avoid extra strain on the clutch, drive components, and engine.
If your trimmer starts acting up after switching line
If problems start right after moving to .095, check the air and fuel system first, then return to a thinner line to confirm the symptom is load-related. A restricted air filter is a common cause of bogging.
- Inspect and replace the air filter if it is dirty or oil-soaked
- Make sure the spool is not overfilled and the line is wound evenly
- Clean debris from the head and eyelets
Helpful part for tune-up: filter 49422
Last updated: February 2026
How to change trimmer line on a gas trimmer?
To change trimmer line on your Homelite ST-185 gas line trimmer, we remove the trimmer head cap, load the correct diameter line onto the spool (or install a prewound spool if your head uses one), then reinstall the cap and test-feed the line before trimming.
Before you start (safety and setup)
- Shut the engine off and let it cool completely.
- Disconnect the spark plug wire so the trimmer cannot start accidentally.
- Clean grass and debris from the trimmer head so the cap tabs and spool seat correctly.
- Use the correct line diameter for your cutting head (most gas trimmers use about 0.080 in to 0.095 in line).
Steps to replace the trimmer line (most bump-feed heads)
- Remove the head cap: Press the side tabs or unscrew the cap (varies by head style).
- Remove the spool: Note how the spring and spool sit in the head.
- Wind new line:
- Cut two equal lengths of line (many heads use two lines).
- Feed the line into the spool holes/slots and wind in the direction of the arrow on the spool.
- Leave about 4 to 6 inches of line free on each side.
- Lock the line in the notches (if your spool has holding notches) to keep it from unwinding.
- Reinstall the spool and cap: Thread the line ends through the eyelets, seat the spool, then snap or screw the cap back on.
- Test feed: Pull both line ends to release them from the notches, then bump-test (with engine running) to confirm smooth feed.
Quick checks if the line will not feed
- Line wound the wrong direction on the spool
- Line diameter too large for the head
- Line fused together from heat (common if you run too long against hard surfaces)
- Debris packed under the cap or around the spring
| Symptom | Most common cause | What to do |
|---|---|---|
| Line breaks constantly | Line too thin or old/brittle | Replace with fresh line of the correct diameter |
| Line will not advance | Spool wound backward or jammed | Rewind correctly; clean head |
| Uneven line lengths | Line not centered on spool | Rewind with equal lengths |
Why it matters
Correctly loaded line reduces vibration, improves cutting performance, and prevents premature wear on the trimmer head, spool, and eyelets.
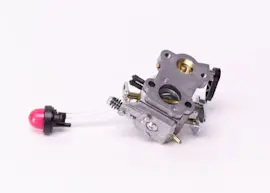
If you are rebuilding the head or doing a deeper repair while you have it apart, we also stock common ST-185 service items like the primer bulb UP04802 and starter rope 900849002.
Last updated: February 2026
How to start a gas line trimmer?
To start your Homelite ST-185 gas line trimmer, use the correct fresh fuel mix, prime the engine, set the choke for a cold start, then pull the starter rope until it fires and move the choke toward run as it warms up.
Quick start steps (cold engine)
- Move the trimmer to a flat, clear area; keep the cutting head off the ground.
- Set the stop switch to ON.
- Press the primer bulb about 10 times (or until you see fuel moving in the lines).
- Move the choke lever to CLOSED/FULL CHOKE.
- Hold the unit firmly; pull the starter rope in short, strong pulls.
- When the engine “pops” or tries to start, move choke to HALF (or OPEN, depending on your lever positions).
- Pull again until it starts; let it warm up 15 to 30 seconds, then move choke to OPEN/RUN.
Warm start (engine recently ran)
For a warm engine, you typically do not need full choke.
| Engine condition | Primer | Choke | Pulls |
|---|---|---|---|
| Cold | ~10 presses | Closed, then half/open after it pops | Until it starts |
| Warm | 0 to 3 presses | Open (or half if needed) | Until it starts |
If it will not start
These checks fix most no-start issues on 2-cycle trimmers:
- Old fuel: Drain and refill with fresh, properly mixed fuel.
- Flooded engine: Move choke to OPEN, hold throttle wide open (if equipped), and pull several times.
- Airflow restriction: Clean or replace the air filter; a clogged filter can prevent starting (see filter PS98913).
- Weak spark: Inspect the spark plug condition and gap; replace if fouled.
- Fuel delivery: Make sure the primer bulb is not cracked or collapsing (see primer bulb UP04802).
Why it matters
Correct priming and choke settings prevent flooding and reduce pull-start effort, which helps protect the recoil starter and gets your ST-185 running consistently.
Last updated: February 2026
Which is better, .080 or .095 trimmer line?
For a Homelite ST-185 gas line trimmer, .095-inch line is the better choice for most cutting because it holds up longer in thicker weeds and along fences. .080-inch line is better when you want easier feeding and lighter cutting in grass.
Quick comparison: .080 vs .095
| Trimmer line size | Best for | What you will notice | Trade-off |
|---|---|---|---|
| .080 in | Light trimming, edging, lighter grass | Smoother cutting, easier bump-feed | Wears faster in heavy weeds |
| .095 in | Heavier trimming, weeds, tougher edging | Longer life, better durability | Can reduce RPM slightly and may feed less easily |
How we choose the right line size
Use these checks to pick the best diameter for your job and your trimmer head:
- Match the trimmer head rating: the head must be designed to accept the diameter you install.
- Start with .095 for weeds: thick stems, fence lines, and rocky edges chew up thinner line.
- Use .080 for routine edging: sidewalks and light grass usually cut cleaner with less drag.
- Watch for symptoms of “too thick” line: bogging down, poor acceleration, or frequent stalling.
- Watch for symptoms of “too thin” line: constant breakage, rapid wear, and poor weed cutting.
Why it matters
Line diameter affects cutting power, fuel use, and how often you stop to re-spool. On a gas trimmer like the Homelite ST-185, stepping up to .095 often reduces downtime in tougher growth, while .080 keeps trimming light and responsive.
If the trimmer is hard to start or won’t stay running
A line change will not fix fuel or ignition issues. For common tune-up items, check the parts list for your ST-185, including the primer bulb UP04802 and filter 49422.
Last updated: February 2026