
Can you replace the chuck on a drill press?
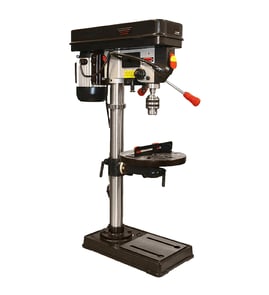
Yes. On the Craftsman 113213131 13-inch drill press, you can replace the chuck as long as you match the chuck mount style (most commonly a Jacobs taper on the chuck and a matching taper or arbor at the quill). The key is seating the taper cleanly and fully so the chuck runs true and does not fall off.
- Mount type: Jacobs taper (JT) size on the chuck (common sizes include JT2, JT3, JT33).
- Arbor or spindle interface: Some setups use a tapered arbor between the chuck and quill; others mount directly.
- Chuck capacity: Match the bit range you need (for example, 1/16 in. to 1/2 in.).
- Quill travel and clearance: A longer chuck or arbor can reduce usable drilling depth.
- Runout expectations: A quality chuck reduces wobble, especially with small bits.
- Unplug the drill press and lower the table for clearance.
- Remove the old chuck:
- If your drill press has a drift key slot, use the correct drift to pop the taper loose.
- If it uses an arbor, remove the arbor and chuck together, then separate them.
- Clean the tapers (inside the chuck and on the arbor/spindle) with a clean rag; remove oil and grit.
- Seat the new chuck by pushing it straight onto the taper, then apply firm upward pressure (many techs seat it by raising the table into a block of wood under the chuck).
- Test for wobble with a straight bit or rod; reseat if needed.
| Symptom | Most common cause | Fix |
|---|---|---|
| Chuck falls off | Taper not fully seated, oil on taper | Clean and reseat firmly |
| Visible wobble | Debris on taper, bent arbor | Clean; replace arbor if bent |
| Bit slips | Worn jaws, wrong chuck capacity | Replace chuck; match capacity |
A properly fitted chuck protects the quill bearings, improves drilling accuracy, and prevents the chuck from dropping during use, which can damage the workpiece and the drill press.
For drill press electrical checks during service (switch, cord, motor), use a meter and follow safe testing practices like those shown in how to use a multimeter to test electrical parts video.
Last updated: February 2026
What is a 13 drill press?
A 13-inch drill press is a drill press size class that refers to its approximate drilling capacity (commonly tied to the swing, meaning about 13 inches over the table). For your Craftsman 113213131 13-inch drill press, it generally means more throat depth and capacity than smaller benchtop models, making it better for larger workpieces and more precise drilling.
Most drill presses are described by swing:
- Swing is roughly 2 times the throat depth (center of spindle to the column)
- A “13-inch” drill press typically has about 6.5 inches of throat depth
- This affects how far from an edge you can drill into a board or panel
| Spec term | What it describes | Why it matters |
|---|---|---|
| Swing (13-inch class) | Max diameter over the table | Determines overall capacity |
| Throat depth | Spindle center to column | Limits how far in from an edge you can drill |
| Quill travel | How far the bit moves down | Impacts drilling depth in one stroke |
| Chuck capacity | Max shank size the chuck grips | Determines bit sizes you can use |
Compared with smaller drill presses, a 13-inch class drill press commonly offers:
- More room between the bit and the column for wider stock
- A sturdier head and column for better accuracy
- Multiple belt-and-pulley speed options for wood and metal drilling
- A tilting and/or swiveling table for angled drilling
- A keyed chuck designed for a wider range of drill bit shank sizes
Choosing the right size drill press helps you drill straighter holes with less vibration, especially in hardwood, thicker lumber, or larger panels. The “13-inch” class is a practical step up when you need capacity and control without moving to a full floor-standing industrial press.
Last updated: February 2026
What is a good horsepower for a drill press?
For a Craftsman 113213131 13-inch drill press, a good motor size for most home shop drilling is 1/2 HP to 3/4 HP. If you regularly drill larger holes in steel or use big Forstner bits and hole saws, 1 HP or more is the better target; low-speed capability and torque matter as much as horsepower.
- 1/3 to 1/2 HP: light duty drilling in wood and plastics; small bits in thin metal
- 1/2 to 3/4 HP: best all-around range for hobby and DIY; common for 13-inch bench/floor presses
- 1 to 1-1/2 HP: frequent metal drilling, larger diameter bits, hole saws, and tougher workloads
- 2 HP+: production-style use; usually paired with heavier industrial drill presses
Horsepower helps, but drill press performance is often limited by speed range, belt setup, and rigidity.
- Low RPM options: critical for larger bits and metal (less heat, less chatter)
- Pulley and belt condition/tension: slipping belts feel like “low power”
- Quill travel and runout: affects accuracy and how hard the bit works
- Chuck capacity and bit type: larger bits demand more torque
- Workholding: a vise or clamps prevent grabbing and stalling
Use this checklist when comparing motors or deciding whether an “upgrade” is worth it.
| Your typical work | Good HP target | Speed priority |
|---|---|---|
| Wood, plastics, occasional thin metal | 1/2 HP | Medium to high RPM range |
| Mixed DIY, moderate hole sizes | 3/4 HP | Wide range, including lower RPM |
| Frequent steel drilling, larger bits | 1 HP+ | Strong low RPM options |
Choosing the right horsepower helps prevent stalling, overheating bits, and rough holes. Just as important, the right speed range and solid belt drive let your Craftsman drill press cut cleanly with less vibration.
For electrical troubleshooting steps and safe testing practices, use how to use a multimeter to test electrical parts video.
Last updated: February 2026
What is the 4 inch rule for drill press?
For the Craftsman 113213131 13" drill press, the 4-inch rule means we keep our hands at least 4 inches away from the rotating drill bit and moving workpiece at all times. If your fingers would be closer than 4 inches, we secure the material with a clamp or vise instead of holding it by hand.
- Clamp the workpiece to the drill press table before you start drilling.
- Use a drill press vise for small parts, short pieces, or round stock.
- Keep your hands on the clamp handles or vise, not on the workpiece.
- Remove the chuck key immediately after tightening the bit.
- Stop the drill press before clearing chips; use a brush, not your fingers.
- Tie back long hair and avoid loose sleeves, gloves, or jewelry near the spindle.
If any of these apply, we treat clamping as mandatory:
| Situation | Why it increases risk | What to do |
|---|---|---|
| Small workpiece | Fingers naturally get too close | Use a vise or clamp blocks |
| Round material (pipe, dowel) | Can spin like a propeller | Use a V-block in a vise |
| Thin sheet metal | Can grab and “wind up” | Clamp to a backing board |
| Large bit or hole saw | Higher torque and grab | Clamp firmly; slow speed |
A drill press can grab the bit and instantly spin the workpiece. The 4-inch rule forces us to use proper workholding so the tool controls the cut, not our hands.
For a quick safety refresher before troubleshooting vibration, belt issues, or electrical problems, we recommend reviewing are diy appliance repairs safe.
Last updated: February 2026