
What are the parts of an arc welder?
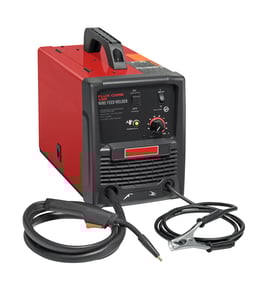
An arc welder like the Craftsman 11320246 is built around a power source and a controlled output circuit that creates and maintains an electric arc. Most units include input power components, a transformer (or inverter), output terminals/leads, and basic controls for amperage.
Main parts you will typically find
- Input power cord and plug: brings power from the outlet to the welder
- On/off switch: energizes the machine
- Transformer or inverter power module: steps voltage down and increases current for welding
- Amperage control: sets welding output (current)
- Output terminals: where the electrode holder lead and work clamp lead connect
- Electrode holder (stinger): grips the welding rod (electrode)
- Work clamp (ground clamp): clamps to the workpiece to complete the circuit
How the circuit works (quick overview)
When you strike the rod on the metal, the welder sends high current through the electrode lead, across the arc, and back through the work clamp lead. The transformer/inverter and controls regulate that current so the arc stays stable.
| Component | What it does | Common symptom if faulty |
|---|---|---|
| Power switch / input wiring | Supplies power to the machine | No power, intermittent power |
| Transformer/inverter | Creates usable welding output | Weak arc, no output |
| Amperage control | Adjusts current | Output stuck too high/low |
| Electrode holder / cables | Delivers current to the rod | Hot connectors, erratic arc |
| Work clamp / cable | Returns current to the machine | Hard starts, unstable arc |
Why it matters
Knowing the major parts helps you troubleshoot safely and faster. For example, an unstable arc is often a connection issue (work clamp, electrode holder, cable ends) rather than a failed transformer.
Safe troubleshooting basics
- Unplug the welder before opening any covers or touching internal wiring
- Inspect cable ends and clamps for looseness, corrosion, or overheating
- Check for damaged insulation, pinched leads, or burnt connectors
- Use a meter only if you are trained; otherwise, have a technician test the circuit
- If you suspect a blown fuse or wiring issue, follow a proven test method like how to tell if a fuse is blown
Last updated: February 2026
Where can I buy Craftsman replacement parts?
You can buy replacement parts for your Craftsman model 11320246 welder through Sears PartsDirect, where you can search by the exact model number to match parts to your 180-amp AC limited-input type arc welder.
Best way to shop for the right part
Because older welders often have multiple revisions, we recommend shopping by model number first, then confirming the part by description and any markings on the original part.
- Use the full model number 11320246 when searching
- Match the part by name, dimensions, and mounting style (not just by appearance)
- Compare any stamped numbers on the old part (switches, cords, clamps, holders)
- If the welder has been modified, match to the current wiring and hardware
- Order only after confirming fit for your exact configuration
What to have ready before you order
Having a few details on hand helps you avoid returns and downtime.
| What to check | Where to find it | Why it matters |
|---|---|---|
| Model number | Rating plate or label on the welder | Ensures the correct parts list |
| Part markings | Printed or stamped on the old part | Helps confirm compatibility |
| Electrical rating | Label on cord/switch or welder plate | Prevents overheating and failures |
| Connection type | Terminals, lugs, plug style | Avoids rewiring surprises |
Why it matters
Using the correct replacement part on a welder protects performance and safety. A mismatched power cord, switch, or internal lead can cause nuisance tripping, overheating, weak arc output, or damage to internal components.
Helpful DIY reference
If you are troubleshooting a no-power issue or intermittent operation, start with basic electrical checks using a meter and a visual inspection of wiring.
Last updated: February 2026
What is the average lifespan of 11320246?
A Craftsman 11320246 180-amp AC limited-input type arc welder typically lasts 15 to 25 years with normal hobby or light shop use. Lifespan depends most on duty cycle habits, cooling/airflow, and keeping cables, connections, and internal wiring in good condition.
What affects lifespan the most
- Duty cycle and heat: frequent overheating shortens transformer, rectifier, and insulation life.
- Airflow and dust: blocked vents and metal dust buildup raise internal temperatures.
- Power quality: loose plugs, undersized extension cords, and low voltage increase current draw and heat.
- Cable and clamp condition: high resistance at worn lugs or a weak ground clamp creates excess heat.
- Storage and corrosion: damp storage promotes rust and electrical connection problems.
Quick maintenance checklist (high impact)
- Blow out vents and interior (when unplugged) with dry, low-pressure air.
- Inspect the electrode holder, ground clamp, and cable insulation for cracks or hot spots.
- Tighten accessible electrical connections; look for discoloration or melted insulation.
- Keep the fan path clear; confirm the fan runs smoothly (if equipped).
- Use a properly sized circuit and cord to avoid voltage drop.
Typical lifespan by use pattern
| Use pattern | Typical lifespan | What usually ends it |
|---|---|---|
| Occasional DIY | 20 to 25 years | cable wear, switches, corrosion |
| Regular home shop | 15 to 20 years | heat stress, connection failures |
| Heavy daily use | 10 to 15 years | overheating, internal electrical wear |
Why it matters
A welder can still “work” while running too hot or with high-resistance connections; that accelerates failure and can cause poor arc stability. Basic airflow and cable checks often add years of reliable service.
For help identifying the correct model number before ordering parts or comparing diagrams, use [how to find your appliance model number (and what it means for parts)].
Last updated: March 2026