Installation guide
 Owner’s manual
 Error Codes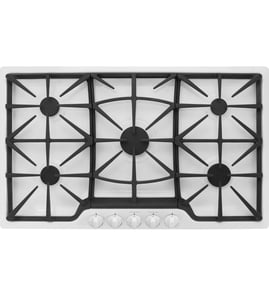


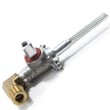
How to order GE appliance parts?
To order parts for your GE PGP953DET2BB gas cooktop, we recommend using the complete model number and serial number so you get the exact match. The serial plate is located on the bottom of the burner box; it also lists burner ratings and the fuel type/pressure the cooktop was set for at the factory (see the PGP953DET2BB installation guide).
What information to gather before you order
Having these details ready prevents wrong-part returns and delays:
- Full model number: PGP953DET2BB
- Serial number (from the serial plate on the bottom of the burner box)
- Fuel type in your home: natural gas or LP (propane)
- The specific burner location having trouble (left front, center, etc.)
- A brief symptom (won’t ignite, weak flame, gas smell, knob hard to turn)
Common cooktop parts customers order for this model
If you are troubleshooting a burner issue, these are frequent replacements on sealed gas cooktops:
| Symptom | Common part to check | Example part for PGP953DET2BB |
|---|---|---|
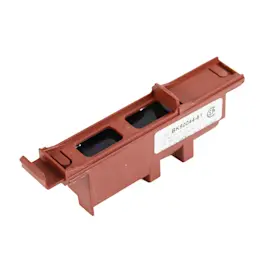
| Burner won’t light or keeps clicking | Igniter switch and wiring | Cooktop burner igniter switch WB17T10026 |
| Uneven flame or poor ignition | Burner cap and burner head | Range surface burner cap WB28K10222, range surface burner head WB16K10062 |
| Burner won’t adjust or won’t shut off smoothly | Burner valve | Cooktop burner valve WB19T10085 |
Ordering tips that prevent fit issues
- Match parts by model number plus serial number when possible.
- If your cooktop has been converted to LP, confirm the correct setup in the PGP953DET2BB installation guide before ordering fuel-related parts.
- Compare your old part’s markings and shape to the replacement listing.
- Order all related small hardware you may need (screws, brackets) if your originals are stripped or corroded.
Why it matters
GE cooktops can use different part revisions by production run. Using the model and serial number from the serial plate helps ensure the replacement part fits, matches the correct fuel configuration, and restores safe burner operation.
Last updated: February 2026
How do I find the right GE part number?
For your GE PGP953DET2BB gas cooktop, the fastest way to get the right part number is to match the model number and the cooktop’s serial plate information, then use the parts diagram to confirm the exact part ID for your burner position or control. Use the PGP953DET2BB installation guide to locate the serial plate and the ordering details.
Step-by-step: how we recommend finding the correct part
- Confirm the model number is PGP953DET2BB (use the rating/serial plate, not the cooktop label on the countertop).
- Find the serial plate location: it’s on the bottom of the burner box.
- Write down the model number, serial number, and the code letter listed on the serial plate.
- Identify the failed area (burner, ignition, valve, grate, wiring) and match it to the correct diagram callout.
- Cross-check the part by name + part ID before ordering.
Common GE cooktop parts you may be matching
If you already know what failed, these are examples of part types shown for this model:
| What you’re replacing | What to match | Example part for this model |
|---|---|---|
| Burner cap | Size and burner position | Range surface burner cap WB28K10222 |
| Burner head | Burner style and position | Range surface burner head WB16K10062 |
| Gas valve | Knob position and valve style | Cooktop burner valve WB19T10085 |
| Ignition switch | Switch style and harness fit | Cooktop burner igniter switch WB17T10026 |
Why the serial number and code letter matter
GE can use different revisions during a production run. Using the model number, serial number, and code letter helps ensure the replacement part matches the exact configuration your PGP953DET2BB left the factory with.
Quick tips to avoid ordering the wrong part
- Match parts by burner location (front-left, rear-right, center) and size.
- If a burner won’t light, check for cleaning and alignment issues before ordering parts.
- If multiple burners click or won’t spark, the issue is often in the ignition circuit (switches, wiring, or module).
Last updated: February 2026
Where can I find my GE cooktop model number?
On your GE PGP953DET2BB gas cooktop, the model number is on the serial plate located on the bottom of the burner box (under the cooktop). Once you find it, record the full model and serial number before ordering parts or scheduling service.
Where to look on the cooktop
Use these common, model-appropriate spots to locate the rating or serial plate:
- Under the cooktop, on the bottom of the burner box (most common for this model)
- Under the cooktop near the center area, not on the grates or burner caps
- On a metal or foil label that also lists gas type and pressure information
What the serial plate tells you (and what to write down)
The plate typically includes more than just the model number. We recommend writing down:
- Model number (PGP953DET2BB)
- Serial number
- Fuel type (natural gas or LP) and factory adjustment information
- Burner ratings (BTU information)
- Any code letter listed for parts identification
| Item on the plate | Why it matters |
|---|---|
| Model number | Ensures parts fit your exact cooktop |
| Serial number | Helps match production changes |
| Code letter (if shown) | Improves accuracy when ordering |
| Gas type and pressure | Critical for safe setup and correct conversion parts |
Why it matters
GE uses model and serial information to match the correct burner components, wiring, and gas parts. Using the exact model number helps avoid ordering the wrong burner cap, burner head, or valve for your cooktop.
Helpful references
- Use the diagrams and label location notes in the PGP953DET2BB installation guide.
- If you are replacing burner-top pieces after confirming your model, common items include the range surface burner cap WB28K10222.
Last updated: February 2026
Can the top of a gas stove be replaced?
Yes. On the GE PGP953DET2BB gas cooktop, the “top” (the main cooktop surface) can be replaced as an assembly when it’s cracked, warped, or heavily stained; the job involves lifting the cooktop, disconnecting components, and re-sealing and leak-checking the gas system per the installation guide.
What “top replacement” usually means
On a gas cooktop, customers often mean one of these:
- Cooktop surface/main top (the large top panel the burners mount through)
- Burner grates (the cast grates that pots sit on)
- Burner caps/heads (the removable burner pieces)
If only a grate, cap, or burner head is damaged, replacing that part is faster and less expensive than replacing the entire top.
Parts that are commonly replaced instead of the whole top
These are frequent “top-area” replacements for this model:
- Cooktop burner grate WB31T10145 if a grate is broken or badly rusted
- Range surface burner cap WB28K10222 if a cap is chipped, corroded, or won’t sit flat
- Range surface burner head WB16K10062 if ports are damaged or the flame pattern is uneven
Quick comparison
| What’s damaged | Typical symptom | What to replace |
|---|---|---|
| Main cooktop surface | cracks, deep corrosion, mounting points broken | cooktop top/surface assembly (model-specific) |
| Grate | wobbling cookware, broken foot | burner grate |
| Cap/head | uneven flame, poor ignition, yellow tips | burner cap and/or burner head |
| Valve/switch | burner won’t adjust, clicking issues | burner valve or igniter switch |
Safety and installation notes (gas matters)
When the cooktop is lifted or removed, gas connections may be disturbed. The installation instructions for this cooktop specify:
- Never reuse old flexible gas connectors
- Use approved thread sealant for LP or natural gas on threaded connections
- Keep the shut-off valve accessible and complete connections correctly
For LP conversion work, the instructions call for a qualified installer or gas supplier.
Why it matters
A damaged top can affect burner alignment, flame stability, and safe clearances around the burner box. Replacing only the failed component (cap, head, grate) often restores performance without the complexity of a full cooktop surface swap.
Last updated: February 2026
Why does my GE gas cooktop igniter keep clicking?
On our GE PGP953DET2BB gas cooktop, a steady igniter clicking usually means the spark system is still trying to light because it is sensing a lighting problem. The most common causes are moisture, a dirty or mis-seated burner cap/head, or a sticking igniter switch.
Quick checks that fix most clicking
- Turn the knob to OFF; wait 60 seconds, then try again.
- Remove the grate, burner cap, and burner head; dry everything completely.
- Reinstall parts carefully; the burner head must sit level and align its slot over the electrode, and the cap must be properly seated. See the installation guide.
- Clean food spills from the burner head ports and around the electrode; use a soft brush and let it dry.
- If clicking continues with all knobs OFF, suspect a stuck spark/igniter switch.
What “normal” clicking sounds like on this model
When you turn a burner knob to LITE, all igniters may tick, but only the selected burner should light. Once it lights, moving the knob out of LITE should stop the clicking. The installation guide describes this spark-ignition behavior and the post-install igniter check.
| What you notice | Most likely cause | What to do first |
|---|---|---|
| Clicks until burner lights, then stops | Normal operation | Turn knob out of LITE |
| Clicks and burner lights poorly or unevenly | Cap/head misaligned or wet | Dry and reseat cap/head |
| Clicks even with knobs OFF | Igniter switch stuck or moisture in switch area | Dry area; plan switch replacement |
Parts that commonly solve persistent clicking
If drying and reseating does not help, these parts are common fixes on the PGP953DET2BB:
- Cooktop burner igniter switch WB17T10026 (stuck/shorted switch can keep sparking)
- Range surface burner cap WB28K10222 (warped or wrong cap can prevent proper lighting)
- Range surface burner head WB16K10062 (clogged/damaged head can delay ignition)
Why it matters
Continuous sparking can wear out the igniter system and often points to a burner that is not lighting cleanly. Correct burner assembly and a dry, clean ignition area restore reliable lighting and help prevent nuisance clicking.
Last updated: February 2026
Where is the igniter on my GE Profile stove top?
On the GE PGP953DET2BB gas cooktop, the igniter (spark electrode) sits right next to each burner, under the burner head and cap. You’ll see the small white ceramic electrode once you lift off the burner grate, burner cap, and burner head; it lines up with a slot in the burner head.
Where you’ll see it (burner parts stack)
From top to bottom, the igniter is located beside the burner base and lines up through the burner head opening:
- Burner grate (lifts off)
- Burner cap (lifts off)
- Burner head (lifts off; has a slot)
- Igniter electrode (fixed in place next to the burner base)
- Burner base (stays mounted to the cooktop)
For the exact burner assembly and positioning details, use the PGP953DET2BB installation guide.
Safety and handling tips
The electrode is exposed when the burner head is removed, so use these precautions:
- Turn all burner knobs to OFF before removing any burner parts.
- Do not turn on any burner while a burner head is removed.
- Do not touch the electrode while another burner is sparking.
- Let the cooktop cool before handling caps and heads.
- Reinstall parts carefully; a small gap between the burner base and head is normal.
Quick check: is the igniter working?
When you turn a knob to LITE, you should hear ticking and see sparking. On this style of GE cooktop, all igniters may spark, but only the selected burner should light.
| What you notice | Most likely cause | What to do next |
|---|---|---|
| No ticking on any burner | No power to cooktop | Check outlet and breaker, then retest |
| Ticking but burner will not light | Cap/head not seated, or burner ports dirty | Reseat and clean burner parts |
| One burner will not spark | Dirty/wet electrode area, or switch issue | Dry/clean; if persistent, inspect ignition switch |
Why it matters
If the burner head slot is not positioned over the electrode, the spark may not jump correctly, causing delayed ignition, clicking, or a burner that will not light.
Last updated: February 2026
What is the code F153 on a GE cooktop?
On a GE cooktop, an F153 code points to a burner temperature-sensing circuit problem (commonly an open sensor circuit). On the GE PGP953DET2BB gas cooktop, this typically leads us to check the burner ignition and control wiring and then the related control components.
What to check first (safe, quick checks)
- Turn all knobs to OFF and let the cooktop cool completely.
- Verify the burner parts are seated correctly: cap centered and burner head aligned.
- Clean and dry the burner head ports and the area around the igniter; moisture and debris can cause false fault behavior.
- Restore power and try lighting one burner at a time to see if the issue is isolated to a single burner position.
- If the igniters keep clicking or a burner behaves erratically, inspect the igniter switch circuit.
Likely causes and the most common fixes
For this model, the most common root causes are ignition-switch or wiring issues rather than a true “temperature sensor” failure.
| Symptom you notice | Most likely area | What we usually do next |
|---|---|---|
| Constant clicking, even with knobs off | Igniter switch circuit | Test/replace cooktop burner igniter switch WB17T10026 |
| One burner won’t light, others OK | Burner head/cap alignment or clog | Clean/realign; replace range surface burner head WB16K10062 or range surface burner cap WB28K10222 if damaged |
| Burner flame is unstable or won’t adjust | Gas valve issue | Inspect/replace cooktop burner valve WB19T10085 |
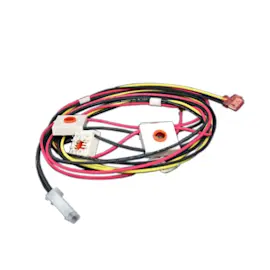
| Intermittent faults after cleaning or moving unit | Loose/burned connector | Inspect harness; replace cooktop wire harness WB18T10511 if needed |
Why it matters
An F153-style fault is often triggered by an abnormal operating condition (misaligned burner parts, moisture, or an ignition-switch short). Correcting it helps prevent nuisance shutoffs, repeated sparking, and unreliable burner operation.
Important safety note
Before any inspection under the cooktop, disconnect electrical power at the breaker and follow the steps in the PGP953DET2BB installation guide.
Last updated: February 2026
Why is my GE cooktop not working?
If your GE PGP953DET2BB gas cooktop is not working, the most common causes are no power to the spark ignition system, a misaligned or clogged burner cap or burner head, or a failed igniter switch or burner valve. Start with power and burner seating first.
Quick checks we recommend first
- Confirm the cooktop has power; spark ignition requires a properly grounded 120V outlet.
- Turn a knob to LITE and listen for rapid ticking; no ticking points to a power, switch, or wiring issue.
- Reseat the burner cap so it sits flat and centered on the burner head.
- Clean spillovers from burner ports and the cap underside; clogged ports prevent ignition.
- If the burner does not light within 5 seconds, turn the knob OFF and wait 1 minute before trying again.
What the symptoms usually mean
| What you notice | Most likely cause | What to do next |
|---|---|---|
| No burners click or spark | No power, failed igniter switch, wiring issue | Check breaker and outlet; inspect switch and harness |
| One burner clicks but will not light | Cap/head misaligned, clogged ports, gas supply issue | Reseat and clean; verify gas is on |
| Lights with a match but not with spark | Spark system or switch problem | Inspect/replace switch; check connections |
| No ignition and no gas flow at one burner | Burner valve not opening | Test/replace the valve |
Parts that commonly fix this on PGP953DET2BB
- Cooktop burner igniter switch WB17T10026 (no clicking or intermittent sparking)
- Cooktop burner valve WB19T10085 (burner gets no gas)
- Range surface burner head WB16K10062 (damaged or heavily clogged ports)
Why it matters
This cooktop needs both gas flow and household power for spark ignition; a simple cap alignment issue can mimic a bigger failure, while a no-spark condition usually traces back to power, a switch, or wiring.
For electrical requirements and safe lighting steps during a power failure, use the PGP953DET2BB installation guide.
Last updated: February 2026