Get free shipping on your order, with any water filter subscription. Find my filter

Open Hamburger Menu
Sears Parts Direct
Tips to find your model number

Jenn-Air C221 electric grill Parts

Here are the diagrams and repair parts for Jenn-Air C221 electric grill, as well as links to manuals and error code tables, if available.

Jenn-Air C221 electric grill
By Schematic
By Part
SELECT DIAGRAM
?

This is the number corresponding to the part on the diagram / schematic

Browse Parts for C221 Electric Grill

  • Screw for Jenn-Air C221 - Part 701933

    Burner box diagram

    Screw

    Part #701933

    The manufacturer no longer makes this part, and there's no substitute part

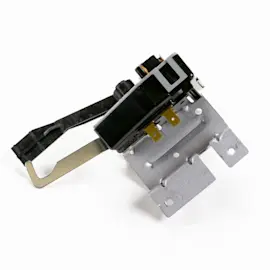
  • Fan Switch for Jenn-Air C221 - Part 715397

    Control panel diagram

    Fan Switch

    Part #715397

    The manufacturer no longer makes this part, and there's no substitute part

  • Retainer Clip for Jenn-Air C221 - Part 700503

    Burner box diagram

    Retainer Clip

    Part #700503

    The manufacturer no longer makes this part, and there's no substitute part

  • Motor Cover for Jenn-Air C221 - Part 700027

    Blower plenum diagram

    Motor Cover

    Part #700027

    The manufacturer no longer makes this part, and there's no substitute part

  • Conduit for Jenn-Air C221 - Part 707758

    Blower plenum diagram

    Conduit

    Part #707758

    The manufacturer no longer makes this part, and there's no substitute part

  • Griddle Element for Jenn-Air C221 - Part 700491

    Top assembly diagram

    Griddle Element

    Part #700491

    The manufacturer no longer makes this part, and there's no substitute part

  • Wire (yellow) for Jenn-Air C221 - Part 712200

    Top assembly diagram

    Wire (yellow)

    Part #712200

    The manufacturer no longer makes this part, and there's no substitute part

  • Connector for Jenn-Air C221 - Part 707766

    Blower plenum diagram

    Connector

    Part #707766

    The manufacturer no longer makes this part, and there's no substitute part

  • Service Manual for Jenn-Air C221 - Part 16000448

    Control panel diagram

    Service Manual

    Part #16000448

    The manufacturer no longer makes this part, and there's no substitute part

  • Washer for Jenn-Air C221 - Part 707664

    Washer

    Part #707664

    The manufacturer no longer makes this part, and there's no substitute part

Jenn-Air Electric Grill C221 FAQs

On Jenn-Air appliances, the model number is printed on a rating label; for C221, confirm the exact characters on that label and match them when ordering parts. The C221 owner's manual typically shows the label location and what information to record.

Where to look for the rating label

  • Underside of the unit or base plate
  • Back panel near the power cord entry
  • Inside an access panel near controls or wiring
  • Along an edge where the unit mounts into a countertop or cabinet

What to write down (exactly as shown)

  • Model number (for example, C221)
  • Serial number
  • Any suffix letters or revision numbers
  • Electrical rating (volts/amps), if listed

Quick checklist before ordering parts

  • Match every character; model numbers are case-sensitive and spacing matters
  • Use the model number to confirm fit for controls like an infinite switch W11120795
  • If the label is worn, take a clear photo and zoom in to verify characters
Label detail Why it matters
Model number Ensures diagrams and parts lists match your exact build
Serial number Helps identify production run changes
Electrical rating Confirms correct switch and wiring specifications

Why it matters

Using the exact model number prevents ordering a similar-looking switch, knob, or receptacle that mounts differently or has different electrical ratings.

Last updated: March 2026

We troubleshoot the Jenn-Air C221 by starting with power and airflow basics, then checking controls and wiring for heat damage or loose connections. Use the wiring diagram and component access guidance in the C221 owner's manual before testing or replacing parts.

Step-by-step troubleshooting (most common)

  • No power: verify outlet power, plug fit, and any accessible internal connections
  • Weak airflow or more smoke/odor: clean the filter and check for obstructions
  • Erratic heat or won’t regulate: suspect the infinite switch or a loose knob
  • Intermittent operation: look for loose receptacles, scorched terminals, or damaged wires
  • Unusual noise: inspect blower area for debris and wheel damage

Safe electrical checks we recommend

  • Unplug the unit before opening panels
  • Look for melted insulation, darkened terminals, or brittle connectors
  • If you have a meter, test continuity and voltage only when you can do so safely
  • Use a wiring schematic to trace the circuit logically

Helpful references:

Parts that commonly solve symptoms

Symptom Likely part Example part on this model
Poor airflow Grease filter clogged Range downdraft vent grease filter WP707929
Heat won’t adjust Infinite switch failing Infinite switch 700855K
Rattling or scraping Blower wheel issue Blower wheel WPY707985
Loose connection Receptacle worn Receptacle WPY702434

Why it matters

Troubleshooting in a simple order (power, airflow, controls, wiring) prevents unnecessary part replacement and reduces the risk of overheating from high-resistance electrical connections.

Last updated: March 2026

Most Jenn-Air appliances in the C221 class typically last 10 to 15 years with normal use and basic maintenance. Keeping electrical connections tight and replacing worn controls early helps prevent overheating and premature failure; see the C221 owner's manual for model-specific care guidance.

What affects lifespan the most

  • Heat exposure and ventilation around the unit
  • Frequency of use (daily use shortens life versus occasional use)
  • Grease and debris buildup that restricts airflow
  • Worn electrical controls (switches, knobs, receptacles)
  • Loose or corroded wiring connections

Maintenance that adds years

  • Keep vents and filters clean so the blower can move air efficiently
  • Inspect knobs and switches for looseness, sticking, or arcing marks
  • Tighten accessible mounting screws if panels or controls feel loose
  • Replace damaged wiring promptly to prevent hot spots

Common wear items (examples)

Part type What you notice Example part on this model
Grease filter Reduced airflow, more smoke/odor Range downdraft vent grease filter WP707929
Control knob Cracked, slipping, hard to turn Switch knob WPY700854
Infinite switch Erratic heat, won’t regulate Infinite switch W11120795

Why it matters

A small appliance that runs hot or has poor airflow stresses wiring and switches. Addressing airflow and control issues early reduces the chance of repeated failures and keeps performance consistent.

Last updated: March 2026
Most common symptoms to help you fix your laundry centers

Choose a symptom to see related laundry center repairs.

Main causes: broken dryer drive belt, weak drive motor, binding drum seals…

Main causes: door not fully shut, bad door switch, faulty push-to-start switch, wiring failure, bad drive motor, blown f…

Main causes: blocked exhaust vent, clogged lint screen, bad timer, moisture sensing problems, weak gas valve coils, bad …

Main causes: broken lid switch or lid lock, faulty drive motor, drain system problem, broken drive system components…

Main causes: bad lid switch or lid lock, drive motor failure, broken motor coupler, bad timer, faulty electronic control…

Main causes: clogged drain system, blocked drain hose, bad drain pump…

Main causes: control system failure, broken heating element, bad gas valve coils, gas supply failure, voltage supply pro…

Main causes: unbalanced load, broken suspension springs or shocks, worn snubber ring…

Main causes: lack of water supply, failed lid switch or lid lock, bad water level pressure switch, control system failur…

Most common repair guides to help fix your laundry centers

These step-by-step repair guides will help you safely fix what’s broken on your laundry center.

How to replace a laundry center washer lid lock switch

How to replace a laundry center washer lid lock switch

If the washer fills but won’t start the agitation cycle, the lid lock switch could be defective. …

Repair time and Difficulty

 15 minutes or less
How to replace a laundry center washer timer

How to replace a laundry center washer timer

If the washer doesn't fill, spin or drain, the timer could be the problem. …

Repair time and Difficulty

 15 minutes or less
How to replace a laundry center washer snubber ring

How to replace a laundry center washer snubber ring

If the washer tub bangs the cabinet during the spin cycle even though the load is balanced, you might need to replace th…

Repair time and Difficulty

 15 minutes or less

Effective articles & videos to help repair your laundry centers

Use the advice and tips in these articles and videos to get the most out of your laundry center.

How to get cleaner clothes: 7 laundry tips for whiter whites and better results

How to get cleaner clothes: 7 laundry tips for whiter whites and better results

Tired of dull laundry? These 7 expert tips help you get cleaner clothes, brighten whites, and fix common washer mistakes…

Are DIY appliance repairs safe?

Are DIY appliance repairs safe?

Find out how to stay safe when repairing your appliances.…

Cleaning your appliances after a drinking water advisory

Cleaning your appliances after a drinking water advisory

Find out how to clean and flush household appliances once a boil water advisory is lifted.…

Parts & More

Bottom-Mount Refrigerator
Chainsaw
Electric Leaf Blower
Electric Range
Gas Water Heater
Lawn & Garden Engine
Parts
Refrigerator
Television
Toaster
Upright Freezer
Washer