
What size string for Black and Decker electric trimmer?
For the Black & Decker ST6000 electric line trimmer, we use 0.065-inch diameter trimmer line for consistent feeding and clean cutting. This is the most common line size for light-duty electric trimmers like the ST6000.
Quick specs to match
- Line diameter: 0.065 in (1.65 mm)
- Typical line length on a spool: about 20 ft (varies by spool style)
- Feed type: commonly bump-feed on many Black & Decker trimmers
- Best use: grass and light weeds (thicker line can overload the motor)
How to confirm you are buying the right line
Even within the ST6000 family, “TYPE 1” matters for parts fit. Use these checks before ordering:
- Verify the model number is ST6000 and the type is TYPE 1 on the trimmer label.
- Match the diameter first (0.065 in), then match the spool style (single vs. dual line).
- If your trimmer uses a pre-wound spool, compare the hub shape and locking tabs to your old spool.
- If you are winding bulk line, wind it evenly to prevent jams.
What happens if you use the wrong size line?
Using the wrong diameter is one of the most common causes of feed problems.
| Line size | What you will notice | Result |
|---|---|---|
| Too thin | Breaks often, poor cutting | More downtime |
| Correct (0.065 in) | Smooth feed, steady cutting | Normal operation |
| Too thick | Won’t feed, stalls, overheats | Motor strain and poor performance |
Why it matters
The ST6000 is designed around a specific line diameter. Staying with 0.065-inch helps the spool feed correctly, reduces vibration, and prevents the motor from working harder than it should.
For help identifying the exact model label location and what the numbers mean, use how to find your appliance model number (and what it means for parts).
Last updated: February 2026
Are black and decker string trimmers good?
Yes. Black & Decker string trimmers are a solid choice for light to medium yard work; they are typically easy to handle, simple to operate, and well-suited for routine trimming and edging. For the Black & DECKER ST6000, overall “good” comes down to matching the tool to your yard size and how often you trim.
What “good” means for a string trimmer
A string trimmer is “good” when it fits your workload and feels reliable in your hands.
- Best for: small to average lawns, fence lines, sidewalks, and touch-up work
- Strengths: lightweight feel, quick edging, easy storage
- Tradeoffs: not ideal for heavy brush, thick weeds, or all-day commercial use
- Typical user wins: less fatigue, faster cleanup, fewer complicated adjustments
What to expect from the ST6000 style of trimmer
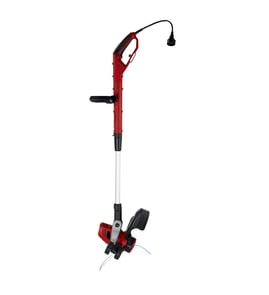
The Black & DECKER ST6000 is a 12-inch class line trimmer; most trimmers in this category are designed for control and convenience more than raw cutting power.
| Yard task | How it typically performs | Tip for better results |
|---|---|---|
| Trimming grass edges | Very good | Keep the line at full speed before contacting grass |
| Sidewalk and driveway edging | Good | Work in short passes to avoid scalping |
| Thick weeds | Fair | Use slower, repeated passes; do not force the head |
| Brushy growth | Poor | A brush cutter or heavier-duty trimmer is a better fit |
How to get the best performance (and fewer headaches)
- Use the correct line diameter for your trimmer head (too thick can bog down; too thin breaks fast).
- Keep the spool wound neatly to reduce tangles and feed issues.
- Avoid “chopping” into hard surfaces; it wears line quickly and can stress the guard.
- If it’s electric corded, use a proper outdoor extension cord and keep connections off wet grass.
- If power seems weak, check for airflow blockage around vents and inspect the cord for damage.
Why it matters
Choosing a trimmer that matches your yard prevents overheating, constant line breakage, and frustration. A lighter 12-inch trimmer like the ST6000 is “good” when you want quick, controlled trimming rather than heavy-duty clearing.
For help confirming you have the exact model and type before ordering parts, use how to find your appliance model number (and what it means for parts).
Last updated: February 2026
How to change string on black and decker electric trimmer?
To change the string on your Black & Decker ST6000 electric line trimmer, you remove the spool cap, lift out the spool, load new trimmer line (or install a prewound spool), then reseat the spool so it feeds through the eyelets and snaps back together.
Safety first
- Unplug the trimmer before opening the spool housing.
- Let the head stop completely before handling it.
- Wear gloves and eye protection; cut line ends can be sharp.
- Work on a flat surface so the spring and cap do not pop away.
Steps to replace the line (typical ST6000-STYLE bump-feed head)
- Disconnect power: unplug the cord.
- Open the spool housing: press the release tabs (or twist the cap, depending on head style) and remove the cap.
- Remove the spool: lift the spool straight off the center post (boss).
- Load new line:
- If using bulk line, wind it evenly in the direction shown on the spool (usually an arrow on the spool).
- Leave two equal tails and route them into the spool notches to hold tension.
- Reinstall the spool: feed the line ends through the eyelets in the housing, push the spool onto the center post, then rotate slightly until it seats.
- Reassemble: reinstall the cap until it clicks or locks.
- Test feed: plug in and briefly run the trimmer; tap the bump knob (if equipped) to confirm line advances.
Quick checks if the line will not feed
| Symptom | Most common cause | What to do |
|---|---|---|
| Line will not advance | Line wound backward or crossed | Rewind neatly in the arrow direction |
| Line jams immediately | Line diameter too thick | Use the correct diameter for the head |
| Line breaks at the eyelet | Burrs or debris in eyelet | Clean the eyelet; replace worn parts if needed |
| Spool will not seat | Spring/cap misaligned | Reposition spring and cap; reseat spool |
Why it matters
Correct winding direction and even tension prevent tangles, reduce motor load, and give smoother cutting. A jammed spool can make the trimmer feel weak and can overheat the motor.
Helpful DIY reference
For basic electrical troubleshooting (for example, if the trimmer will not run after reassembly), use how to use a multimeter to test electrical parts video.
Last updated: February 2026
How to release trimmer line black and decker?
On the Black & Decker ST6000 electric line trimmer, you release more cutting line using the touch feed (bump-feed) system while the trimmer is running. If the line will not advance, you fix it by cleaning the head and correctly rewinding or reseating the spool and cap.
How to advance (release) line during trimming
- Plug in the trimmer and start it.
- Hold the head close to the ground (not digging into soil).
- Press the touch feed bar (bump button) on the trimmer head briefly.
- Let the head spin; the line feeds out.
- The line trims to the correct length against the line cutter (if equipped).
If the line will not feed out
- Stop the trimmer and unplug it before touching the head.
- Remove the spool cap, then check that the line is routed through the eyelet(s).
- Make sure the spool is seated fully and the cap snaps on evenly.
- Rewind the line neatly in the spool channel; crossed wraps jam.
- Replace line that is melted, flattened, or brittle.
Quick diagnosis
| What you see | Most common cause | What to do |
|---|---|---|
| Touch feed does nothing | Line jammed or crossed | Rewind line neatly and reseat spool |
| Line feeds, then stops | Spool overfilled | Remove some line and rewind |
| Line breaks constantly | Wrong diameter line or hard edging | Use the recommended line size; avoid concrete contact |
Why it matters
Proper touch-feed operation keeps the cutting head balanced and reduces heat buildup that can melt line on the spool and wear the spool cap.
For general repair safety practices before servicing powered equipment, use: are diy appliance repairs safe.
Last updated: February 2026