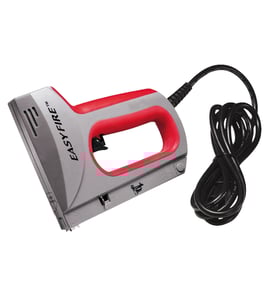

What size staples does a Craftsman stapler use?
For the Craftsman crown stapler model 351184080, staple size depends on the stapler’s magazine and nose design; most Craftsman power staplers in this class use narrow-crown staples with leg lengths commonly ranging from 1/4 inch to 9/16 inch. Confirm the exact staple series and crown width printed on the tool label or magazine.
How to identify the correct staple size
Check these spots on your Craftsman 351184080 before buying staples:
- The magazine rail (often stamped with the staple series and leg-length range)
- The nose casting near the driver channel
- The tool label plate (may list crown width and compatible fasteners)
- The staples currently loaded (measure crown width and leg length)
- The work material thickness (helps choose the right leg length)
Common staple sizes you’ll see (typical for power staplers)
Most power staplers use a fixed crown width and allow multiple leg lengths. Use this as a practical starting point, then match what your tool is marked for.
| What you measure | Typical range you’ll find | Why it matters |
|---|---|---|
| Leg length | 1/4 in to 9/16 in | Too long can blow through; too short won’t hold |
| Crown width | Narrow crown (varies by series) | Wrong crown width will not feed or will jam |
| Wire gauge | Light to medium duty | Affects holding power and splitting risk |
Choosing the right leg length for the job
Use leg length based on what you’re fastening into:
- 1/4 in to 5/16 in: thin fabrics, light trim, screens
- 3/8 in to 1/2 in: paneling, light wood-to-wood fastening
- 9/16 in: thicker wood or when you need more bite (if your tool is rated for it)
Why it matters
Using the correct staple series (crown width) and leg length prevents feed problems, reduces jams, and helps the driver blade set staples flush without damaging the work surface.
For help confirming the exact model number on the tool tag before ordering supplies, use how to find your appliance model number (and what it means for parts).
Last updated: February 2026
Where can I buy Craftsman replacement parts?
You can buy replacement parts for your Craftsman 351184080 crown stapler by searching the model-based parts list on Sears PartsDirect; this is the most reliable way to match the correct components to your exact model number before you order.
Best way to buy the right part for model 351184080
- Use the full model number 351184080 when searching so you get the correct diagrams and parts list.
- Compare the part description to what you are replacing (trigger, magazine, driver blade, switch, cord, etc.).
- If multiple similar parts appear, match by location in the diagram and how it mounts.
- Order once you confirm the part is listed for your exact model.
What to check before you place an order
Even with power tools like a stapler, small differences matter (fastener size range, magazine style, and internal drive parts).
| What to match | Why it matters | Quick tip |
|---|---|---|
| Model number | Ensures compatibility | Use 351184080 exactly |
| Part name/function | Prevents ordering the wrong assembly | Identify whether it is a switch vs. trigger vs. magazine |
| Visual fit | Confirms mounting and shape | Compare screw holes, connectors, and length |
Why it matters
Craftsman staplers often have look-alike parts across different model numbers; ordering by model helps prevent returns and gets your tool back in service faster.
For more help using our site tools to locate the correct listing, see how to find your appliance model number (and what it means for parts).
Last updated: February 2026
How to reload a sears Craftsman staple gun?
To reload your Craftsman 351184080 crown stapler, make it safe first, then open the staple magazine, load a strip of the correct crown staples in the proper orientation, and close the magazine until it fully locks. Correct staple type and orientation prevent jams and misfires.
Reload steps (works for most Craftsman crown staplers)
- Disconnect power: unplug the corded tool or remove the battery pack.
- Keep your finger off the trigger; point the stapler away from you.
- Find the magazine release on the magazine assembly (commonly a latch or button near the magazine end).
- Open the magazine fully so the follower spring and pusher are out of the way.
- Load one strip of crown staples into the magazine track.
- Close the magazine completely and confirm it latched by gently pulling on it.
Staple orientation and fit
Most crown staplers load with the staple legs pointing down into the nose and the crown facing up in the track. If the magazine will not close, the staples are usually the wrong style or not seated flat.
| What to check | Correct result | If it is wrong |
|---|---|---|
| Staple orientation | Legs down, strip sits flat | Flip the strip and reseat it |
| Staple style | Crown staples (not brads or T-staples) | Switch to the correct staple type |
| Staple length | Fits the magazine without binding | Use a shorter leg length |
If the magazine will not close
- Remove the staple strip and check for a bent staple in the track.
- Make sure the follower spring is behind the staple strip (not on top of it).
- Clear debris from the magazine rails and nose area.
- Check for a jam at the nose; remove the jam before reloading.
Why it matters
A fully latched magazine keeps the follower spring applying steady pressure to the staple strip, which prevents misfeeds that can damage the driver area and cause repeated staple jams.
For general safety practices while working on powered tools, use: are diy appliance repairs safe.
Last updated: February 2026