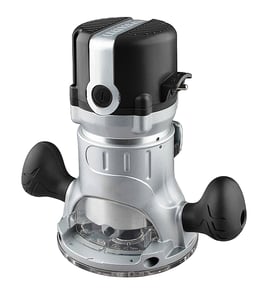

Does Craftsman make a corded router?
Yes. Craftsman makes corded routers, and your Craftsman model 31517491 is a corded electric router (it uses a power cord rather than a battery) designed for steady, full-time power during routing and edge-forming work.
How to tell a Craftsman router is corded
A corded router plugs into a standard outlet and typically has a fixed power cord coming out of the motor housing.
- Look for a permanently attached cord at the rear of the router
- Check the tool label for amps (A) rather than battery voltage
- Confirm there is no battery slide or battery release latch
- Verify the switch is a standard on/off trigger or rocker (not an electronic battery interface)
Corded vs cordless routers: what changes for you
Corded and cordless routers can do similar woodworking tasks, but they behave differently in day-to-day use.
| Feature | Corded router | Cordless router |
|---|---|---|
| Power delivery | Continuous, consistent | Depends on battery charge and pack size |
| Runtime | Unlimited (plugged in) | Limited by battery capacity |
| Best for | Long cuts, heavy profiles, shop use | Quick jobs, trim work, portability |
| Typical spec callout | Amps (often 6A to 15A) | Voltage (often 18V to 60V) |
Why it matters
If you are choosing bits, extension cords, or planning a repair, knowing you have a corded Craftsman router helps you match the right electrical setup (outlet, cord gauge, and switch behavior) and avoid power drop that can cause burning or chatter.
Helpful DIY reading for electrical checks
If your corded router will not power on, these guides help you troubleshoot safely with basic electrical testing.
- How to tell if a fuse is blown
- How to use a multimeter to test electrical parts video
- How to repair broken or damaged wires video
Last updated: February 2026
How do I find the model number on my 31517491?
The model number for your Craftsman router is printed on the tool’s identification label; on model 31517491, it’s typically on the motor housing or base near the handles. Match the full number exactly so we can help you find the correct diagrams and replacement parts.
Where to look on a Craftsman router
Check these common label locations:
- Side of the motor housing (near the on/off switch)
- On the router base (outside edge or underside)
- Near the cord entry point or strain relief
- On the nameplate by the handles
- Inside the base area after removing the motor from the base (if your design allows)
What the label should show
Most Craftsman power tools list several identifiers. Use the model number for parts lookup.
| Label item | What it’s used for | Example format |
|---|---|---|
| Model number | Correct parts diagrams and fit | 31517491 |
| Serial number | Production tracking | Letters and numbers |
| Voltage/amps | Electrical rating | 120V, amps |
Tips to avoid ordering the wrong parts
Getting the exact model number matters because routers can have multiple versions that look similar.
- Write the model number exactly as shown (include all digits)
- If the label is worn, take a clear photo and zoom in
- Compare the model number on the label to the one you search
- If you see a second number (like a type or revision), keep it noted for reference
Why it matters
Craftsman router parts like brushes, switches, collets, and bases can vary by production run; using the correct model number ensures the parts list and diagrams match your specific tool.
For more help identifying the correct number format, use [how to find your appliance model number (and what it means for parts)].
Last updated: March 2026
What is the average lifespan of 31517491?
A Craftsman router like model 31517491 typically lasts 10 to 15 years with normal DIY use and basic maintenance. Heavy, daily use shortens lifespan; keeping the motor cool, the collet clean, and the brushes in good shape extends service life.
What affects router lifespan most
These factors have the biggest impact on how long a router motor and bearings last:
- Duty cycle: long continuous cuts build heat and wear
- Dust control: fine wood dust accelerates switch and bearing wear
- Brush wear (if your router uses carbon brushes): worn brushes can damage the commutator
- Bit sharpness: dull bits overload the motor
- Collet condition: dirty or worn collets cause vibration and runout
Signs your router is nearing end of life
Use this checklist to decide whether maintenance or repair makes sense:
- Burning smell, excessive sparking, or power drop under load
- Loud bearing noise (growl or squeal) that changes with speed
- Speed surging or intermittent power (often switch, cord, or brush related)
- Excessive vibration even with a known-straight bit
Quick maintenance schedule
| Interval | What we recommend |
|---|---|
| Every use | Blow out vents, wipe base, check bit tightness |
| Monthly | Inspect cord, clean collet and nut, check base screws |
| As needed | Replace brushes (when short), address bearing noise early |
Why it matters
Routers fail most often from heat and dust; simple upkeep prevents motor damage and keeps cuts accurate and safe.
If you’re troubleshooting power loss or intermittent operation, follow the steps in [how to tell if a fuse is blown] to rule out basic electrical issues in your shop setup before digging into the tool.
Last updated: March 2026