 Owner’s manual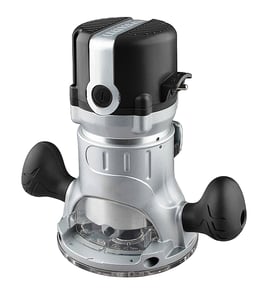

How to remove collet from Craftsman router?
On a Craftsman router used with the 17125490 router table, we remove the collet by unplugging the router, removing the bit, then loosening the collet nut until the collet releases from the shaft. Many Craftsman routers use a “self-releasing” collet that pops free as you keep loosening.
Safe removal steps (recommended)
- Unplug the router before touching the collet or bit.
- Remove the router from the table if access is tight.
- Hold the spindle (use the spindle lock if your router has one).
- Turn the collet nut counterclockwise to loosen.
- Keep loosening until you feel the collet “break free,” then remove the bit.
- Finish unthreading the nut if you need to remove the collet and nut assembly.
If the collet is stuck in the nut
A collet can stay seated in the nut even after the nut is off the shaft. Use this method:
- Thread the collet nut back onto the shaft a few turns.
- Loosen the nut again until it “clicks” or pops the collet loose.
- If it still sticks, remove the nut and press the collet sideways out of the nut with your thumbs (do not pry on the shaft).
Quick checks before reinstalling
| What to check | What you want to see |
|---|---|
| Collet slots | Clean, not packed with dust/resin |
| Collet taper | Smooth, no burrs |
| Nut threads | Not cross-threaded |
| Bit shank | Clean, fully inserted then backed out slightly |
Why it matters
A collet that is dirty, damaged, or not fully released can clamp the bit unevenly. That increases vibration, hurts cut quality, and can make bit changes difficult. The router table manual also stresses unplugging before adjustments and ensuring the bit is securely tightened before operation.
For model-specific mounting and safe operation reminders (including unplug-before-adjusting guidance), use the 17125490 owner's manual.
Last updated: February 2026
How to replace a Craftsman router bit?
To replace a router bit on a Craftsman router used with the Craftsman 17125490 router table, we unplug the router first, loosen the collet, remove the old bit, insert the new bit to the correct depth, then tighten the collet securely before operating. See the safety notes in the owner's manual.
Steps to change the bit (safe, repeatable process)
- Unplug the router before any adjustment or bit change.
- Raise the bit above the table enough to access the collet (use your router’s height adjustment).
- Use the correct wrenches for your router’s collet; loosen the collet nut counterclockwise.
- Remove the old bit; clean dust from the collet and bit shank.
- Insert the new bit shank fully, then pull it back out about 1/16 to 1/8 inch so it is not bottomed out.
- Tighten the collet firmly (snug plus a solid final tighten); do not overtighten.
- Spin the bit by hand (router still unplugged) to confirm it clears the throat plate and guard.
Quick checks before you power back on
The manual calls out three “secure” points that matter every time you change bits.
| Checkpoint | What “good” looks like | Why it matters |
|---|---|---|
| Router unplugged | Cord is out of the outlet | Prevents accidental start during a bit change |
| Bit clamped in collet | Bit does not slip when tugged | Prevents bit creep and poor cuts |
| Router mounted tight to table | Base is tight to the throat plate/table top | Reduces vibration and keeps cuts accurate |
Common mistakes to avoid
- Changing bits with the router plugged in.
- Bottoming the bit shank in the collet (can reduce grip).
- Clamping on the flutes instead of the smooth shank.
- Running the router if any part of the bit contacts the guard.
Why it matters
A properly tightened collet and a securely mounted router reduce vibration, improve cut quality, and help prevent the bit from loosening during operation. The Craftsman 17125490 router table instructions also emphasize verifying the bit is secure and the router is firmly attached before use.
Last updated: February 2026
What size shank bit will fit in a Craftsman router?
Most Craftsman routers accept 1/4-inch shank bits, and many models also accept 1/2-inch shank bits if they include a matching collet. For your Craftsman 17125490 router table setup, confirm the exact collet size(s) your router uses in the 17125490 owner's manual before buying bits.
How to confirm the correct shank size
We recommend checking the router’s collet and any included collet sleeves (reducers). Use this quick checklist:
- Unplug the router before inspecting or changing bits.
- Remove the bit (if installed) and look for markings on the collet nut or collet (often 1/4 or 1/2).
- Check whether your router came with two collets (one for 1/4-inch, one for 1/2-inch).
- If you see a reducer sleeve, it usually means a larger collet is being adapted to a smaller shank.
- Never force a bit into the collet; the shank should slide in smoothly.
Common shank sizes and what they’re used for
| Shank size | Typical use | Why you might choose it |
|---|---|---|
| 1/4-inch | Light to medium routing, trim work, smaller profiles | Widely available, fits many routers |
| 1/2-inch | Heavier cuts, larger bits, smoother routing | More rigidity, less vibration |
Why it matters
Using the correct shank size is a safety and performance issue. A bit that does not match the collet can slip, vibrate, or cut poorly. Router table work also creates vibration, so keeping fasteners tight and using the correct bit and collet fit helps maintain control during routing.
Last updated: February 2026