
How to look up AC model number?
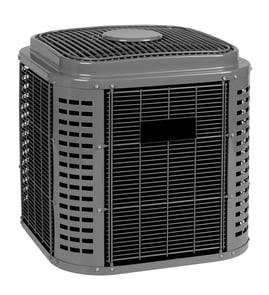
To look up the AC model number for your York central air conditioner (condensing unit), find the rating plate on the outdoor unit cabinet and copy the full model number exactly as printed (for example, H2DH036S06B). Use that exact number when searching parts to ensure the right fit.
Where to find the model number on a central AC condensing unit
Most York outdoor condensing units have a data label (rating plate) in one of these spots:
- On the outside of the cabinet near the electrical access panel
- Inside the service panel area (you may need to remove screws to view it)
- Near the refrigerant line connections (where the copper lines enter the unit)
- On a corner post or along the back side of the cabinet
What to write down (so parts match)
Copy the information exactly, including letters, numbers, and dashes.
- Model number (example: H2DH036S06B)
- Serial number (helps identify production run)
- Electrical ratings (voltage and phase)
- Unit size code (often indicates nominal capacity)
Quick checklist: model number vs. serial number
| Item | What it’s used for | Example format |
|---|---|---|
| Model number | Identifies the exact unit design for parts lookup | H2DH036S06B |
| Serial number | Identifies the specific unit built | Letters and numbers, often longer |
Why it matters
York condensing units can look similar across multiple model families, but parts like the contactor, capacitor, fan motor, and control components must match the exact model series and electrical configuration.
Next step after you find it
Once you have the model number, use it to search and confirm you are viewing the correct parts list for your unit. If the label is worn or missing, the most reliable backup is the model number from your original paperwork or service invoice.
For help understanding what the model number means and where else it may appear, use how to find your appliance model number (and what it means for parts).
Last updated: February 2026
What is the most expensive part to replace on an AC unit?
On a central AC condensing unit like the York H2DH036S06B, the most expensive repair is typically the compressor replacement because it is the sealed-system “heart” of the unit and often involves significant labor plus refrigerant handling.
Most expensive AC parts (typical ranking)
Costs vary by size, refrigerant type, and access, but these are usually the top-ticket items:
- Compressor (often the highest total cost)
- Condenser coil (coil replacement can be costly and labor-heavy)
- Outdoor fan motor (mid-to-high cost, depending on motor type)
- Control board (varies widely by model)
- Refrigerant leak repair (cost depends on leak location and repair method)
Quick comparison: part cost vs. total repair cost
| Component | Part cost (typical) | Labor complexity | Why it gets expensive |
|---|---|---|---|
| Compressor | High | High | Sealed system work, evacuation, recharge, brazing |
| Condenser coil | High | Medium to high | Coil swap, potential refrigerant work |
| Fan motor | Medium | Medium | Electrical diagnosis, mounting, wiring |
| Control board | Medium | Low to medium | Diagnosis is the hard part; swap is usually straightforward |
How to tell if it is a “big-ticket” failure
These symptoms often point to compressor, coil, or refrigerant-related problems:
- Outdoor unit hums or hard-starts, then trips the breaker
- Unit runs but does not cool; suction line is not getting cold
- Ice on the indoor coil or refrigerant lines (often airflow or refrigerant issue)
- Oily residue on tubing or coils (common sign of a refrigerant leak)
- Repeated capacitor or contactor failures (can be a sign of a deeper issue)
Why it matters
On a condensing unit, compressor and coil repairs can approach a large share of the system’s value. Getting the diagnosis right first prevents replacing “likely” parts (capacitor, contactor, motor) when the real issue is sealed-system related.
A safe next step before buying parts
Because central AC work involves high voltage and refrigerant, we recommend confirming the diagnosis with proper electrical testing and visual inspection. If you are doing basic checks, use a meter correctly and safely; our how to use a multimeter to test electrical parts video is a good starting point.
Last updated: February 2026
Can I replace AC spare parts myself?
Yes, you can replace some parts on your York H2DH036S06B condensing unit yourself, but we only recommend DIY for basic, low-voltage or non-refrigerant tasks. Anything involving refrigerant lines, the compressor, or high-voltage wiring should be handled by a qualified technician.
What you can usually do yourself (safer DIY)
These tasks are common for central air conditioner parts and typically do not require opening the sealed refrigerant system:
- Replace a thermostat (if you are comfortable labeling low-voltage wires)
- Replace a condenser fan motor capacitor (after confirming power is fully off)
- Replace a contactor (line-voltage part; DIY only if you have electrical experience)
- Clean the outdoor coil and remove debris around the condensing unit
- Tighten obvious loose wire connections only after power is disconnected
Repairs we do not recommend as DIY
These repairs can be dangerous or require specialized tools and certification:
- Any refrigerant work (leak repair, evacuation, charging)
- Compressor replacement
- Replacing the outdoor coil or any brazed refrigerant tubing
- Diagnosing repeated breaker trips without electrical test equipment
- Control board diagnosis when you cannot confirm correct voltage inputs
Quick safety checklist before you start
- Turn off power at the outdoor disconnect and the main breaker
- Confirm power is off with a meter (not just the thermostat)
- Discharge capacitors properly before handling terminals
- Take a photo of wiring before removing any connectors
- Use insulated tools and keep hands clear of the fan blade path
What tools and skill level are typically needed
| Task | Typical tools | Skill level |
|---|---|---|
| Coil cleaning | Hose, coil-safe cleaner, fin comb | Basic |
| Contactor/capacitor swap | Nut driver, needle-nose pliers, multimeter | Intermediate |
| Fan motor replacement | Hand tools, multimeter | Intermediate |
| Refrigerant repair/charge | Gauges, vacuum pump, recovery equipment | Pro only |
Why it matters
A central AC condensing unit combines high voltage, stored electrical energy (capacitors), and a sealed refrigerant system. Choosing the right DIY boundary helps prevent shock hazards, miswiring, and expensive compressor damage.
For electrical testing basics before replacing parts, use our guide: how to use a multimeter to test electrical parts video.
Last updated: February 2026
What AC parts are most commonly replaced?
For the York H2DH036S06B condensing unit, the most commonly replaced parts are the electrical starting components and wear items that handle heat, vibration, and outdoor exposure. In most central AC systems, service calls frequently involve the capacitor, contactor, fan motor, and condenser fan blade.
Most common central AC parts that fail
These parts see heavy electrical load or constant outdoor wear, so they are replaced often:
- Run capacitor / dual run capacitor (hard starting, humming, fan not spinning)
- Contactor (outdoor unit will not turn on, chattering, burned contacts)
- Condenser fan motor (overheating, fan stops, noisy operation)
- Condenser fan blade (wobble, vibration, poor airflow)
- Defrost control board or sensors (on heat pump style outdoor units; defrost issues)
- Pressure switches (nuisance shutoffs, safety lockouts)
Quick symptom-to-part cheat sheet
| Symptom at the outdoor unit | Most likely part to check first | What you will usually notice |
|---|---|---|
| Fan will not spin but you hear a hum | Run capacitor | Fan starts if pushed (power off first) or starts then stops |
| Outdoor unit will not start at all | Contactor | No click when thermostat calls for cooling |
| Fan runs but air is not cool inside | Capacitor, contactor, compressor components | Warm air at vents, high energy use |
| Loud buzzing or rapid clicking | Contactor | Visible pitting or heat damage |
| Unit shuts off on hot days | Fan motor, capacitor | Top of unit very hot, intermittent operation |
How we recommend you confirm the right part
Because this model page does not include a parts list or manual, we match by model number and the part markings.
- Turn off power at the disconnect and breaker before opening the service panel.
- Photograph the wiring before removing any wires.
- Read the label values (for example, capacitor microfarads and voltage) and match exactly.
- If you test electrical parts, use a meter correctly and safely.
- If you see burned wiring, melted terminals, or repeated breaker trips, stop and have a technician diagnose the system.
For safe testing basics, use our guide: how to use a multimeter to test electrical parts video.
Why it matters
Replacing the correct wear part restores reliable starting, proper airflow across the condenser coil, and protects expensive components like the compressor. A weak capacitor or failing fan motor can quickly lead to overheating and repeated shutdowns.
Last updated: February 2026