Installation guide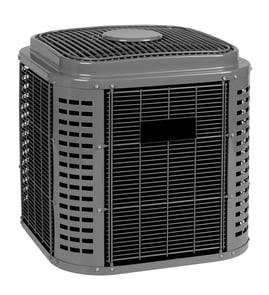



What is the average cost to replace a central air conditioner?
Replacing a central air conditioner typically costs about $5,000 to $12,000 installed for many homes; higher-efficiency equipment, ductwork changes, electrical upgrades, or difficult access can push the total higher. For an Icp TCA024AKA1 condensing unit, the final price depends on sizing, refrigerant work, and installation requirements in your home.
What drives the replacement price
These are the biggest factors that change the installed cost:
- System size (tons/BTU): larger capacity usually costs more
- Efficiency rating: higher efficiency equipment costs more up front
- Ductwork condition: repairs, sealing, or replacement add cost
- Electrical and disconnect work: panel, breaker, whip, or disconnect updates
- Refrigerant and line set work: leak repair, line set replacement, evacuation, recharge
- Labor complexity: rooftop installs, tight clearances, crane needs, or long line runs
Typical cost ranges (what you usually see)
| Scenario | What’s included | Typical installed range |
|---|---|---|
| Like-for-like condenser swap | Outdoor unit replacement with minimal changes | $5,000 to $8,000 |
| Full system changeout | Outdoor unit + indoor coil/air handler or furnace tie-in | $7,000 to $12,000 |
| Complex replacement | Ductwork, electrical upgrades, access challenges | $12,000+ |
Installation details that matter for performance
Even with a new unit, setup affects comfort and operating cost. The TCA024AKA1 installation guidance calls out items like verifying indoor airflow and checking refrigerant charge after the system runs. Use the installation guide for the correct procedures and target values.
- Confirm indoor airflow is in the recommended range (commonly 350 to 450 CFM per ton)
- Run the system long enough to stabilize before checking charge
- Keep the outdoor coil clear for proper heat rejection
Why it matters
A low bid that skips airflow setup, refrigerant charging checks, or basic electrical and drainage details can lead to poor cooling, higher energy use, and premature compressor wear. A properly installed system delivers the efficiency you paid for.
Last updated: February 2026
What is the average lifespan of a central air conditioning unit?
Most central air conditioning systems last 15 to 20 years with normal use and consistent maintenance. For an Icp TCA024AKA1 condensing unit, keeping the coil clear, maintaining proper airflow, and installing it with correct clearances helps the system run cooler and reduces wear.
Typical lifespan ranges
- 15 to 20 years: Most modern central A/C systems
- 10 to 12 years: Units that run in harsh conditions or get limited maintenance
- 20+ years: Possible when installation, airflow, and upkeep stay consistently strong
| What affects lifespan most | What to do about it |
|---|---|
| Airflow across the indoor coil | Keep filters and blower performance in spec (typical target is 350 to 450 CFM per ton) |
| Outdoor unit placement and clearances | Maintain space for intake and discharge air so the unit does not recirculate hot air |
| Drainage and level support | Keep the unit level and supported above grade on a stable pad/platform |
| Electrical wear (starts/stops) | Address hard-starting, buzzing, or chattering quickly to prevent contactor damage |
Installation details that directly impact longevity (TCA024AKA1)
Good installation reduces heat stress on the compressor and helps prevent nuisance shutdowns.
- Aim for 48 inches above the unit for discharge air when practical
- Keep about 18 inches around the coil for intake air on three sides
- One side clearance can be reduced to about 6 inches (typically the side near the structure)
- Avoid recessed or confined locations where discharge air can recirculate
- Place the unit in a well-drained area and keep it supported above grade
For the full clearance and placement guidance, use the installation guide.
Signs your A/C is nearing end of life
- Cooling takes longer than it used to, even after basic maintenance
- Frequent service calls for electrical or refrigerant-related issues
- Loud operation or vibration that is new or worsening
- Rising energy use compared to prior seasons
Why it matters
A central A/C that is near the end of its lifespan often runs hotter and longer to meet thermostat demand. That extra runtime accelerates wear on high-cost components like the compressor and can also stress electrical parts such as the contactor.
Last updated: February 2026
Is it worth repairing a 10 year old air conditioner?
Yes. A 10-year-old Icp TCA024AKA1 central air conditioner is worth repairing when the unit is in solid condition and the failure is a common electrical or control issue (like a contactor, wiring, or control board). Replacement makes sense when failures are frequent or the compressor or refrigerant system needs major work.
Quick decision checklist (repair vs. replace)
- Repair when the problem is isolated (no-cool due to a control or wiring failure).
- Repair when the outdoor coil is clean and you can maintain at least 2 feet of clearance around coil air inlets.
- Repair when the unit has been reliable and this is the first major issue in 1 to 2 seasons.
- Replace when you have repeated breakdowns in the last 1 to 2 seasons.
- Replace when the compressor is failing or refrigerant leaks keep returning.
- Replace when the repair cost approaches a large share of a new matched system.
What to check first (often low-cost, high-impact)
Use the safety and start-up guidance in the installation guide before any service.
| Check | What it tells you | Typical next step |
|---|---|---|
| Outdoor unit will not start | Control or power issue | Check disconnect, fuses, wiring, contactor operation |
| Starts then shuts off | Control, airflow, or coil restriction | Verify clearances, clean coil, diagnose controls |
| Runs but cooling is weak | Airflow or charge setup | Verify indoor airflow and charge procedure |
Parts that commonly fix “won’t start” symptoms
These model-matched parts are often involved when the outdoor unit has power but will not pull in and run:
- Board 1088977 (condenser electronic control board)
- Plug wire 1083654 (wiring connection issues can interrupt operation)
Why it matters
At around 10 years, many central AC failures are still serviceable (controls, wiring, maintenance). Repairing those items restores cooling quickly and helps you avoid the cost and disruption of a full system replacement.
Last updated: February 2026
What is the most expensive part to replace on an AC unit?
On most central AC systems (including an outdoor condensing unit like Icp model TCA024AKA1), the compressor is typically the most expensive single component to replace because it is the core of the refrigerant system and often drives higher labor and refrigerant-handling costs.
What’s usually most expensive (and why)
These are the parts that most often create the biggest repair bills on a split-system air conditioner:
- Compressor: sealed refrigerant-system component; replacement commonly involves refrigerant recovery/charging and significant labor.
- Condenser coil: can be costly if damaged or leaking; coil work also involves refrigerant handling.
- Evaporator coil (indoor): not in the outdoor unit, but it is another high-cost refrigerant component in the overall system.
- Major electrical failures: less than compressor/coil in many cases, but can still add up depending on diagnosis time and parts.
Where the TCA024AKA1 parts on this page fit in
For the TCA024AKA1 outdoor unit, the parts we commonly see replaced are electrical controls. They are usually not the most expensive repair compared to a compressor, but they are frequent causes of “won’t start” or “no cooling” complaints.
- Board 1088977
- Contactor (part number 1050699)
- Plug wire (part number 1081938)
Quick comparison (typical cost impact)
| Component type | Typical cost impact | Why it gets expensive |
|---|---|---|
| Compressor | Highest | Refrigerant work, labor time, system condition checks |
| Coil (condenser/evaporator) | High | Leak repair, refrigerant work, access/labor |
| Control board/contactor/wiring | Medium | Diagnosis time; electrical testing and safe access |
What to check before replacing big-ticket parts
Because compressor and coil repairs are expensive, we recommend confirming the basics first:
- Verify the thermostat is calling for cooling.
- Confirm the outdoor disconnect and breaker are on.
- Inspect for burned wires or loose connections (power off).
- Test the contactor and control circuit with a meter.
- Make sure the unit has proper clearances for airflow (restricted airflow can contribute to failures).
Why it matters
Misdiagnosing a compressor or coil can turn a manageable electrical repair into an unnecessary major expense. Using the clearances, safety notes, and startup guidance in the installation guide helps you rule out installation and airflow issues that can mimic “bad compressor” symptoms.
Last updated: February 2026
What is the most common part to fail on an AC unit?
On most central AC condensing units (including Icp model TCA024AKA1), the most common electrical failure is the run capacitor; the next most common are the contactor and heat damaged wiring connections. Heat, age, vibration, and power events stress these parts and can stop the compressor or condenser fan from starting.
What typically fails most often (and what you’ll notice)
- Run capacitor: outdoor unit hums, fan will not start, compressor struggles to start
- Contactor: thermostat calls for cooling but the outdoor unit does nothing, or it chatters/buzzes
- Wiring/connectors: intermittent operation, burnt terminals, melted insulation
- Control board (on equipped models): erratic starts, no response to a call for cooling
- Condenser fan motor: fan runs slow, overheats, or stops and trips protection
Quick checks that help narrow it down
The installation instructions for TCA024AKA1 emphasize verifying power is disconnected with a meter and keeping hands out of fan areas when power is connected.
- Turn off power at the disconnect and breaker; verify with a meter
- Look for obvious signs: burnt smell, bulged capacitor, pitted contactor contacts, loose spade terminals
- If the outdoor fan does not run but the unit hums, suspect the capacitor first
- If nothing runs at all, suspect the contactor, control circuit, or an upstream fuse/breaker
- If operation is intermittent, inspect wiring and connections for heat damage and looseness
Common failure parts vs. symptoms (at a glance)
| Likely issue | Common symptom | Typical next step |
|---|---|---|
| Run capacitor | Humming, hard start, fan not spinning | Test capacitance; replace if out of spec |
| Contactor | No outdoor operation on a call for cooling | Check coil voltage; inspect contacts |
| Wiring/terminals | Random shutdowns, visible scorching | Repair damaged wire ends and tighten connections |
| Control board | Unpredictable behavior | Verify inputs/outputs before replacing |
Model-listed parts that can be involved in a “no start” complaint
If your Icp TCA024AKA1 is not starting reliably, these parts listed for this model are commonly involved in electrical no-start troubleshooting:
Why it matters
Catching a weak capacitor, failing contactor, or overheated wiring early helps prevent repeated breaker trips and reduces the chance of secondary damage to higher-cost components like the compressor.
For clearances, service access, and safety precautions during inspection, follow the installation guide.
Last updated: February 2026