Installation guide
 Owner’s manual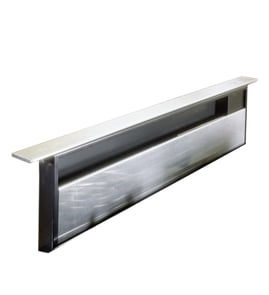




How does a downdraft ventilation system work?
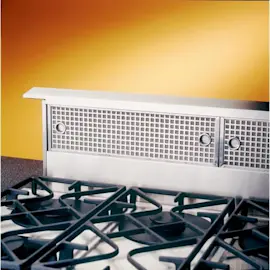
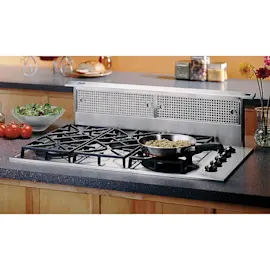
A downdraft ventilation system like the Dacor ERV48-ER raises an intake near the cooktop and pulls smoke, steam, and cooking odors downward through filters and a duct path to an approved blower, then exhausts the air outside (or through the configured duct route). See the installation guide for approved configurations and operation checks.
What’s happening inside the system
A typical downdraft (raised vent) setup works as a chain of airflow and controls:
- You press the control to raise the vent intake into position.
- The blower turns on when the raised vent is turned on (wired to the vent).
- Air is drawn across the cooking surface into the intake.
- Grease and debris are captured by the front filters before air enters the duct.
- Air moves through the duct run (with elbows and transitions adding resistance).
- The system vents through the back or bottom, depending on how it’s configured.
Ducting and performance basics (why elbows matter)
Duct length and fittings directly affect how well a downdraft captures smoke. The installation instructions use “equivalent feet” to account for resistance from elbows and transitions.
| Duct component | Effect on airflow | What to do |
|---|---|---|
| Straight duct | Lowest resistance | Keep runs as short and direct as possible |
| 90° elbow | High resistance | Use fewer elbows when possible |
| Transitions | Added resistance | Use only what’s needed for your duct size |
Quick checks if airflow seems weak
We recommend these practical checks before replacing parts:
- Confirm the vent fully raises and lowers without scraping or binding.
- Make sure all front filters are installed correctly before operation.
- Verify the blower is receiving power from the raised vent wiring.
- Inspect the duct path for crushed sections, loose joints, or obstructions.
- Reduce duct restrictions (extra elbows, tight turns) where possible.
Why it matters
Downdraft systems rely on capture efficiency at the cooking surface. A clean filter path, correct blower wiring, and a low-resistance duct layout help the ERV48-ER pull fumes down before they spread through the kitchen.
Last updated: February 2026
What are the cons of a downdraft range?
Downdraft setups (like the Dacor ERV48-ER raised vent used with a cooktop or range) trade convenience for capture performance: they pull smoke and steam sideways and down, so they are less effective than an overhead hood for high-heat searing, tall pots, and heavy grease. Review the ducting and operation details in the installation guide before deciding.
Main drawbacks to expect
- Weaker capture for heavy cooking: Smoke and heat naturally rise, so a downdraft has to fight that airflow.
- More sensitive to cookware placement: Tall stockpots and griddles can block the intake path.
- Can affect gas burner performance: Strong cross-drafts near the cooktop can disturb flames on some installations.
- Takes up cabinet space: The vent housing, ductwork, and (if used) remote or in-line blower routing reduce usable storage.
- More complex installation: Duct planning (rear vs bottom exhaust) and wiring are more involved than many wall or island hoods.
- More maintenance touchpoints: Filters must be installed and kept clean; the lift mechanism also needs to stay unobstructed.
Installation and performance trade-offs (quick comparison)
| Feature | Downdraft (ERV48-ER style) | Overhead hood |
|---|---|---|
| Best at capturing smoke | Light to moderate cooking | Moderate to heavy cooking |
| Works well with tall pots | Less consistent | More consistent |
| Cabinet space impact | Higher | Lower |
| Ducting complexity | Often higher (under-cabinet runs) | Often simpler (up and out) |
What we recommend checking before you choose downdraft
- Confirm the vent is used only with approved Dacor appliances (not every range/cooktop is suitable).
- Plan duct routing early; the guide shows example layouts for rear exhaust and bottom exhaust.
- Verify there is no interference when the vent lowers; the guide warns that contact with the cooktop edge can cause damage.
- Make sure filters are installed before operation; the checklist calls this out as a required step.
- If you expect frequent high-smoke cooking, consider whether an overhead hood better matches your cooking style.
Why it matters
Ventilation affects indoor air quality, grease buildup, and comfort. A downdraft can be a great fit for open sightlines and island layouts, but the physics of rising heat means it typically underperforms a hood when cooking gets smoky.
Last updated: February 2026
How to clean a Dacor downdraft vent?
For the Dacor ERV48-ER downdraft ventilation system, we clean it by turning power off, removing the vent filters and any accessible covers, then washing degreaseable parts with warm, soapy water and drying everything completely before reinstalling. Use the installation guide for filter placement and access details.
Safe cleaning steps (what we recommend)
- Turn off power to the raised vent at the breaker (and confirm the vent cannot be raised).
- Let nearby cooking surfaces cool completely.
- Remove the vent filters and clean them with hot, soapy water; rinse and dry fully.
- Wipe the intake area and accessible interior surfaces with a non-abrasive degreaser and a soft cloth.
- Check the vent path for grease buildup and wipe what you can reach safely.
- Reinstall filters and verify the vent raises and lowers smoothly.
What to avoid
- Do not spray cleaner directly into the vent opening; apply cleaner to a cloth first.
- Do not use abrasive pads that can scratch stainless or painted surfaces.
- Do not run the vent with filters removed; airflow and grease capture depend on them.
- Do not attempt internal electrical repairs; keep moisture away from wiring and controls.
Quick troubleshooting while you clean
If the vent does not raise properly or you hear scraping, we check for obstructions that interfere with the raising mechanism and confirm power is supplied to the raised vent and to the blower through the vent.
| Symptom | What we check first | Typical fix |
|---|---|---|
| Weak airflow | Greasy or clogged filters | Clean or replace filters |
| Rattling/vibration | Loose duct connection or debris | Tighten joints, remove debris |
| Vent scrapes while moving | Obstruction in lift path | Clear obstruction, re-test |
Why it matters
A clean filter and intake area keeps airflow strong, reduces grease buildup in the ductwork, and helps the ERV48-ER raise and lower without strain.
You can order replacement parts for your Dacor ERV48-ER from the parts list for this model, or search by model number on Sears PartsDirect.
Last updated: February 2026
How much does downdraft ventilation cost?
For a Dacor ERV48-ER downdraft ventilation system, total cost is the vent system plus the blower, ductwork materials, and installation labor. The biggest price swings come from duct routing complexity and whether you need new electrical work; use the installation guide to plan the duct path and clearances.
What you pay for (typical cost drivers)
- Vent system and controls (the raised vent assembly itself)
- Blower (remote or in-line, depending on your setup)
- Ductwork (duct, elbows, transitions, fasteners, tape)
- Labor (cabinet modifications, routing to exterior, sealing joints)
- Electrical (adding or relocating an outlet, routing the power cord safely)
ERV48-ER installation details that affect cost
The ERV48-ER installation instructions call out ducting practices that can increase labor and materials when the route is difficult.
- Plan the shortest, most direct route to the outside
- Do not decrease duct size over the run (upsizing is acceptable)
- Avoid flexible metal duct
- Use sheet metal screws at joints; do not rely on duct tape alone
- Avoid tight elbow layouts (keep straight duct between elbows when possible)
Planning estimate: what changes the budget most
| Situation | Expected impact on cost | Why |
|---|---|---|
| Short, straight duct run | Lower | Fewer parts and less labor |
| Long run with multiple elbows/transitions | Higher | More materials, more time, more airflow resistance |
| New outlet or electrical changes | Higher | Additional electrical labor and materials |
Parts and materials to account for
Some items are commonly needed during installation or service and can add to the total.
- Ductwork components (purchased separately)
- Fasteners and sealing supplies
- Replacement vent components if damaged or missing (example: plenum 27812)
Why it matters
Downdraft performance depends on duct design. A low-cost install with long runs, too many elbows, or poor sealing often leads to weak capture and more noise, which can drive rework costs.
For replacement parts for your ERV48-ER, order from the parts list for this model or search by model number on Sears PartsDirect.
Last updated: February 2026