Owner’s manual


Are KitchenAid blenders lifetime warranty?
No. For the KitchenAid blender model KSB4026HY0, the warranty is a five-year full warranty from the date of purchase, not a lifetime warranty. During that period, KitchenAid covers replacement (or parts and repair labor through authorized service), depending on your location and service option in the warranty terms in the KSB4026HY0 owner's manual.
Within five years of ownership, the warranty is designed to address defects in materials or workmanship.
- Coverage applies to blenders operated in the 50 United States, District of Columbia, Puerto Rico, and Canada
- KitchenAid may provide a hassle-free replacement option (U.S./PR and Canada programs are described separately)
- Another covered path is replacement parts and repair labor when service is performed by an Authorized KitchenAid Service Facility
- Proof of purchase (your sales receipt) is required to start a claim
Even with a five-year warranty, some situations are excluded.
- Use outside normal single-family home use
- Issues caused by misuse, abuse, or accidents (common warranty exclusion category)
- Service performed by non-authorized providers (when the warranty requires authorized service)
| Warranty type | How long it lasts | What you should expect |
|---|---|---|
| Lifetime warranty | For the life of the product | Rare for small appliances; terms vary widely |
| KSB4026HY0 warranty | 5 years from purchase date | Replacement or authorized repair for covered defects |
Knowing it is a five-year warranty helps you decide whether to pursue warranty service or a parts repair. If your blender is out of warranty, we can still help you repair common wear items, for example a worn drive connection such as the blender drive coupling W11627528 when the jar stops turning but the motor still runs.
Last updated: February 2026
Does KitchenAid sell replacement parts?
Yes. For the KitchenAid KSB4026HY0 blender, KitchenAid sells accessories and replacement parts, and we also offer model-matched parts such as the jar, lid, drive coupling, and control components. For official service and parts ordering details, use the KSB4026HY0 owner's manual.
Common replaceable items for this blender include:
- Jar and lid components (cracks, leaks, lost parts)
- Drive components (stripped coupling, poor blending)
- Controls and knobs (won’t start, intermittent operation)
- Power cord (damage, loose connection)
- Motor and electronic control (no power, burning smell, dead unit)
Here are a few examples of replacement parts available for this model:
| Symptom or need | Part to check first | What it affects |
|---|---|---|
| Blender runs but blades do not turn well | Blender drive coupling W11627528 | Transfers motor power to the jar/blade drive |
| Jar is cracked or leaking | Glass jar assembly (model-matched) | Containment and sealing during blending |
| Lid is torn, missing, or won’t seal | Lid assembly | Spill prevention and proper venting |
KitchenAid coverage can change what you should do first. The KSB4026HY0 blender warranty is five years from the date of purchase for normal single-family home use, and KitchenAid may provide replacement or authorized service during that period. Checking the warranty section helps you decide whether to order parts now or arrange service first.
- Confirm the full model number on the rating label: KSB4026HY0
- Match the symptom to the most likely failure point (coupling, jar, lid, control)
- Unplug the blender before inspecting the base or cord
- If you smell burning or see sparking, stop using the blender and inspect the cord and base
- Use the diagrams and part listings to ensure the correct color and version (some bases vary)
Last updated: February 2026
How do I contact KitchenAid about parts?
For KitchenAid KSB4026HY0 blender parts, accessories, or service information, use the contact options listed in your warranty paperwork and the KSB4026HY0 owner's manual. If you are trying to identify or purchase replacement parts quickly, we recommend using the model-based parts list for KSB4026HY0.
Use the option that matches what you need so you get routed correctly.
- Accessories or replacement parts: use the parts and accessories contact method in your warranty documents
- Service information (in-warranty or out-of-warranty): use the service contact method listed in your warranty documents
- Have documentation ready: original sales receipt (proof of purchase)
- If shipping is involved: provide a complete shipping address (no P.O. Box)
Having these details speeds up parts identification and ordering.
| What to provide | Example for this blender | Why it helps |
|---|---|---|
| Model number | KSB4026HY0 | Confirms the correct parts list |
| Part name (if known) | Blender drive coupling | Helps match the right component |
| Symptoms | Leaks, won't start, loud grinding | Points to likely parts |
| Proof of purchase | Receipt | Needed for warranty claims |
If you already know what you need for the KSB4026HY0, we commonly see customers replace wear items like the blender drive coupling W11627528 when the jar won't engage or the coupling is stripped.
Using the correct model number and the correct part ID prevents ordering a similar-looking part that will not fit or will not couple to the motor correctly.
Last updated: March 2026
How to disassemble a KitchenAid blender blade?
To disassemble the blade assembly on your KitchenAid KSB4026HY0 blender, unplug the blender first, remove the jar, and work on a stable counter with cut-resistant gloves. Most blade assemblies loosen by turning the retaining nut in the reverse direction (often clockwise), then separating the blade unit from the jar.
- Unplug the blender base and keep the cord away from the work area.
- Let the blender come to a complete stop before removing the jar or lid.
- Wear cut-resistant gloves; blender blades stay sharp even when dull-looking.
- Use a towel or rubber grip to hold parts; do not grip the blade edges.
- If you were blending hot ingredients, let everything cool before disassembly.
- Remove the jar from the base and take off the lid.
- Turn the jar upside down on a folded towel.
- Locate the retaining nut or coupler at the bottom of the blade assembly.
- Loosen the retaining nut (many designs use reverse threads, so it loosens clockwise).
- Lift out the blade assembly and any gasket/seal pieces; keep them in order for reassembly.
- Cracks in the jar base area or around the blade seat.
- Leaks or a flattened gasket/seal.
- A stripped or rounded coupler/drive interface.
- Excess wobble in the blade shaft.
| Symptom | Most likely cause | What we recommend |
|---|---|---|
| Blade won’t turn freely | Food jam or bent blade | Clean thoroughly; replace blade assembly if damaged |
| Leaks under jar | Worn seal/gasket | Replace the sealing parts; reassemble in correct order |
| Loud grinding or slipping | Worn drive coupling | Inspect and replace the blender drive coupling W11627528 if worn |
Correct blade disassembly prevents leaks, reduces motor strain, and helps avoid overload shutoffs. The manual also emphasizes letting the blender fully stop before removing the jar or lid, which is especially important when you are handling the blade area.
For model-specific diagrams, cleaning guidance, and jar handling details, use the KSB4026HY0 owner’s manual.
Last updated: February 2026
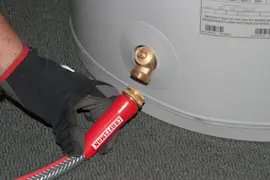
How to remove blender drive coupling?
To remove the drive coupling on your KitchenAid KSB4026HY0 blender, unplug the blender first, then access the coupling on top of the motor base and loosen it using the correct removal direction for the coupling threads. Use controlled force so you do not crack the base or damage the motor shaft; see the KSB4026HY0 owner's manual for safety and handling notes.
- Unplug the blender from the outlet before touching the coupling or motor area.
- Remove the jar and lid; wait until everything is fully stopped before handling parts.
- Protect the finish: place a towel under the base to prevent scratches.
- Use hand tools only; avoid prying against plastic housing.
- If the coupling is seized, use short, controlled taps rather than heavy blows.
- Unplug the blender and remove the jar.
- Expose the coupling on the top center of the base (the part the jar engages).
- Hold the motor shaft steady (method varies by design; use the least invasive approach described in service instructions or the manual’s handling guidance).
- Loosen the coupling by turning it in the loosening direction for the thread style used on your coupling.
- If it will not budge, apply penetrating oil sparingly to the coupling threads (keep liquids away from internal electronics), wait a few minutes, then try again.
- Replace with the correct part and tighten snugly (do not overtighten).
If the coupling is rounded, cracked, or slipping, replacement is usually the best fix. The correct replacement for this model is the blender drive coupling W11627528.
- Coupling sits flat and spins true (no wobble).
- Jar engages smoothly without grinding.
- Blender runs without a burning smell or repeated stopping.
| Symptom | Likely cause | What to do |
|---|---|---|
| Jar slips, rattles, or won’t drive | Worn coupling teeth | Replace the coupling |
| Coupling won’t loosen | Seized threads | Use controlled taps, then retry |
| Blender stops under load | Overload/jam protection | Reduce batch size, add liquid, restart |
A worn or seized drive coupling can make the jar slip, strain the motor, and trigger shutdowns under load. Replacing the coupling restores proper power transfer from the motor to the blade system.
Last updated: February 2026
Is the KitchenAid KSB4026HY0 blender dishwasher-safe?
Yes. For the KitchenAid KSB4026HY0 blender, several removable accessories are dishwasher-safe; most are top rack only, while the blender jar and glass jar can also be washed on the bottom rack. For the full care list and cleaning steps, follow the KSB4026HY0 owner's manual.
From the care and cleaning guidance for this blender series:
- Top rack only: personal jar, small batch jar, lids, blade assembly, reamer, juice container, pulp basket, tamper, lid center cap
- Bottom rack allowed: blender jar and glass jar
- Never dishwasher-safe: blender base and power cord (do not immerse in water)
| Item | Dishwasher-safe? | Rack |
|---|---|---|
| Blender base and power cord | No | None |
| Lids and lid center cap | Yes | Top |
| Blade assembly | Yes | Top |
| Blender jar / glass jar | Yes | Bottom |
Using the correct rack helps prevent warping, clouding, and seal issues. Keeping the base and cord dry also protects the motor and electronic control from damage.
If the jar no longer sits firmly or you notice slipping at the drive connection, inspect the drive coupling for wear. The correct replacement for this model is the blender drive coupling W11627528.
Last updated: February 2026
Why is my KitchenAid blender jug leaking from the bottom?
If your KitchenAid KSB4026HY0 blender jar is leaking from the bottom, the most common causes are a worn jar sealing surface, a loose or damaged drive coupling area, or liquid that has worked its way into the base from overfilling or blending hot liquids. Start by stopping use, cleaning and drying everything, then inspect the jar bottom and coupling area closely using the KSB4026HY0 owner’s manual.
- Unplug the blender; never troubleshoot a powered base.
- Remove the jar and wipe the jar bottom completely dry.
- Check for cracks, chips, or a warped sealing surface on the jar bottom.
- Confirm the jar is seated flat and fully engaged on the base.
- Look for residue buildup that can prevent a proper seal.
| What you see | Most likely cause | What to do |
|---|---|---|
| Slow drip after blending | Jar bottom seal area is dirty or worn | Clean thoroughly; if wear is visible, replace the jar |
| Leak starts during blending | Jar not seated or coupling area slipping | Reseat jar; inspect coupling and coupler plug |
| Moisture under base after heavy use | Overfill, foamy blends, or hot contents | Reduce fill level; let hot liquids cool before blending |
| Oily-looking seepage near drive area | Drive coupling wear allowing seepage | Inspect and replace coupling components |
If the leak appears to originate around the drive interface (where the jar meets the base), these model-matched parts are the first ones we check:
- Blender drive coupling W11627528 (worn, cracked, or slipping coupling)
- Plug, coupler W11486757 (damaged plug can allow seepage and wobble)
- Glass jar as W11528690 (cracks or worn sealing surface at the jar bottom)
A surprising number of “leaks” are liquid trapped around the jar bottom or splashed into the base area. For KSB4026HY0 care, we follow the manual guidance:
- Do not immerse the blender base or cord in water.
- Wipe the base and cord with a warm, damp cloth; dry with a soft cloth.
- Use the clean function with warm water and a drop or two of dish soap, then rinse and dry thoroughly.
A bottom leak can let liquid migrate into the drive area, which increases wear on the coupling and can lead to slipping, noise, or intermittent operation. Catching it early protects the motor and electronic control.
Last updated: February 2026