Owner’s manual
 View engine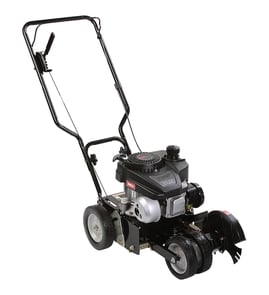

What engine is on a Craftsman edger?
For the Craftsman lawn edger model 536797470, the exact engine make and displacement depend on the engine model installed on your unit; we match it by the engine ID tag and the parts breakdown in the 536797470 owner's manual. Many Craftsman edgers in this class use a small 4-cycle gasoline engine.
How to identify the exact engine on model 536797470
Check these spots on the engine (not the edger frame):
- Recoil starter housing (often shows the engine brand)
- Valve cover or blower shroud for a model/type code label
- Muffler side of the engine block for a stamped ID
- Carburetor area for a tag or sticker
- Oil fill/dipstick side for a manufacturer plate
What you will typically see (common Craftsman edger setups)
Most walk-behind gas edgers like the Craftsman 536797470 are built around a:
- 4-cycle (4-stroke) engine
- Pull-start recoil
- Vertical crankshaft layout
- Splash lubrication (check oil level before each use)
Quick comparison: 2-cycle vs 4-cycle
| Feature | 2-cycle engine | 4-cycle engine |
|---|---|---|
| Fuel | Gas/oil mix | Straight gas (oil in crankcase) |
| Starting/operation | Higher RPM, louder | Smoother, typically quieter |
| Maintenance | Mix ratio critical | Oil checks and changes |
Why it matters
The engine identification determines the correct tune-up and repair parts (spark plug, air filter, carburetor kit, belts, and hardware). It also prevents ordering the wrong fasteners or drive components when you are servicing the edger.
Related drive parts you may replace during service
If your edger runs but the blade does not drive, these model-matched parts are common service items:
- V-belt 32668MA (connects engine power to the drive system)
- Wheel and tire assembly 336545MA (traction and height stability)
Last updated: February 2026
Where can I get Craftsman replacement parts?
For your Craftsman lawn edger model 536797470, we recommend buying replacement parts from Sears PartsDirect or other authorized retailers that let you shop by exact model number; that is the most reliable way to get the right fit for hardware and wear items.
Best ways to buy the correct part
- Match parts using the full model number 536797470 (not just “Craftsman edger”).
- Use the exploded views and parts list in the 536797470 owner's manual to confirm where the part installs.
- Replace worn fasteners with the correct type (bolt vs. lock nut vs. spacer) to keep the edger safe and aligned.
- For drive issues, confirm belt routing and tension before ordering parts.
- If you are unsure which item you need, identify the assembly first (handle, wheel, blade area), then select the part.
Common Craftsman 536797470 parts customers replace
These are examples of model-matched parts commonly ordered for this edger:
| What you are fixing | Part example | What it does |
|---|---|---|
| Loose or missing adjustment hardware | Knob kit 1501260MA | Secures and adjusts components that use a knob-style fastener |
| Edger will not self-drive or slips | V-belt 32668MA | Transfers power through the drive system |
| Wobble or poor tracking | Wheel and tire assembly 336545MA | Supports the edger and helps maintain a straight cut |
Why it matters
Craftsman outdoor power equipment often has multiple similar-looking versions. Shopping by the exact model number 536797470 helps you avoid ordering a part that looks right but mounts differently, has the wrong thread size, or does not match the belt length.
Quick checklist before you order
- Confirm the model tag reads 536797470.
- Compare the part location in the 536797470 owner's manual.
- Check whether you need related hardware (washers, lock nuts, spacers) when replacing a moving part.
Last updated: February 2026
What is the average lifespan of 536797470?
A Craftsman lawn edger like model 536797470 typically lasts 8 to 12 years with normal residential use and basic maintenance. Lifespan depends most on engine care, belt condition, and keeping the blade area clean and properly adjusted (see the 536797470 owner's manual).
What affects lifespan the most
- Maintenance frequency: regular oil changes, air filter service, and fresh fuel practices
- Drive system wear: a worn belt can slip, overheat, and reduce performance
- Blade and hardware condition: loose or worn fasteners accelerate vibration and wear
- Storage: dry, covered storage reduces rust and fuel system issues
- Operating habits: edging in heavy roots or rocks increases load and wear
Quick maintenance schedule (typical)
| Task | Typical interval | Why it matters |
|---|---|---|
| Check/replace drive belt | Each season | Prevents slipping and loss of drive |
| Inspect blade washers and fasteners | Each use | Reduces vibration and uneven cutting |
| Clean debris from guard and blade area | Each use | Prevents overheating and binding |
| Check wheel/tire condition | Each season | Keeps depth consistent and reduces strain |
Parts that commonly limit service life
If performance drops (slipping drive, inconsistent depth, excess vibration), these model-matched parts are common wear items to inspect or replace:
- V-belt 32668MA (drive slipping, poor self-propel/drive function)
- Wheel and tire assembly 336545MA (wobble, uneven edging depth)
- Washer blade 22265MA (blade stack looseness, vibration)
Why it matters
Replacing a few wear parts on time and following the correct adjustments helps your 536797470 cut cleaner, run cooler, and avoid bigger failures that shorten overall lifespan.
Last updated: March 2026