Owner’s manual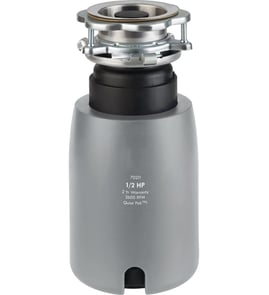

Why don't plumbers like garbage disposals?
Plumbers often dislike garbage disposals because they increase the chance of drain clogs and service calls when the disposer is used like a trash can. With the Kenmore 175605540, avoiding fibrous foods and grease, and flushing with plenty of cold water, prevents most disposal-related plumbing problems (see the owner's manual).
These are the most common disposal habits that lead to slow drains, backups, and odors:
- Pouring grease or fat into the sink; it coats pipes and traps debris
- Grinding very fibrous foods (corn husks, artichokes, stringy peels); they can tangle and mat in the trap
- Feeding a large amount of vegetable peels at once instead of gradually
- Using hot water while grinding; it can soften fats so they move into the drain line and re-solidify
- Treating the disposer as a substitute for the trash can (large volumes of scraps)
The care guidance in the manual is designed to protect both the disposer and your plumbing.
- Run a moderate to strong flow of cold water first, then turn the disposer on
- Keep cold water running for about 15 seconds after grinding to help flush the drain line
- Feed scraps in gradually; do not pack the grind chamber
- Skip grease, fat, and extremely fibrous waste
- Use ice, small bones, or fruit pits occasionally for a scouring action inside the grind chamber
| Task | Do | Don’t |
|---|---|---|
| Water temperature | Cold water while grinding | Hot water while grinding |
| Grease handling | Collect in a jar and trash it | Pour grease/fat into sink |
| Fibrous foods | Trash or compost | Grind corn husks, artichokes |
| Loading | Feed gradually | Dump a big batch at once |
A garbage disposal sits upstream of your sink trap and branch drain; when grease and fibrous scraps build up, they restrict flow and create clogs that look like “bad plumbing.” Using the disposer correctly reduces blockages, odors, and leak checks under the sink.
For model-specific operating and care steps, use the owner's manual. For replacement parts and diagrams for the Kenmore 175605540, start with the model parts list, or search by model on Sears PartsDirect.
Last updated: February 2026
How long does a Kenmore garbage disposal last?
Most Kenmore garbage disposals, including model 175605540, last 10 to 12 years with normal household use. Lifespan depends most on what you grind, how consistently you flush with cold water, and how quickly you clear jams and reset the motor when needed (see the owner's manual).
A disposal usually fails from motor wear, repeated jams, or corrosion from poor flushing habits.
- Frequent heavy loads (fibrous peels, starchy foods) shorten life
- Running cold water during grinding and for about 15 seconds after helps protect the drain line
- Avoid packing the grind chamber; feed waste in batches
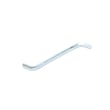
- Clearing jams correctly (wrenchette + reset button) prevents motor damage
- Grinding ice or small bones occasionally can help scour the chamber
Use this simple routine to get the longest service life from a Kenmore disposer.
| Task | How often | What it does |
|---|---|---|
| Flush with cold water while grinding | Every use | Moves ground waste through the drain line |
| Keep water running after grinding | Every use | Helps prevent clogs and odor buildup |
| Scour with ice or small bones | Weekly to monthly | Helps clean the grind chamber |
| Freshen with citrus peels | As needed | Reduces sink and drain odors |
| Clear jams using the bottom hex/wrenchette and press reset | As needed | Restores operation without overheating the motor |
These symptoms usually mean the disposer is wearing out or has internal damage.
- Needs the reset button frequently
- Hums but struggles to spin even after clearing a jam
- Leaks from the disposer body (not just the sink flange)
- Grinding is noticeably slower or louder than normal
- Persistent odors even after cleaning and flushing
A disposal that is nearing the end of its lifespan is more likely to jam, trip a breaker, or clog the drain line. Following the cold-water flush and jam-release steps in the owner's manual helps you avoid premature motor wear and keeps the kitchen sink draining properly.
If you end up needing replacement parts or a new disposer, we recommend starting with the model 175605540 parts information, then using Sears PartsDirect to search by model number for the best match.
Last updated: February 2026
Is it cheaper to repair or replace a garbage disposal?
For the Kenmore 175605540 garbage disposal, repair is cheaper when the unit still runs and the issue is a jam, a loose mount, or a leak at a connection. Replacement is the better value when the motor fails or the disposer body leaks.
| Option | Typical total cost | Best fit |
|---|---|---|
| DIY repair | $0 to $60 | Jam clearing, tightening connections |
| Pro repair | $70 to $250 | Leak diagnosis, electrical checks |
| Replace (unit + install) | $250 to $600 | Motor failure, cracked housing |
Start with repair if you see common, fixable problems:
- Jam or stuck grind plate: turn power off; free it with the self-service wrenchette or a long wooden handle.
- Trips and will not run: clear the jam first, then press the reset button.
- Leak at the drain connection: re-seat and align the discharge tube to the trap; do not pull or bend the tube to make it fit.
- Leak after replacing a disposer: install a new discharge tube and gasket; old parts often do not reseal.
- Odors or sluggish flow: run a strong flow of cold water while grinding and for at least 15 seconds after.
For model-specific mounting, discharge tube guidance, and safety steps, use the owner's manual.
Replace the disposal when any of these are true:
- Water leaks from the disposer body (not a connection)
- The motor hums then trips even after clearing jams
- You have repeat resets under light loads
A leaking or repeatedly tripping disposal can damage cabinets and wiring; a simple jam or misaligned discharge tube is often a quick, low-cost fix.
If you decide to replace parts or the entire unit, search by model number on Sears PartsDirect to match Kenmore 175605540 components.
Last updated: February 2026