- Kenmore refrigerator water filters
- Whirlpool refrigerator water filters
- Samsung refrigerator water filters
- GE refrigerator water filters
- LG refrigerator water filters
- Frigidaire refrigerator water filters
- KitchenAid refrigerator water filters
- Maytag refrigerator water filters
- Kenmore Elite refrigerator water filters
- Estate refrigerator water filters
- GE Profile refrigerator water filters
- Amana refrigerator water filters
- Bosch refrigerator water filters
- Dacor refrigerator water filters
- Electrolux refrigerator water filters
Top DIY repair help
View All Repair Categories
Appliances
Lawn & Garden
Power Tools
Home Improvement
Sports & Leisure
Heating & Cooling
Quick Links
How to replace an ice maker in a side-by-side refrigerator
less than a minute readFeb 18Lyle Weischwill
Repair time and Difficulty
30 minutes or less
Tools Required
- 1/4-in nut driver
- Slot screwdriver
- Work gloves
- Tape
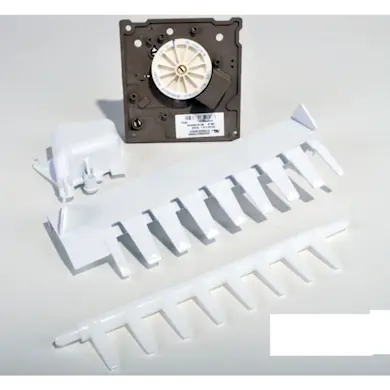
This DIY repair guide shows how to remove and replace a factory-installed ice maker in a side-by-side refrigerator. The ice maker assembly has electronic parts that can malfunction and prevent water from filling the ice maker mold or from dropping the ice from the mold after it forms. Replace the ice maker assembly using the manufacturer-approved side-by-side refrigerator part if it stops working.
These repair instructions work for replacing an ice maker in Kenmore, Whirlpool and KitchenAid side-by-side refrigerators with in-door-ice systems.
Instructions
- 1. Shut off power and water to the refrigerator
Unplug the refrigerator or shut off the circuit breaker for the refrigerator.
Close the water supply cut-off valve for the water line attached to the back of the refrigerator. The valve is often on the wall behind the refrigerator but could be under the kitchen sink or in the basement below the refrigerator.
Move highly perishable food to a cooler or other cooled space. The refrigerator will be without power for about 60 minutes, which shouldn't affect most refrigerated or frozen foods.
- 2. Remove the ice maker's front cover
Use tape to shut the flipper cover on the left wall in front of the ice maker. Open the plastic cover in front of the refrigerator ice maker. Slide the cover to the left and push up on the right side of the cover to release the plastic pin from the bracket. Use a slot screwdriver to pry the pin from the bracket, if necessary. Pull off the cover and set it aside. Tape the flipper shut.
- 3. Remove the wire harness cover
Using a 1/4-inch nut driver, remove the screw that's under the ice maker module, in the rear right corner. Pull off the cover that the screw held in place. Set the screw and plastic cover aside.
- 4. Remove the ice maker
Push in on the tab to the left of the ice maker to release the ice maker and slide the ice maker forward, off its rails. Use a slot screwdriver to release the locking tab on the wire harness plug and pull the wire harness out of the plug. Remove the ice maker from the freezer compartment. Close the freezer door.
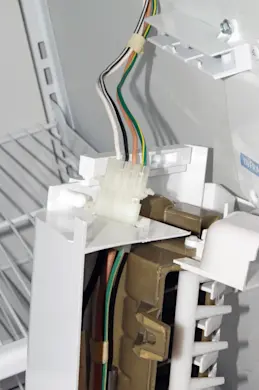
PHOTO: Remove the ice maker from the rails to access the wire harness. 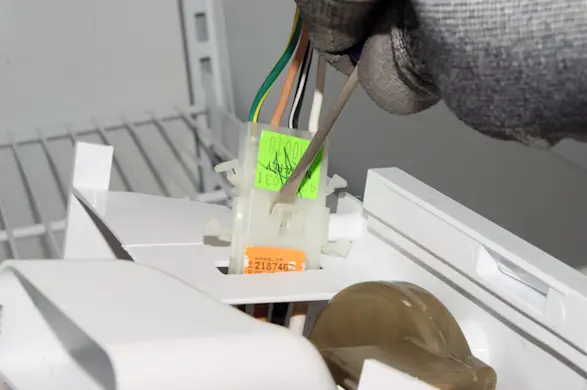
PHOTO: Release the wire harness locking tab. 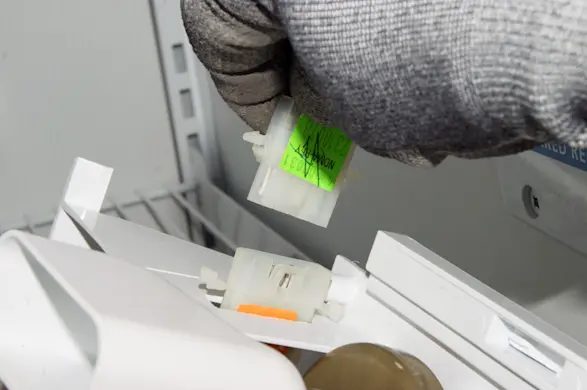
PHOTO: Unplug the wire harness.
- 5. Remove the mounting plate
Place the ice maker module upside down on a flat surface. Using a 1/4-inch nut driver, remove the screws that secure the base mounting plate to the bottom of the ice maker module.
Release the locking tabs on both side of the wire harness plug that secure it to the plastic base mounting plate. Pull the wire harness plug out of the base mounting plate to release the ice maker module.
Set the old ice maker aside for disposal.
- 6. Attach the mounting plate to the new ice maker assembly
Position the new ice maker in the bottom plastic mounting plate and push the plastic wire harness plug into the side of the mounting plate until the plastic locking tabs snap into place.
Line up the screw holes on the bottom of the plastic mounting plate. Insert the screws and tighten them just past hand tight.
- 7. Plug in the wire harness
In the freezer, hold the ice maker near the mounting rails and plug in the wire harness into the connection plug until the locking tab snaps into place.
- 8. Slide the ice maker assembly onto the mounting rails
Inside the freezer compartment, line up the new ice maker with the mounting rails and push it onto the rails until you can position the fill tube in the fill cup. Put the fill tube into the cup.
Slide the ice maker module into position until the locking tab snaps into place.
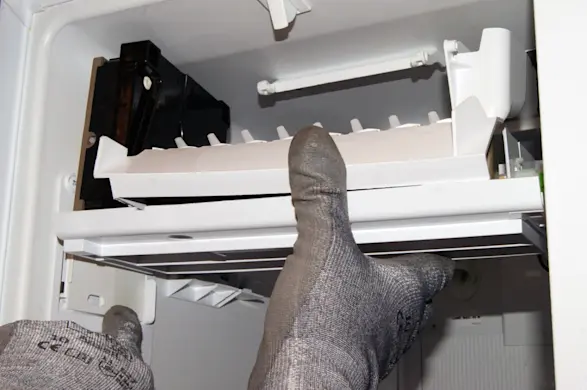
PHOTO: Slide the ice maker onto the rails. 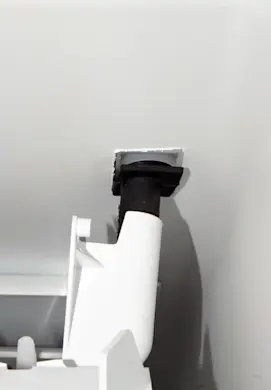
PHOTO: Position the fill tube in the fill cup.
- 9. Replace the wire harness cover
Position the plastic wire harness cover and screw it into place. Tighten the screws until they stop turning and then give them a reasonably firm twist to secure them. Don't overtighten.
- 10. Reattach the front cover
Position the front plastic cover in front of the mounting clip and insert the left side pin into the mounting clip. Work the right side pin over the top of the mounting clip and snap it into place.
Remove the tape that holds the flipper cover.
- 11. Restore water and electricity
Open the water supply shut-off valve to restore the water supply to the refrigerator.
Plug in the refrigerator or turn on the house circuit breaker to restore power.