 Owner’s manual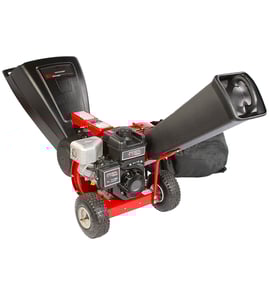




What are the common problems with chipper machines?
The most common problems we see on the Craftsman 247799640 chipper-vacuum are jams/clogs, poor chipping from dull blades, loss of power or no-start engine issues, and excess vibration from worn rotating parts. Many problems trace back to feeding material over 3 inches, clogged screens, or neglected maintenance in the owner's manual.
Common problems and what they usually mean
- Jamming in the chipper chute: often caused by wet, stringy debris or feeding too fast.
- Won’t start: commonly stale fuel, spark plug issues, or the safety switch not engaged.
- Loss of power or surging: dirty air cleaner, fuel restriction, or running on CHOKE too long.
- Overheating: restricted airflow (dirty air cleaner) or engine running poorly.
- Poor chipping or shredding: dull or damaged cutting edges.
- Clogged discharge area: flail screen packed with debris.
- High vibration or rattling: loose fasteners, damaged blade, or bearing wear.
Model-specific operating limits that prevent problems
Your Craftsman 247799640 is designed for typical yard vegetation (branches, leaves, twigs). A key limit from the manual is the chipper chute capacity.
| Issue you notice | Common cause | Best first check |
|---|---|---|
| Frequent jams | Material too large or fed too fast | Keep branches 3 inches max; use tamper plug, not hands |
| Poor chipping | Dull blade edge | Inspect cutting components; replace if nicked |
| Loss of power | Dirty air cleaner or fuel issue | Check air cleaner and fuel freshness |
| Clogging at discharge | Screen packed | Clean the flail screen area |
Parts that commonly relate to these symptoms
If you confirm wear or damage during inspection, these parts are often involved:
- Dull cutting performance: replace the chipper blade 742-0544b.
- Shredding issues or imbalance: inspect the mtd chipper/shredder flail blade 719-0329.
- Vibration or rumbling: check bearings such as ball bearing 741-0600 for roughness.
Why it matters
A chipper/shredder can throw objects and the cutting system can cause severe injury. Preventing jams and vibration protects the impeller area, reduces belt and bearing wear, and keeps the machine operating safely and efficiently.
Last updated: February 2026
Will a chipper shredder work on bamboo?
Yes, a Craftsman chipper/shredder like model 247799640 can chip bamboo as long as it is treated like yard vegetation and kept within the machine’s feed limits. For this model, only material up to 3 inches in diameter should go into the chipper chute; thicker bamboo can damage the machine or cause injury. See the owner's manual for safe operating rules and chipping guidance.
Best practices for chipping bamboo
Bamboo is fibrous and can be stringy, so steady feeding and correct prep help prevent jams.
- Cut bamboo into straight sections; remove rocks, wire, and dirt
- Keep pieces under 3 inches diameter at the thickest point
- Feed slowly; let the engine recover between pieces
- Use the tamper plug to push material; never put hands in the chute
- Stop the engine and disconnect the spark plug wire before clearing clogs
What bamboo sizes typically work best
| Bamboo type | Typical result in a chipper chute | What to do |
|---|---|---|
| Thin canes (small diameter) | Chips quickly, may “whip” | Feed in small bundles |
| Medium canes (near the limit) | Can bog down, more stringy | Feed one at a time |
| Thick culms (over 3 inches) | Unsafe, can jam or damage parts | Cut smaller; do not chip |
If bamboo keeps clogging the discharge
This model uses an internal flail screen in the discharge area; if it clogs, performance drops and jams become more likely.
- Shut off the engine and let all moving parts stop
- Disconnect the spark plug wire
- Clean the discharge area and flail screen as described in the manual
- Inspect cutting components for wear (dull blades increase clogging)
Parts that commonly affect chipping performance
If chipping quality drops (stringy output, frequent jams, excessive vibration), worn cutting parts are a common cause.
- Chipper blade 742-0544 (primary cutting edge)
- Mtd chipper/shredder flail blade 719-0329 (helps shred and move material)
Why it matters
Bamboo can be processed efficiently, but it also loads the cutting system heavily. Staying within the 3-inch maximum and keeping blades sharp reduces clogs, protects the impeller and bearings, and helps the chipper/shredder run safer and smoother.
Last updated: February 2026
Why is my wood chipper not turning?
If your Craftsman 247799640 chipper/shredder engine runs but the chipper or shredder rotor will not turn, the most common causes are a jam in the housing, a worn or broken drive belt, or an out-of-adjustment clutch cable. Use the 247799640 owner's manual to verify the clutch-cable adjustment procedure.
Quick checks (fastest to rule out)
- Shut the engine off, remove the spark plug wire, and wait for all moving parts to stop.
- Check the chipper chute and housing for a jam; never put hands inside the chute.
- Inspect the discharge area and internal screen for clogging; clean packed debris.
- Inspect the belt and pulleys for a belt that is off-track, shredded, glazed, or loose.
- Confirm the drive clutch handle is fully engaged (held against the upper handle).
Clutch cable adjustment (model-specific)
The manual for model 247799640 calls for adjusting the hex nuts at the cable bracket so there is no slack, but the cable is not tight (do not overtighten). Use this check:
| Check | What you should see | If it fails |
|---|---|---|
| Clutch released; push unit | Moves freely | Cable too tight; loosen at bracket |
| Clutch engaged; push unit | Wheels lock up | Cable too loose; tighten at bracket |
If the wheels do not lock up with the clutch engaged, tighten the cable by turning the bottom nut clockwise, then recheck and secure both nuts.
If the belt is the problem
A worn belt can let the engine run while the chipper blades do not spin under load.
- Replace a belt that is cracked, missing chunks, or heavily glazed
- Remove oil or fuel contamination sources; contaminated belts slip
- Confirm the belt is routed correctly and fully seated in the pulleys
If you also notice poor chipping or stringy discharge, inspect blade condition; a dull blade can overload the drive. A common replacement is the chipper blade 742-0544.
Why it matters
A slipping belt, a misadjusted clutch cable, or a clog reduces rotor speed; that causes poor chipping, frequent plugging, and extra wear on the impeller and bearings.
Last updated: February 2026
What is the difference between a chipper shredder and a chipper shredder?
A chipper is built to cut thicker woody branches into coarse chips, while a shredder is built to break down leaves and small twigs into finer mulch. A “chipper shredder” combines both; the Craftsman 247799640 is a chipper-vacuum style combo, and the chipper chute accepts material up to 3 inches in diameter (see the 247799640 owner's manual).
Chipping vs. shredding: what each function does
- Chipping: uses a chipper blade to slice branches into larger chips.
- Shredding: uses flails and a screen to reduce leaves and small debris into finer material.
- Combo units: let you process mixed yard waste without switching machines.
- Chipper-vacuum designs (like 247799640): add vacuuming and bagging to collect leaves, then reduce them through the housing.
What the Craftsman 247799640 is designed to handle
Use the chipper chute only for normal yard vegetation and stay within the chute limit stated in the manual.
| Material you feed | Best function | Typical result | Common issue if misused |
|---|---|---|---|
| Branches up to 3 in. diameter | Chipping | Coarse chips | Jams if oversized or fed too fast |
| Leaves, small twigs | Shredding/vacuuming | Fine mulch | Clogs if wet or packed |
| Wet, stringy plant matter | Limited | Uneven shredding | Screen and discharge clogging |
Why it matters
Feeding the right material into the right opening prevents clogs, reduces vibration, and protects wear parts such as the chipper blade and the internal screen.
Parts that commonly affect performance
If chipping or shredding quality drops, inspect these common wear or airflow-related items:
- Chipper blade 742-0544b (dull edges reduce chipping and increase strain)
- Mtd chipper/shredder flail blade 719-0329 (worn flails reduce shredding)
- Troybilt lawn vacuum chipper/shredder screen 719-0326 (clogged or damaged screen restricts discharge)
Last updated: February 2026