Owner’s manual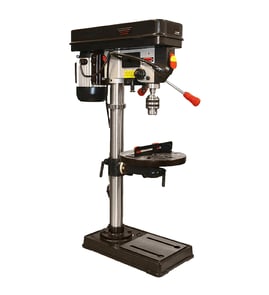

How much does a Craftsman 11321371 drill press weigh?
The Craftsman 11321371 15-1/2 drill press weight is not listed in the model’s parts list and wiring diagram sections; most floor-standing drill presses in this size class weigh about 150 to 250 lb depending on the motor, base, and table assembly. For the most accurate spec, check the 11321371 owner's manual.
Typical weight range (what to expect)
Most 15-inch to 16-inch drill presses land in a fairly consistent range because of the cast-iron base, column, and table.
- Benchtop units: often 60 to 120 lb
- Floor-standing 15-1/2 inch class: often 150 to 250 lb
- Heavier builds: can exceed 250 lb when the base and head are especially robust
How to estimate weight if you need it for moving or shipping
If you are planning transport, we recommend estimating on the safe side and breaking the drill press down into major assemblies.
- Remove the table and table bracket from the column
- Separate the head from the column (support it; it is the heaviest section)
- Keep the base flat to prevent tipping
- Bag and label fasteners so reassembly is straightforward
- Use a hand truck and straps; cast iron shifts suddenly if it tilts
Quick planning table
| Scenario | Use this planning weight | Notes |
|---|---|---|
| Carrying down steps | 200 to 250 lb | Plan for 2 people and a dolly |
| Vehicle loading | 175 to 250 lb | Strap the column and head to prevent rotation |
| Freight or palletizing | 225 to 300 lb | Includes pallet, straps, and packing materials |
Why it matters
Weight affects safety and accuracy. A heavier drill press base and column reduce vibration, which helps limit runout and wobble during drilling and improves hole quality.
Ordering parts and confirming your exact model
For repair parts, match by model number 11321371 and the part number shown in the diagrams. You can also search by model number on Sears PartsDirect if you are sourcing additional items.
Last updated: February 2026
What is a good horsepower for a drill press?
For a Craftsman drill press like model 11321371, 1/2 HP is a strong, practical choice for most home shop drilling because it provides steady torque at common drilling speeds without overloading the machine’s design. We also prioritize correct speed selection and safe workholding for clean holes.
Recommended horsepower by typical use
Most drill press work is limited more by bit size, material, and speed than by raw HP.
- 1/3 HP: light-duty drilling in softwood, plastics, small bits
- 1/2 HP: general-purpose drilling in hardwood and mild steel with proper speeds
- 3/4 HP to 1 HP: frequent larger bits, hole saws, Forstner bits, or production-style use
- More than 1 HP: usually only needed for heavy-duty floor presses and large cutters
For this Craftsman platform, the manual lists acceptable motors in the 1/3 HP to 1/2 HP range and specifies a 1725 RPM motor and 110-120V operation; we follow those limits to keep the drill press safe and reliable. See the 11321371 owner's manual.
What matters as much as horsepower
Horsepower helps, but these factors often matter more for results and safety:
- Correct RPM for the bit and material (too fast overheats bits and burns wood)
- Sharp bits and the right bit type (twist bit vs. brad point vs. Forstner)
- Feed pressure (steady pressure prevents chatter and grabbing)
- Workpiece clamping (prevents spinning and injury)
- Accessory speed limits (hole saws and drum sanders must be run at reduced RPM)
Quick guide: choosing the right HP
| If you mostly drill... | A good HP target | Notes |
|---|---|---|
| Softwood, small holes | 1/3 HP | Focus on sharp bits and correct speed |
| Mixed wood and light metal | 1/2 HP | Best all-around choice for most users |
| Large cutters often | 3/4 HP to 1 HP | Only if the drill press is rated for it |
Why it matters
Choosing horsepower that matches the drill press design helps prevent belt slip, stalling, overheated bits, and unsafe grabbing. Staying within the motor and electrical requirements in the manual also protects the switch, wiring, and operator.
Parts and diagrams
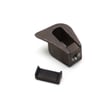
If you are matching components (like the switch key, depth stop parts, quill hardware, or spindle assembly items), use the model number 11321371 when searching diagrams and repair parts. For broader parts lookup by model, use Sears PartsDirect.
Last updated: February 2026
What is the difference between a drill press and a pedestal drill?
A drill press and a pedestal drill are the same type of machine; “pedestal drill” is simply another name for a drill press. Your Craftsman model 11321371 is a drill press designed to be mounted securely (bench or floor) for controlled, accurate drilling.
Names you may hear (and what they mean)
These terms are commonly used interchangeably:
- Drill press: the general name for the machine
- Pedestal drill: a drill press on a floor-standing column and base
- Bench drill: a drill press sized to bolt to a workbench
- Pillar drill: another common name for a drill press
Practical differences you will notice in the shop
Even though the names overlap, people often use them to describe mounting style and capacity.
| Term people use | Typical mounting | Typical use case |
|---|---|---|
| Bench drill (bench drill press) | Bolted to a bench | Small to medium workpieces |
| Pedestal drill (floor drill press) | Bolted to the floor | Larger workpieces, more leverage |
| Drill press (generic) | Bench or floor | Any fixed drilling where accuracy matters |
Why it matters for safety and accuracy
A fixed drill press setup reduces bit grab and kickback risk because the work is supported and the machine is anchored. In our Craftsman 11321371 drill press guidance, we emphasize stable mounting and proper work support to prevent the workpiece from being pulled from your hands.
Key safety habits we recommend
- Bolt the drill press down if it can tip or shift during use.
- Clamp the workpiece to the table when it is short or cannot butt against the column.
- Use a drill press vise for small parts; fasten the vise to the table.
- Keep the belt guard down before switching the motor on.
- Do not wear gloves while operating the drill press.
Where to confirm model-specific setup details
For mounting, adjustments, and basic operation steps specific to Craftsman 11321371, use the 11321371 owner's manual.
You can also look up diagrams and replacement parts by model number on Sears PartsDirect.
Last updated: February 2026