Owner’s manual


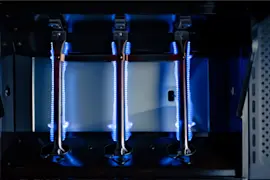
How to ignite a Kenmore gas grill?
To ignite your Kenmore Elite gas grill model 14648588710, open the lid, turn ON the LP tank valve, then push and turn a main burner knob to HI and hold it in until the burner lights. If it does not light within 5 seconds, shut it off and wait 5 minutes before retrying (see the 14648588710 owner's manual).
Standard igniter lighting steps
- Open the lid before lighting (never light with the lid closed).
- Turn ON the gas valve on the LP tank.
- Push and turn any main burner control knob to HI and hold it in.
- Listen for clicking from the igniter electrodes.
- If it does not ignite in 5 seconds: turn the knob OFF, wait 5 minutes, then repeat.
- To light another main burner, repeat the same knob-to-HI step.
Match lighting (if the igniter will not spark)
Use match lighting exactly as described in the manual.
| Method | What you use | Where the flame goes | When to use |
|---|---|---|---|
| Igniter lighting | Built-in igniter | Burner area (automatic spark) | Normal starting |
| Match lighting | Match and match holder | Lighting hole on left side of firebox | Igniter not working |
Quick checks if it will not light
- Confirm the LP cylinder valve is fully open.
- Make sure you are holding the burner knob in at HI long enough to ignite.
- If the grill has been stored, clean the burner assembly (spider webs and debris commonly block burner tubes).
- Inspect igniter wiring for damage or loose connections; replace the gas grill igniter wire set 30800243 if wires are cracked or terminals are corroded.
- If you smell gas after a failed attempt, turn everything OFF and wait 5 minutes before trying again.
Why it matters
Lighting with the lid open and using the 5-second attempt and 5-minute wait reduces the chance of unburned gas building up in the firebox. Keeping burners clean also prevents ignition problems and uneven heating.
Last updated: February 2026
What are the parts of a gas grill called?
On the Kenmore Elite gas grill model 14648588710, the main parts are the cooking grates (cooking grids), burners and venturi tubes, ignition components (electrodes and wires), heat diffusers, and the grease management system (drip tray/box). Our 14648588710 owner's manual lists the exact names used for this grill.
Common gas grill parts (what they do)
- Cooking grids/grates: hold food over the flame
- Burners: mix gas and air to create flame (often paired with venturi tubes)
- Heat diffusers/radiants: spread heat and reduce flare-ups
- Ignition system: electrodes, igniter wires, and sometimes a transformer for spark
- Control knobs/valves and regulator: control gas flow from the LP cylinder
- Grease system: drip tray/box and cup to catch drippings
Names you will see in the 14648588710 parts list
The manual’s parts list uses specific terms for this model. Here are examples that match common “gas grill anatomy” names:
| Common name | Manual-style name (example) | What it affects |
|---|---|---|
| Cooking grate | Cooking grid | Searing, heat transfer |
| Grease tray | Drip tray / drip box | Flare-ups, cleanup |
| Igniter | Main burner electrode | Lighting reliability |
| Burner | Main burner | Heat output |
Parts on this model you may replace
These are examples of real parts used on this grill that relate to the “anatomy” above:
- Gas grill igniter wire set 30800243: connects ignition to electrodes
- Transformer 41500216: powers the electronic ignition (if equipped)
- Seat 30800249C: a mounting/support piece used in assembly
Why it matters
Using the correct part names helps you match diagrams, order the right Kenmore replacement parts, and troubleshoot safely. For example, the manual warns that venturi burner tubes can clog (spider nests) and cause hard lighting or weak flames, so knowing “venturi tube” versus “burner” speeds up diagnosis.
Last updated: February 2026
What is the average lifespan of 14648588710?
A Kenmore Elite gas grill like model 14648588710 typically lasts 10 years with normal residential use. Lifespan depends most on how well you control corrosion, keep burners and ignition components clean, and protect the grill from weather between cookouts.
What affects grill lifespan the most
- Exposure to rain, salt air, and humidity (accelerates rust on the firebox, lid, and fasteners)
- Grease and carbon buildup (causes flare-ups and overheats parts)
- Burner and ignition wear (hard starts and uneven heat)
- Covering and storage habits (a breathable cover and dry storage extend life)
- Fuel system care (proper LP cylinder handling and leak checks)
Maintenance schedule we recommend
| Task | How often | Why it matters |
|---|---|---|
| Brush grates; empty grease | Every cook | Reduces flare-ups and hot spots |
| Clean burners and ports | Monthly in season | Prevents low heat and uneven flames |
| Check igniter operation and wiring | Monthly | Avoids no-spark and delayed ignition |
| Inspect hoses and fittings for leaks | At tank changes | Prevents unsafe gas leaks |
| Deep clean firebox and heat shields | 1 to 2 times per year | Slows corrosion and improves heat control |
Signs your grill is nearing end of life
- Firebox or lid has rust-through or soft spots
- Persistent uneven heating after cleaning burners and ports
- Ignition failures even after checking connections
- Gas leaks that return after tightening fittings (stop using the grill until repaired)
Parts that commonly extend service life
Replacing small wear items often restores performance faster than replacing the whole grill.
- Gas grill igniter wire set 30800243 (for spark/ignition connection issues)
- Transformer 41500216 (for powered ignition systems)
- Gas grill ground wire 30800244 (for reliable spark grounding)
Why it matters
A grill can look fine outside but lose efficiency inside; keeping the burner system, grease management, and ignition in good shape helps your 14648588710 heat evenly, light safely, and avoid premature rust damage. For model-specific care and safety steps, follow the 14648588710 owner's manual.
Last updated: March 2026