
What brand makes the best mitre saw?
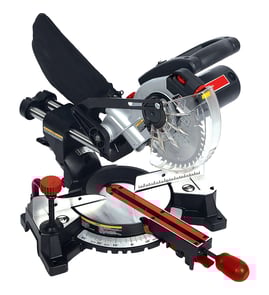
There is no single “best” miter saw brand for everyone; the best choice depends on how you’ll use it (DIY trim work vs. daily jobsite framing), the blade size you need, and how much accuracy and durability you expect. For Tradesman model 8323, focus on the features that affect cut quality and long-term reliability, then compare brands that meet those needs.
- Cut accuracy and repeatability: solid fence, stable pivot, minimal play in the head
- Miter and bevel range: common needs are 0 to 45 degrees (or more) in both directions
- Slide mechanism quality (if sliding): smooth travel, no side-to-side slop
- Dust collection design: better airflow and shroud design keeps the cut line visible
- Parts and serviceability: availability of common wear items (brushes, switches, guards)
- Safety features: reliable blade guard return, electric brake (if equipped)
| If you care most about | Brands that commonly excel | What to watch for |
|---|---|---|
| Maximum precision for finish work | Premium “pro” lines | Higher cost, heavier saws |
| Jobsite durability and availability | Major pro-tool brands | Some models need more calibration checks |
| Best value for occasional use | Mid-tier brands | More plastic parts, fewer adjustment features |
- Pick the blade size you need (10-inch vs. 12-inch is most common).
- Decide if you need a sliding miter saw for wider crosscuts.
- Check for easy calibration (fence alignment, bevel stops, miter detents).
- Confirm the saw supports your workflow: stand compatibility, weight, and dust control.
A “best brand” miter saw is the one that stays accurate after transport and repeated use. Accuracy, smooth sliding action, and dependable safety components affect every cut more than brand name alone.
For parts lookups and model-based searching, start with the Tradesman 8323 parts list and expand your search on Sears PartsDirect.
Is there a difference between a chop saw and a miter saw?
Yes. A chop saw is built mainly for fast, straight 90-degree cuts (often in metal), while a miter saw like the Tradesman 8323 is designed for accurate angle cuts (miter, bevel, and compound) in wood and trim using a toothed circular blade.
| Feature | Chop saw | Miter saw (Tradesman 8323) |
|---|---|---|
| Best for | Metal stock, rebar, pipe, angle iron | Trim, framing, molding, woodworking |
| Typical blade type | Abrasive wheel or metal-cutting blade | Carbide-tooth wood blade |
| Common cuts | Mostly 90-degree crosscuts | Miter, bevel, compound (angle + bevel) |
| Cut quality | Faster, rougher edge | Cleaner, more precise edge |
| Dust/debris | Sparks and grit (metal) | Sawdust (wood) |
We recommend matching the saw to the material and the cut you need:
- Choose a miter saw for baseboards, crown molding, picture frames, and repeatable angle cuts.
- Choose a chop saw for metal fabrication work where speed matters more than a finish-ready edge.
- Do not swap blades casually; using the wrong blade type for the material can damage the tool and create unsafe kickback or shattering.
- If you cut both wood and metal, keep separate tools or use a tool specifically rated for both materials.
In everyday use, some people call any saw that pivots down in a chopping motion a “chop saw.” In repair and parts terms, we treat them as different tools because the guard design, motor load, blade type, and intended materials are different.
Using the correct saw helps you get safer cuts, better accuracy, and longer life from wear parts like the blade, guard components, and switch. When you are ready to look up replacement parts for the Tradesman 8323, start with the model-based parts list, or search by model number on Sears PartsDirect.
Last updated: February 2026
Will any miter saw stand work with any miter saw?
No. A miter saw stand is not automatically a perfect fit for every saw; even with a Tradesman 8323 miter saw, you need to match the stand’s mounting method and hole spacing to the saw base (or plan on using a mounting board/adapter) so the saw bolts down securely.
Most “universal” miter saw stands work because the mounting brackets slide and adjust, not because every saw shares the same bolt pattern.
- Mounting hole spacing on the saw base (front to back and side to side)
- Stand bracket adjustability (range of slot travel and clamp style)
- Bolt size and hardware (diameter, washer size, lock nuts)
- Base footprint and rail clearance (fences, bevel lock, slide rails)
- Stand capacity (weight rating and stability with the head fully extended)
Use these quick checks on your Tradesman 8323 and the stand you’re considering.
- Measure the center-to-center distance between the mounting holes in the saw base.
- Compare that to the stand’s bracket slot range.
- Confirm you can access the bolts and nuts once the saw is sitting on the brackets.
- Dry-fit the saw and cycle it through a full cut: miter left/right, bevel, and slide (if applicable).
| Item to verify | What “good” looks like | What causes problems |
|---|---|---|
| Hole alignment | Bolts drop through without forcing | Holes land outside bracket slots |
| Stability | No rocking; stand doesn’t twist | Flexing legs, narrow stance |
| Clearance | Rails/handles don’t hit supports | Slide rails hit extension arms |
| Fastening | Lock nuts fully tighten | Hardware bottoms out or strips |
A simple adapter board solves most mismatch issues.
- Use 3/4-inch plywood or MDF as a mounting plate
- Bolt the saw to the board first, then bolt the board to the stand brackets
- Use flat washers and lock nuts to prevent loosening from vibration
- Recheck tightness after the first few cutting sessions
A stand that doesn’t mount correctly can shift during a cut, which hurts accuracy and increases kickback risk. A solid, square mount keeps your miter angles consistent and protects the saw base and stand brackets.
For help finding the right stand style or hardware for your setup, search by model and accessory type on Sears PartsDirect.
Last updated: February 2026
Is it worth getting a double bevel mitre saw?
Yes, a double bevel miter saw is worth it when you regularly cut crown molding, baseboard, or complex trim because it lets you bevel left and right without flipping the workpiece, which saves time and helps keep cuts consistent. For basic DIY cuts, a single bevel is usually enough; you can still find parts and support resources for your Tradesman 8323 through Sears PartsDirect.
A double bevel saw tilts the blade both directions. That matters most when you need matching left and right bevels (common in finish carpentry) and you want to keep the board in the same position against the fence.
You will notice the biggest payoff when you:
- Install crown molding (nested or sprung) and need mirrored bevels
- Cut long runs of base/casing with repeated left and right corners
- Do production-style work where speed and repeatability matter
- Prefer keeping the “show face” up to reduce tear-out and handling
If your Tradesman 8323 is mainly for occasional projects, a single bevel saw typically delivers the same accuracy with one extra step (flipping the board).
- Mostly 90 degree crosscuts and simple miters
- Limited shop space and you want a simpler, lighter tool
- You do not cut much crown or compound angles
- Budget is better spent on a quality blade and a stable stand
| Feature | Single bevel miter saw | Double bevel miter saw |
|---|---|---|
| Opposing bevel cuts | Flip the workpiece | Tilt the saw head |
| Speed on trim work | Moderate | Faster |
| Chance of handling errors | Higher (more repositioning) | Lower |
| Cost/complexity | Lower | Higher |
Most “bad miter saw cuts” come from inconsistent setup: flipping the board, changing reference faces, or slightly shifting against the fence. Double bevel reduces those opportunities for small mistakes, especially on finish work.
Last updated: February 2026
Why is 31.6 on a miter saw?
The 31.6° mark on a miter saw (including the Tradesman 8323) is a common preset used for compound crown molding cuts when you cut crown nested against the fence. It pairs with a typical 33.9° bevel setting to produce tight corner joints on standard crown spring angles.
Most miter saws include “crown stops” because crown molding corners are repetitive and easy to mis-measure. The 31.6° miter setting is mainly used when:
- You are cutting crown molding (inside or outside corners)
- The crown is held upside down and backward (nested) against the fence
- You want a fast, repeatable setup instead of calculating angles each time
- You are making compound cuts (miter + bevel together)
These are the common preset angles you will see referenced for standard crown molding spring angles.
| Cut type | Miter setting | Bevel setting | Common use |
|---|---|---|---|
| Compound crown preset | 31.6° | 33.9° | Standard crown corners (nested) |
| Simple miter (no bevel) | 45° | 0° | Flat trim, picture frames |
| Simple bevel (no miter) | 0° | Varies | Bevel rips, specialty cuts |
Before you cut, we recommend these basics for accuracy and safety:
- Confirm the crown is seated firmly against the fence and table (no rocking)
- Use a stop block or clamp for repeat cuts
- Make a test cut on scrap and dry-fit the corner
- Verify the saw is square at 0° miter and 0° bevel (calibration matters)
- If the saw has drift or intermittent power, inspect the cord and switch wiring (a multimeter helps)
For electrical troubleshooting skills that apply to many power tools, use our guide: how to use a multimeter to test electrical parts video.
Crown molding is unforgiving; a small angle error creates visible gaps at the ceiling or wall. The 31.6° marking reduces guesswork and speeds up trim work by giving you a proven starting point for common crown installations.
If you are looking for replacement parts (guards, switches, brushes, fences, or hardware), start with the model-based parts list for Tradesman 8323. You can also search by model number on Sears PartsDirect to find additional diagrams and compatible parts listings.
Last updated: February 2026