Owner’s manual


Can I replace the burners on my gas grill?
Yes. On the Kenmore Elite 14648591710 gas grill, you can replace the burners yourself by shutting off the gas, removing the cooking grates and heat diffusers, pulling the cotter pin(s), lifting the burners off the valve openings, then reinstalling so the burner tubes fully reengage the valves (or replacing any damaged burner).
- Turn all control knobs OFF and shut OFF the LP cylinder or gas source.
- Open the lid while lighting and while checking burner operation.
- If ignition does not occur within 5 seconds, turn controls OFF, wait 5 minutes, then retry.
- Let the grill cool completely before disassembly.
- If you ever suspect a gas leak you cannot stop, stop using the grill and contact your gas supplier or a qualified technician.
We follow the same access steps used for burner cleaning in the 14648591710 owner's manual.
- Turn gas off at the control knobs and LP cylinder.
- Remove the cooking grates.
- Remove the heat diffusers.
- Remove the cotter pin from the rear of each burner.
- Lift each burner up and away from the valve openings.
- Inspect the burner: if holes are enlarged, or you see cracks or large openings, replace the burner.
- Reinstall (or install the new) burner(s) and make sure the burner tubes reengage the valve openings.
- Reattach burners to the brackets with the cotter pin(s).
- Reinstall heat diffusers and cooking grates; then test-light and confirm steady flame.
| What you see | What it usually means | Best next step |
|---|---|---|
| Hard to light after storage | Venturi tubes may be blocked (spiders/insects) | Remove burners and clean burner/venturi tubes |
| Low flame or sudden flame drop | Possible venturi restriction or regulator flow issue | Clean venturi tubes; then re-light and recheck |
| Large cracks, split seams, or big holes | Burner is worn/corroded | Replace the burner |
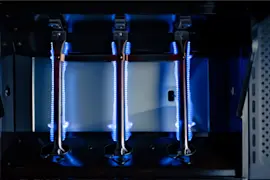
Correct burner alignment is critical because the burner tube must sit over the valve opening (orifice). If it is not seated correctly, the grill can light poorly, burn unevenly, or create a flashback risk in the burner tube area.
Last updated: February 2026
How to ignite a Kenmore gas grill?
To ignite your Kenmore Elite gas grill model 14648591710, open the lid, turn on the gas at the tank, then push and turn a main burner knob to HI and hold it in until the igniter clicks and the burner lights (within 5 seconds). See the 14648591710 owner's manual for the exact lighting steps and match-lighting location.
Follow this sequence every time to prevent a gas buildup:
- Open the grill lid before lighting.
- Turn on the LP cylinder valve (gas source).
- Push in and turn any main burner control knob to HI; keep holding it in.
- Listen for clicking from the electrodes; the burner should ignite within 5 seconds.
- If it does not light: turn all burner knobs OFF, wait 5 minutes, then retry.
- After one burner is lit, turn other main burner knobs to HI to light them.
Use match lighting when the igniter is not sparking or the burner will not catch.
- Open the lid.
- Place a lit match in the match holder, then position it at the lighting hole on the left side of the firebox.
- Turn the right main burner knob to HI.
- Confirm the burner lights and stays lit, then light other burners.
| Burner | Lid position | Where to place match | Knob setting |
|---|---|---|---|
| Side burner | Open | Near the burner | HI |
| Searing burner | Open | Near the burner | ON |
These are the most common causes of hard starts and delayed ignition:
- LP cylinder valve not fully open.
- Control knob not held in long enough for ignition.
- Burner ports clogged with grease or debris.
- Burner tube not seated correctly on the valve opening.
- Excess grease buildup causing flare-ups that disrupt ignition.
Lighting with the lid open and using the 5-second, 5-minute rule helps prevent unignited gas from collecting in the firebox, which reduces the risk of a sudden flare when ignition finally occurs.
Last updated: February 2026
What are the parts of a gas grill called?
On the Kenmore Elite gas grill model 14648591710, the main parts are the cooking grate (where food sits), burners and manifold (deliver gas), ignition and wiring (lights the burners), and grease handling parts like the drip tray. For the full parts list and diagrams, use the 14648591710 owner's manual.
Here are the names you will see most often when ordering parts or troubleshooting:
- Cooking grate: holds food over the flame (example: gas grill cooking grate 50600205C)
- Burner base and burners: create and support the flame (example: burner base 50600036)
- Manifold: distributes gas to each control valve and burner (example: manifold 50600030)
- Valves and control knobs: regulate gas flow (example: gas grill side burner valve 41500208)
- Regulator and hose: connects the LP tank to the grill and controls pressure
- Ignition system: transformer, wires, and electrodes that spark the burners (example: transformer 41500216)
- Drip tray/grease management: catches grease to reduce flare-ups (the manual notes the drip tray must be inserted and emptied after each use)
| Part name (common) | Where it is | What it affects |
|---|---|---|
| Cooking grate | Top of firebox | Searing, heat transfer |
| Manifold/valves | Behind the control panel | Burner flame strength |
| Burner base/burners | Inside firebox | Even heating, hot spots |
| Regulator/hose | Between tank and grill | Gas pressure and safety |
| Ignition wiring/transformer | Under/behind control area | Lighting reliability |
| Drip tray | Under firebox | Flare-ups, cleanup |
Using the correct part name helps us match the right component to your exact grill configuration (LP vs natural gas setup, side burner options, and ignition style). It also prevents replacing the wrong item when the real issue is gas flow, ignition, or grease buildup.
From the manual’s safety guidance, we recommend:
- Use the grill only in a well-ventilated outdoor area (never in a garage, carport, or enclosed patio)
- Keep the grill at least 3 ft. from walls and maintain 10 ft. clearance from ignition sources
- Turn off all control knobs and the LP cylinder valve when not in use
- Let the grill cool completely before removing or emptying the drip tray
Last updated: February 2026