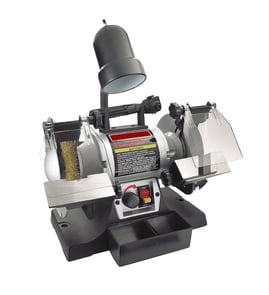

What are the 4 important rules for a bench grinder?
For the Craftsman 319190622 6-inch bench grinder, the 4 most important rules are: wear proper eye and face protection, keep guards and tool rests correctly adjusted, use only wheels rated for the grinder’s RPM, and keep hands, clothing, and hair safely clear of the wheel and spindle.
The 4 rules (with what to do)
- Protect your eyes and face: Wear safety glasses plus a face shield; grinding wheels can throw sparks and debris.
- Set the guards and tool rest before you grind: Keep the tool rest close to the wheel (commonly about 1/8 inch) and keep the spark guard close as well; re-check after wheel changes.
- Match wheel rating to the grinder: Only install a grinding wheel with an RPM rating at or above the grinder’s no-load speed.
- Control entanglement and hand position: No loose sleeves, gloves near rotating parts, jewelry, or untied hair; keep fingers away from the wheel and never “freehand” tiny parts.
Quick safety checklist before you switch it on
- Inspect the wheel for chips or cracks; replace damaged wheels.
- Confirm the wheel is seated and tightened correctly; do not overtighten.
- Stand slightly to one side at startup and let the wheel reach full speed.
- Grind on the wheel face (not the side) unless the wheel is specifically designed for side grinding.
- Use light pressure; forcing the work can overheat the wheel and the motor.
Common settings and limits (typical guidance)
| Item | Typical safe target | Why it matters |
|---|---|---|
| Tool rest gap | About 1/8 inch | Reduces the chance the workpiece wedges and kicks back |
| Spark guard gap | About 1/4 inch | Helps contain sparks and debris |
| Startup practice | Full speed before grinding | Reveals wobble and reduces snag risk |
Why it matters
Bench grinders remove metal fast. Correct guard spacing, wheel RPM matching, and proper PPE reduce the most common hazards: wheel failure, kickback, and eye injuries.
For parts and model-specific diagrams for Craftsman 319190622, start with the parts list for this model, or search by model number on Sears PartsDirect.
Last updated: February 2026
What sizes do bench grinders come in?
Bench grinders commonly come in 3-inch, 6-inch, and 8-inch sizes, which refers to the grinding wheel diameter. Your Craftsman 319190622 is a 6-inch bench grinder, so it uses 6-inch wheels and accessories sized for that format; you can shop by model on Sears PartsDirect.
Common bench grinder sizes (and what they’re best for)
- 3-inch: light-duty sharpening and small touch-ups; compact footprint
- 6-inch: the most common home-shop size; good balance of power and control
- 8-inch: heavier-duty grinding; typically smoother operation and more wheel surface
- Combination units (grinder + sharpener/belt): designed for sharpening workflows more than stock removal
Quick size comparison
| Wheel size | Typical use | Typical wheel width | Typical arbor size |
|---|---|---|---|
| 3-inch | light sharpening | 1/2 to 3/4 inch | 1/4 to 3/8 inch |
| 6-inch (your 319190622) | general-purpose shop work | 3/4 inch | 1/2 inch |
| 8-inch | heavier grinding | 1 inch | 5/8 inch |
How to choose the right size for your job
- Match the wheel diameter to your grinder (3, 6, or 8 inch).
- Confirm arbor size and use the correct bushings/adapters if needed.
- Pick the right grit: 36 to 60 for shaping, 80 to 120 for sharpening.
- Choose the right wheel type: aluminum oxide for steel, silicon carbide for masonry and some non-ferrous work.
- Replace wheels that are cracked, glazed, or out of round.
Why it matters
Wheel size affects how the grinder feels and performs: larger wheels usually run cooler and smoother, while smaller wheels are easier to store and handle for quick sharpening. Using the correct wheel size for Craftsman 319190622 helps prevent vibration, poor grinding results, and unsafe wheel fit.
Last updated: February 2026
What is a Craftsman bench grinder?
A Craftsman bench grinder (including model 319190622) is a stationary shop tool with a motor that spins abrasive wheels to grind, sharpen, shape, and clean up metal. It is commonly used for sharpening blades and tools, removing rust, and smoothing rough edges.
What you can do with a 6-inch bench grinder
A 6-inch bench grinder like the Craftsman 319190622 is typically used for light to medium-duty workshop tasks.
- Sharpen chisels, lawn mower blades, and hand tools
- Deburr cut metal and smooth sharp edges
- Remove light rust or paint (with the right wheel or accessory)
- Shape small metal parts and hardware
- Clean up welds and rough grinding marks
Key parts and features (what they do)
Bench grinders vary by model, but most include the same core components.
| Component | What it does | Why it matters |
|---|---|---|
| Grinding wheels | Perform the grinding and sharpening | Wheel type and grit control finish quality |
| Tool rests | Support the workpiece at a steady angle | Helps prevent gouging and uneven sharpening |
| Eye shields/spark guards | Reduce exposure to sparks and debris | Improves safety and visibility |
| Motor and arbor | Spins the wheels at operating speed | Affects power, smoothness, and vibration |
Safe-use basics we recommend
A bench grinder is simple to use, but it can be hazardous if the wheel or setup is wrong.
- Wear eye protection and keep guards in place
- Keep tool rests close to the wheel (a small gap) to reduce snagging
- Let the wheel reach full speed before grinding
- Use light pressure; overheating can damage tool edges
- Unplug the grinder before changing wheels or making adjustments
Why it matters
Knowing what a bench grinder is and what it is designed to do helps you choose the right wheel, set the correct grinding angle, and avoid common issues like overheating tool steel, excessive vibration, or wheel damage.
For model-specific replacement parts and diagrams for the Craftsman 319190622, start with the parts list for this model, or search by model number on Sears PartsDirect.
Last updated: February 2026
What are the required clearances for a grinding wheel on a bench grinder?
For a Craftsman 319190622 6-inch bench grinder, keep the work rest adjusted close to the grinding wheel with a maximum gap of 1/8 inch, and set the tongue guard (spark guard) with about 1/4 inch clearance to the wheel. These clearances reduce the chance of the workpiece getting pulled into the wheel.
Recommended clearance settings
Use these targets any time you install a new wheel, dress the wheel, or notice vibration.
- Work rest to wheel: 1/8 inch maximum gap
- Tongue guard (spark guard) to wheel: 1/4 inch clearance
- Recheck clearances after wheel dressing because the wheel diameter changes
- Tighten all adjustment hardware so the rest and guard do not drift during use
- Rotate the wheel by hand (power unplugged) to confirm nothing contacts the wheel
Quick reference table
| Component | Where you measure | Target clearance |
|---|---|---|
| Work rest | Front edge of rest to wheel face | 1/8 inch max |
| Tongue guard (spark guard) | Guard edge to wheel | About 1/4 inch |
How we set the clearances safely
- Unplug the grinder.
- Loosen the work rest hardware; slide the rest toward the wheel.
- Set the gap to 1/8 inch or less; tighten securely.
- Adjust the tongue guard to about 1/4 inch from the wheel; tighten.
- Spin the wheel by hand to confirm free movement.
Why it matters
If the work rest gap is too large, small parts can wedge between the rest and wheel and get yanked downward. If the tongue guard is too far away, it provides less protection from sparks and debris.
Parts and diagrams
If you need replacement guards, rests, or mounting hardware for model 319190622, use the model diagrams and parts list first; for broader part search by model number, use Sears PartsDirect.
Last updated: February 2026
How to restore a bench grinder?
To restore a Craftsman bench grinder model 319190622, we focus on safety first, then clean, inspect, and rebuild the grinder so it runs smoothly and grinds accurately. Most restorations come down to removing rust and grime, replacing worn wheels, and correcting vibration.
Safety first (before any teardown)
- Unplug the grinder and remove the plug from the work area
- Wear eye protection and a dust mask; old grit and rust get airborne fast
- Avoid loose sleeves and gloves near rotating parts
- If the cord is cracked, stiff, or repaired poorly, replace it before testing
- Do not run the grinder without guards and eye shields installed
Step-by-step restoration checklist
- Document and disassemble: Take photos as you remove guards, tool rests, and wheel flanges
- Clean and de-rust: Degrease the housing; remove rust from fasteners, guards, and tool rests
- Inspect the wheels: Replace any wheel that is chipped, dropped, out-of-round, or unknown age
- Check bearings and shaft play: Spin the shaft by hand; roughness, noise, or wobble points to bearing wear
- Inspect wiring and switch: Look for brittle insulation, loose terminals, and heat discoloration
- Reassemble and align: Set tool rests close to the wheel (typically about 1/16 inch) and square to the wheel face
- Test run and tune: Run it briefly, then recheck vibration, wheel tracking, and fastener tightness
Quick diagnosis guide (what you find vs. what it usually means)
| Symptom during test run | Most common cause | What to do next |
|---|---|---|
| Strong vibration | Wheel out-of-balance, bent flange, loose mounting | Replace wheel, clean flanges, tighten hardware |
| Grinding feels “bumpy” | Wheel out-of-round or glazed | Dress the wheel; replace if damaged |
| Loud growl/rumble | Worn bearings | Replace bearings before regular use |
| Intermittent power | Bad switch, loose wire, damaged cord | Repair wiring and connections |
Why it matters
A restored bench grinder is safer and more accurate. Proper wheel condition, tight flanges, and stable tool rests reduce the chance of wheel failure and help you sharpen tools evenly without overheating edges.
Parts and repair help
For Craftsman 319190622 parts and diagrams, start with the parts list for your model; you can also search by model number on Sears PartsDirect. If you are troubleshooting power issues, our guide on how to use a multimeter to test electrical parts video helps you confirm whether the switch, cord, or connections are the problem.
Last updated: February 2026